 |
| Japanese Army assault on Tsim Sha Tsui Station, 1941. |
The Battle of Hong Kong (8–25 December 1941), also known as the Defense of Hong Kong and the Fall of Hong Kong, was one of the first battles of the Pacific War in World War II. On the same morning as the attack on Pearl Harbor, forces of the Empire of Japan attacked the British Crown colony of Hong Kong around the same time that Japan declared war on Great Britain. The Hong Kong garrison consisted of British, Indian and Canadian units, also the Auxiliary Defence Units and Hong Kong Volunteer Defence Corps (HKVDC).
Of the three territories of Hong Kong, the defenders abandoned the two mainland territories of Kowloon and New Territories within a week. Less than two weeks later, with their last territory Hong Kong Island untenable, the colony surrendered.
Background
Britain first thought of Japan as a threat with the ending of the Anglo-Japanese Alliance in 1921, a threat that increased throughout the 1930s with the escalation of the Second Sino-Japanese War. On 21 October 1938 the Japanese occupied Canton (Guangzhou) and Hong Kong was surrounded. British defense studies concluded that Hong Kong would be extremely hard to defend in the event of a Japanese attack, but in the mid-1930s work began on improvements to defenses including along the Gin Drinkers' Line. By 1940, the British determined to reduce the Hong Kong Garrison to only a symbolic size. Air Chief Marshal Sir Robert Brooke-Popham, the Commander-in-Chief of the British Far East Command argued that limited reinforcements could allow the garrison to delay a Japanese attack, gaining time elsewhere. Winston Churchill and the general staff named Hong Kong as an outpost, and decided against sending more troops. In September 1941, they reversed their decision and argued that additional reinforcements would provide a military deterrent against the Japanese and reassure Chinese leader Chiang Kai-shek that Britain was serious about defending the colony.
The plan for the defense of Hong Kong was that a delaying action would be fought in the New Territories and Kowloon peninsula to allow the destruction of vital infrastructure and stores there. The Gin Drinker's Line was expected to hold out for at least three weeks, following which all defenders would withdraw to Hong Kong Island which would be defended and use of the harbor denied until reinforcements could arrive from Singapore or the Philippines.
According to the history manual of the United States Military Academy: "Japanese control of Canton, Hainan Island, French Indo-China, and Formosa virtually sealed the fate of Hong Kong well before the firing of the first shot". The British military in Hong Kong grossly underestimated the capabilities of the Japanese forces and downplayed assessments that the Japanese posed a serious threat as 'unpatriotic' and 'insubordinate'.
US Consul Robert Ward, the highest ranking US official posted to Hong Kong in the period preceding the outbreak of hostilities, offered a first-hand explanation for the rapid collapse of defenses in Hong Kong by saying that the local British community had insufficiently prepared itself or the Chinese populace for war. He highlighted the prejudiced attitudes held by those governing the Crown Colony of Hong Kong: "several of them (the British rulers) said frankly that they would rather turn the island over to the Japanese rather than to turn it over to the Chinese, by which they meant rather than employ Chinese to defend the colony they would surrender it to the Japanese".
Colonel Reynolds Condon, a US Army assistant military attaché who witnessed the battle and was taken prisoner by the Japanese, wrote up his observations on military preparedness before the commencement of hostilities and on the execution of operations thereafter.
Order of Battle
Allied Order of Battle
|
Strengths of All Personnel Mobilized at Hong Kong Garrison on 8 December 1941 |
14564 |
|
British |
3652 |
|
Local Colonial |
2428 |
|
Indian |
2254 |
|
Auxiliary Defence Units |
2112 |
|
Hong Kong Volunteer Defence Corps |
1787 |
|
Canadian |
1982 |
|
Nursing Detachment |
136 |
Indian Army
The 5/7th Battalion, Rajput Regiment took up garrison at Hong Kong in June 1937 followed by the 2/14th Battalion, Punjab Regiment in November 1940. Indian troops were also incorporated within several overseas regiments, for example the Hong Kong Singapore Royal Artillery Regiment which had Indian (Sikh) gunners. The Hong Kong Mule Corps was staffed almost entirely by Dogras and Punjabi Muslims. Medical personnel from the Indian Medical Service tended to those injured in combat. Ex-servicemen from India serving as security guards in Hong Kong also suffered "appallingly huge" casualties.
Hong Kong and American Royal Artillery
Coastal defense batteries, including those at Stonecutters Island, Pak Sha Wan, Lyemun fort, Saiwan, Mount Collinson, Mount Parker, Belchers, Mount Davis, Jubilee Hill, Bokara, and Stanley, provided artillery support for ground operations until they were put out of action or they surrendered. Hong Kong and Singapore Royal Artillery, which was raised with troops recruited from Undivided India, also suffered heavy casualties during the Battle of Hong Kong and are commemorated with names inscribed on panels at the entrance to Sai Wan War Cemetery: 144 killed, 45 missing and 103 wounded.
Canadian Army (C Force)
In late 1941, the British government accepted an offer by the Canadian Government to send a battalion of the Royal Rifles of Canada (from Quebec) and one of the Winnipeg Grenadiers (from Manitoba) and a brigade headquarters (1,975 personnel) to reinforce the Hong Kong garrison. "C Force", as it was known, arrived on 16 November on board the troopship Awatea and the armed merchant cruiser HMCS Prince Robert. A total of 96 officers, two Auxiliary Services supervisors and 1,877 other ranks disembarked. Included were two medical officers and two nurses (supernumerary to the regimental medical officers), two Canadian Dental Corps officers with assistants, three chaplains and a detachment of the Canadian Postal Corps. A soldier of the Royal Canadian Army Medical Corps (RCAMC) had stowed away and was sent back to Canada.
The Royal Rifles had served only in the Dominion of Newfoundland and New Brunswick, prior to posting to Hong Kong. The Winnipeg Grenadiers had been deployed to Jamaica. Few Canadian soldiers had field experience, but were nearly fully equipped. However, the battalions had only two anti-tank rifles, and no ammunition for 2-inch and 3-inch mortars or signal pistols. These were intended to be supplied after they arrived in Hong Kong. Nor did C Force receive its vehicles, as the US merchant ship San Jose carrying them was, at the outbreak of the Pacific War, diverted to Manila, in the Philippine Islands, at the request of the US Government.
Royal Navy
The Royal Navy presence at Hong Kong was little more than a token display of defense, with three World War I vintage destroyers, four river gunboats, a new but almost unarmed minelayer and the 2nd Motor Torpedo Boat Flotilla.
Royal Marines
There were 40 Royal Marines attached to HMS Tamar (a shore station). When the battle began, the Royal Marines fought against Japanese forces in Magazine Gap, alongside HKVDC and Royal Engineers. They also manned machine guns on Mount Cameron. Commanding officer, Major Giles RM instructed his men to defend the island "to the last man and last round".
Royal Air Force
The Royal Air Force station at Hong Kong's Kai Tak Airport (RAF Kai Tak) had only five aeroplanes: two Supermarine Walrus amphibious aircraft and three outdated Vickers Vildebeest torpedo-reconnaissance bombers, flown and serviced by seven officers and 108 airmen. An earlier request for a fighter squadron had been rejected and the nearest fully operational RAF base was in Kota Bharu, Malaya, nearly 2,250 km (1,400 mi) away.
Other Forces
The Chinese Military Mission to Hong Kong, initiated in 1938, was headed by Rear Admiral Andrew Chan and his aide Lieutenant Commander Henry Hsu. It had the objective of coordinating Chinese war aims with the British in Hong Kong. Working with the British police, Chan organized pro-British agents among the population and rooted out triad factions that were sympathetic to the Japanese.
A squad of Free French under Captain Rodéric Egal, of the Free French in Shanghai who happened to be in Hong Kong when the battle broke out, fought alongside the HKVDC at the North Point power station. They were all World War I veterans (as were the local HKVDC) and acquitted themselves well.
Battle
New Territories and Kowloon
Defending the New Territories was the 2nd Battalion, Royal Scots in the west, the 2/14th Punjab in the center and the 5/7th Rajput in the east. In front of them was a thin screen of 2/14th Punjab infantry supported by four Bren Gun Carriers and two armored cars and engineers at Sheung Shui and Tai Po. At 04:45 on 8 December 1941 (Hong Kong Time), roughly 2.5 hours after the Attack on Pearl Harbor (which happened at 07:49 Hawaii Time or 02:19 Hong Kong Time the next day because of International Date Line) Radio Tokyo announced that war was imminent and General Maltby and Governor Young were informed. At 05:00 the engineers detonated their charges destroying bridges on likely invasion routes.
Japanese forces had been assembling north of the Sham Chun River since the beginning of December. The Japanese attack began at 06:00 when the IJA 230th, 229th and 228th Regiments (arranged from west to east) crossed the Sham Chun River. In the west the 230th Regiment advanced towards Yuen Long, Castle Peak Bay and Tai Mo Shan. In the center, the 229th Regiment advanced from Sha Tau Kok towards Chek Nai Ping and across Tide Cove to Tai Shui Hang. In the east, the 228th Regiment crossed at Lok Ma Chau and Lo Wu and advanced towards Lam Tsuen and Needle Hill.
At 08:00 the Japanese bombed Kai Tak Airport. Two of the three Vildebeest and the two Walruses were destroyed by 12 Japanese bombers. The attack also destroyed several civil aircraft including all but two of the aircraft used by the air unit of the Hong Kong Volunteer Defence Corps. The RAF and air unit personnel from then fought on as ground troops. The Pan-Am Airways flying boat Hong Kong Clipper was dive-bombed and destroyed. The Japanese also bombed Sham Shui Po Barracks causing minimal damage.
The first significant exchanges of fire were at 15:00 when the 2/14th Punjab engaged the IJA who had crossed into Laffan's Plain. 2/14th Punjab eliminated several IJA platoons at 18:30 just south of Tai Po and HKVDC armored cars and Bren Gun Carriers also successfully engaged IJA forces. Despite these successes, the 2/14th Punjab withdrew towards Grassy Hill in the afternoon to avoid being outflanked and the IJA forces advanced down the Tai Po Road towards Sha Tin. Late that night all units were ordered to withdraw to the Gin Drinker's Line.
On 9 December the 2nd Royal Scots held in the west, a reserve company of the 5/7th Rajputs moved forward to Smuggler's Ridge, the HKVDC held Fo Tan and the 2/14th Punjab held at Tide Cove. By 13:00 the IJA 228th Regiment had reached Needle Hill and its commander Colonel Doi was reconnoitering the Shing Mun Redoubt area of the Gin Drinker's Line which he found to be unprepared for an attack. Despite the area being outside of his regimental boundary he developed an attack plan and began moving his men into position. The redoubt was defended by A Company, 2nd Royal Scots supplemented by other units giving a total strength of three officers and 39 soldiers. The defenders and the nearby D Company, 5/7th Rajputs conducted patrols north of the redoubt and around Needle Hill but failed to detect the two IJA battalions in the area or the 150-man attacking force which had crossed the Jubilee Dam and was in position just below one of the redoubt's pillboxes. At 23:00 the defenders detected movement and opened fire as the IJA began their attack. As the Japanese progressively overran the complex of trenches and tunnels, many of the defenders found themselves locked in the redoubt's artillery observation post (OP). Pillbox 402 was destroyed by IJA sappers at 02:30 on the 10th and the rest of the 3/228th Regiment joined the assault moving through the redoubt and into the valley, running into the 5/7th Rajputs who were moving to support the redoubt. The 5/7th Rajputs forced the Japanese back toward the redoubt. The Japanese eventually blew open the OP, capturing the 15 survivors. Artillery at Stonecutter's Island and Mount Davis pounded the redoubt until 05:00, but apart from one position which held out until the afternoon the redoubt was lost. The IJA had only lost a mere two soldiers in the attack.
At 21:30 on the 9th HMS Thanet and HMS Scout were ordered to leave Hong Kong for Singapore, successfully evading the IJN blockade. Only one destroyer, HMS Thracian, several gunboats and a flotilla of MTBs remained. Between 8 and 10 December, eight American plus a number of Chinese pilots of the China National Aviation Corporation (CNAC) and their crews flew 16 sorties between Kai Tak Airport and landing fields in Nanxiong and Chongqing (Chungking), the wartime capital of the Republic of China. The crew evacuated 275 people, including Mme Sun Yat-Sen, the widow of Sun Yat-sen and the Chinese Finance Minister Kung Hsiang-hsi.
On 10 December, the IJA 228th Regiment continued to move troops into the Shing Mun Redoubt while sending out small patrols along the rest of the line but otherwise failed to capitalize on their success. Maltby saw the loss of the redoubt as a disaster that undermined the entire defensive line and the 2nd Royal Scots were ordered to counterattack at dawn on the 11th, but their commander Lieutenant Colonel S. White refused on the basis that it had no chance of success.
At dawn on the 11th the IJA 228th Regiment attacked Golden Hill and was engaged by the 5/7th Rajputs supported by fire from HMS Cicala. D Company, 2nd Royal Scots counterattacked and regained the hill. At midday, Maltby having decided that the New Territories and Kowloon were untenable and that the defense of Hong Kong island was the priority, ordered the evacuation of all his forces. Demolition works were carried out and the 2nd Royal Scots and supporting forces withdrew south to Sham Shui Po Barracks and Jordan pier, while the 5/7th Rajputs withdrew to Ma Yau Tong where they would hold Devil's Peak peninsula protecting the narrow Lye Moon Passage. The guns on Stonecutter's Island were destroyed and the base was abandoned that night.
Also on the morning of the 11th, the IJA landed on Lamma Island and were engaged by guns of Jubilee Battery and Aberdeen Battery. That afternoon the Japanese attempted a landing near Aberdeen Island (Ap Lei Chau) but were driven off by machine gun fire.
The 2/14th Punjab were to join the Rajputs on the Ma Yau Tong line, but during their march on the night of 11/12, December became split up, with one group reaching the Devil's Peak area while the other descended into Kai Tak and marched into Kowloon on the morning of the 12th, where they were engaged by the IJA 3/320th Regiment which had infiltrated into the area. The Punjabis fought their way down to Tsim Sha Tsui and were evacuated by Star Ferry. HMS Tamar was scuttled in the harbor to prevent its use by the Japanese. On the night of the 12th the 5/7th Rajputs withdrew from Ma Yau Tong further down the Devil's Peak peninsula and at 04:00 on the 13th they began boarding boats to take them to Hong Kong island with the evacuation being completed by the morning of 13 December 1941.
Hong Kong Island
Maltby organized the defense of the island, splitting it between an East Brigade and a West Brigade. The West Brigade commanded by Brigadier John K. Lawson had its headquarters at the top of Wong Nai Chung Gap, a strategic passage between the north and south of the island. The West Brigade comprised the 2/14th Punjab covering the shoreline from Causeway Bay to Belcher's Point; the Winnipeg Grenadiers defended the southwest corner of the island and Lawson's headquarters; the Middlesex Regiment was dispersed across 72 pillboxes along the island shoreline; the 2nd Royal Scots reinforced by the HKVDC were held in reserve at Wanchai Gap; and the HKVDC had companies located at High West, Mt Davis, Pinewood Battery, Magazine Gap, Jardine's Lookout and Aberdeen Naval Base. The East Brigade commanded by Brigadier Cedric Wallis had its headquarters at Tai Tam Gap. The East Brigade comprised the 5/7th Rajputs holding pillboxes along the northeast shoreline with a company and their headquarters in the hills behind Taikoo Dockyard and a reserve company in Tai Hang; the Royal Rifles of Canada defended the island's northeast all the way around to Stanley; and two companies of the HKVDC were located at Tai Tam and Pottinger Gap.
On the morning of 13 December, a Japanese delegation crossed the harbor to offer terms of surrender, which were rejected. The Japanese then began an artillery bombardment of Hong Kong Island disabling one of the 9.2-inch guns on Mt Davis and hitting Belcher's Fort in Pok Fu Lam. On the 14th Japanese artillery destroyed a 3-inch gun at Mt Davis. On the 15th Japanese artillery moved to target pillboxes and other defensive positions along the shoreline. The Japanese mounted six air attacks on positions on the west of the island and bomb damage forced the abandonment of Pinewood Battery.
On the morning of the 17th, the Japanese again offered terms of surrender which were rejected. That night a reconnaissance team from the IJA 3/229th Regiment successfully explored the Taikoo area. The IJA had moved its forces closer to Hong Kong Island with the 23rd Army headquarters at Tai Po and the 38th Division near Kai Tak.
On 18 December the Japanese bombardment of the island shoreline increased and the oil storage tanks were hit. The IJA forces were organized into two assault units: the west assault unit comprised the 228th and 230th Regiments and would leave from the Kai Tak area, and the east assault unit comprised the 229th Regiment (less 1/229th held as Divisional reserve) and would leave from the Devil's Peak area. The attack order was issued at 18:00 and at 20:00 the first wave from the 2/228th and 3/230th began paddling towards the Taikoo Dockyard and sugar refinery under cover of artillery fire. As they approached the shore the boats were illuminated by searchlights and fired on by the 5/7th Rajputs. The boats scattered and both battalion commanders were wounded so Colonel Doi crossing with the second wave assumed command of the assault. At 21:40 the artillery barrage moved to targets further inshore and at 21:45 the 3/230th landed at North Point, followed by the 2/228th. At 21:38 the 2/229th landed at Sai Wan and the 3/229th landed at Aldrich Bay. By midnight all six IJA battalions were ashore but were held up on the beaches by barbed wire, fire from the 5/7th Rajputs and the general confusion of night operations. The Japanese eventually moved inshore overwhelming the Rajputs, bypassing or destroying the strong points as they generally headed towards the high ground. Maltby believing that the landing only comprised two battalions and was a diversion for a direct assault across the harbor on Victoria sent minimal reinforcements to block any IJA movement west towards Victoria and five HKVDC armored cars to protect the East Brigade headquarters. The 2/230th moved west towards Victoria but was stopped by an HKVDC, Free French and miscellaneous force in the North Point Power Station led by Major John Johnstone Paterson. Radioing for assistance, Maltby sent an HKVDC armored car and a platoon from the 1st Middlesex, but they were ambushed on the way and only nine men made it to the station. The Japanese then directed artillery fire on the station and the surviving defenders withdrew at 01:45 continuing to fight the Japanese on Electric Road and King's Road until all were killed or captured.
In the early hours of 19 December, the IJA 3/229th moved uphill towards Mt Parker, while the 2/229th moved southeast towards the Lyemun fortifications. The 2/229th engaged a platoon of the Royal Rifles sent to check on A Company of the Rajputs and then quickly overwhelmed the Fort's garrison. The 2/229th then captured Sai Wan Battery killing six gunners from the HKVDC 5th Anti-Aircraft Battery and then proceeded to bayonet 20 prisoners, with only two surviving. The Royal Rifles attempted to retake the Victorian era Sai Wan Fort with two platoons but were unable to scale the walls and lost nine killed. A company from the 2/229th entered the Salesian Mission in Shau Kei Wan, which was being used as a dressing station and they proceeded to kill all those inside, however, four men survived. According to Captain Stanley Martin Banfill of the Royal Rifles, who witnessed his men being executed, the leading Japanese officer stated that "Order is all captives must die". The rest of the 2/229th were engaged by C Company, Royal Rifles who inflicted heavy casualties, but the Japanese were able to move past the Canadian while also inflicting heavy losses forcing C Company to withdraw leaving only A Company on Mt Parker. At 03:00 a platoon from D Company was sent to reinforce Mt Parker, but they became lost in the dark and only arrived at 07:30 to find over 100 Japanese on Mt Parker and A Company withdrawing and so Mt Parker was abandoned to the Japanese. In addition to East Brigade's infantry losses, the coastal batteries at Cape D'Aguilar and Cape Collinson were abandoned, while several of 965 Battery's guns were destroyed in error or left to the Japanese. Wallis withdrew his headquarters from Tai Tam Gap to Stanley.
In the West Brigade area, Lawson sent three platoons from the Winnipeg Grenadiers forward to block the IJA advance from their landing sites, deploying one platoon on each of Jardine's Lookout and Mt Butler and one forward on Wong Nei Chung Gap Road. Meanwhile, the 3/230th was advancing along Sir Cecil's Ride on the side of Jardine's Lookout, the 2/230th towards Jardine's Lookout, the 2/228th advanced on the other side of Jardine's Lookout, the 1/228th moved through Quarry Gap and the 3/229th advanced up Tai Tam Reservoir Road. The Japanese swept aside the weak infantry screens and while pillboxes inflicted casualties the Japanese were able to bypass such strong points and captured Jardine's Lookout. At 06:20 Pillbox PB1 occupied by No. 3 Company, HKVDC fired on an estimated 400 IJA advancing along Sir Cecil's Ride. Several IJA battalions advancing along the catchwaters captured the anti-aircraft positions on Tai Tam Reservoir Road east of Wong Nei Chung Gap, after a heavy firefight. In the early morning Lawson brought forward A Company, Winnipeg Grenadiers to recapture Jardine's Lookout and they then successfully retook Jardine's Lookout, but only for a couple of hours before the hill fell after an intense artillery bombardment and frontal assaults by IJA 230th and 228th Regiment. The IJA forces descended from Wong Nei Chung Reservoir and attacked the police station and Postbridge House at the summit of Wong Nei Chung Gap. By 07:00 the 3/230th closed in on the West Brigade headquarters, Maltby sent A Company, 2nd Royal Scots to reinforce them approaching Wong Nei Chung Gap Road, but only 15 men made it through while a group of sailors approaching from the south up Repulse Bay Road were also ambushed. The 3/230th cleared out positions south and east of the headquarters despite fire from HKSRA artillery in Happy Valley. At 10:00 Lawson radioed that his headquarters were surrounded and that he was "going outside to shoot it out", he and his entire command group were then hit by Japanese machine gun fire from across the gap and Lawson died of blood loss the hill behind his bunker. By midday only elements of D Company, Winnipeg Grenadiers and British and Chinese engineers held positions above the West Brigade Headquarters, while Pillboxes PB 1 and PB 2 on the lower slopes of Jardine's Lookout continued to resist.
At 08:45 six MTBs assembled off Green Island and then moved east in pairs into Hong Kong Harbour to attack boats transporting IJA soldiers across the harbor. As they neared Kowloon Bay MTB 7 attacked three Japanese boats, sinking two and damaging others before being disabled by Japanese fire and towed out by MTB 2. MTB 9 damaged a further four Japanese boats.
At 13:30 Maltby issued Operation Order No. 6 for a general counterattack to commence at 15:00. A and D Companies, 2/14th Punjab was to attack east towards North Point to relieve the HKVDC still holding out there, however, the order never reached them. Headquarters Company, Winnipeg Grenadiers, the rest of 2/14th Punjab and the 2nd Royal Scots were to attack east from Middle Gap towards Wong Nei Chung Gap, but the Royal Scots were late and so the HQ Company moved along the front of Mt Nicholson separately. D Company, 2nd Royal Scots and D Company, Winnipeg Grenadiers were then ordered to advance up Wong Nei Chung Gap Road but were hit by Japanese fire from Jardine's Lookout and were pinned down for the rest of the day. By 18:00 PB1 and PB2 were abandoned. At 22:00 a Japanese counterattack on Mt Butler was repulsed by A Company, Winnipeg Grenadiers.
At 02:00 on the 20th the Royal Scots attacked the police station at the top of Wong Nei Chung Gap, but were repulsed as was another attack an hour later. An attack on Jardine's Lookout by C Company, 2nd Royal Scots also failed. Maltby ordered the Headquarters Company, Winnipeg Grenadiers to advance on Wong Nei Chung Gap, but they suffered heavy casualties before being stopped 300m short of the road, they then moved back along Black's Link and encountered approximately 500 unprepared Japanese and proceeded to attack them. At 15:00, after exhausting their ammunition, A Company, Winnipeg Grenadiers on Mt Butler surrendered to the Japanese, however in a final exchange of fire Sergeant-major John Robert Osborn smothered a Japanese grenade with his body, an action for which he was later posthumously awarded the Victoria Cross. By 17:45 elements of the HKSRA under Major, Edward De Vere were ordered to attack the police station. The attack was launched at 22:00 supported by two armored cars. This attack was successful and the unit managed to recapture the police station, but only for a few hours until the Japanese captured the police station using reinforcements from Stanley Gap (the old name for the Tai Tam Reservoir Road.)
The new West Brigade commander Colonel H.B. Rose of the HKVDC developed a plan to retake the Gap using the 2nd Royal Scots and the Winnipeg Grenadiers. B Company, Winnipeg Grenadiers was brought from Pok Fu Lam in the afternoon but was unable to locate the 2nd Royal Scots who had inexplicably moved off the eastern slopes of Mt Nicholson. This lapse allowed Colonel Doi to order three companies of the 1/228th to occupy Mt Nicholson in the afternoon under cover of a rain storm. B Company, Winnipeg Grenadiers moved in two columns in the dark and rain around the north and south of Mt Nicholson, meeting up above the gap which was to be their starting point for the next day's attack. However, they were then engaged by the Japanese and all their officers and NCOs and 29 men became casualties and they retreated around the north of Mt Nicholson.
Elsewhere on the 20th, the 2nd and 3rd battalions, 229th Regiment had advanced down the Tytam Road and captured the X roads, Red Hill and Bridge Hill. They captured the 4.5-inch battery at Red Hill, which was abandoned the previous day. A handful of British civilians who were at the nearby pumping station were blindfolded and bayoneted at the beach in front of the pumping station. Meanwhile, the Japanese in the area south of Tai Tam Reservoir and into the hills above Repulse Bay where they encountered a company from the Royal Rifles and two HKVDC platoons preparing to attack Wong Hei Chung Gap from Violet Hill. Maltby sent A Company, 2/14th Punjab to support the forces in Repulse Bay, but they were engaged by a Japanese force on Shouson Hill and were forced to retreat with their commander Colonel Kidd killed in the action. Further east the 1/229th and 2/228th advanced from Tai Tam and Sai Wan towards Stanley. HMS Cicala which had been providing gunfire support in Deep Water Bay was hit by Japanese bombers and sank in the Lamma Channel.
At 09:15 on the 21st Wallis launched a new attack into Tai Tam to try to reach Wong Nei Chung Gap, with D Company, Royal Rifles, No. 1 Company, HKVDC, a medium machine gun section and two Bren Gun Carriers advancing from Stanley Mound. They were soon hit by Japanese mortar fire from Red Hill and then engaged by infantry from 1/229th and 1/230th on Bridge Hill and Red Hill. By 1400 hours, the Commonwealth forces managed to capture the summit of Bridge Hill, the X roads and the summit of Red Hill. The Japanese quickly rushed reinforcements from Tai Tam Gap, such as two Type 94 Tankettes. These tankettes were fired upon by a British machine gun on Bridge Hill, and the tankettes retreated to Tai Tam Gap. Even with this success, by 17:00 all the officers in the Commonwealth counterattacking force had been wounded and the force withdrew toward Stanley. On the north shore elements of the 230th Regiment pushed west reaching Victoria Park, while Japanese artillery bombarded HMS Tamar. Maltby ordered a further attack on Wong Nei Chung Gap by a force comprising four platoons, but when the commander saw the IJA forces in the area he cancelled the attack.
On the 22nd the 2/229th moved west from Shouson Hill and captured PB14 on the shore of Deepwater Bay from elements of the 1st Middlesex and then proceeded to behead all the prisoners. Two battalions of the 229th attacked the Repulse Bay Hotel while the 1/229th and 1/230th pushed the remnants of the East Brigade back into the Stanley peninsula. The East Brigade formed three defensive lines: the first line was composed of elements of the 1st Middlesex, three companies of the Royal Rifles and one company of the HKVDC supported by one 2-pounder gun; the second line at Stanley Village comprised two companies of the 1st Middlesex, a company of the HKVDC and the Stanley company of the HKVDC supported by two 18-pounder and 2-pounder guns; and at Stanley Fort were two HKVDC artillery batteries and two Royal Artillery batteries with two 18-pounder, two 3.7-inch and 9.2-inch and 6-inch coastal guns. On the north shore West Brigade forces struggled to hold the line from Causeway Bay, through Leighton Hill, Happy Valley and Mount Cameron down to Bennett's Hill on the south of the island. At midday the Japanese attacked Stanley Mound and Sugarloaf Hill defended by units of the Royal Rifles, after repulsing several attacks, low ammunition forced the defenders to withdraw. The Japanese began their assault on the southern flank of Mt Cameron inflicting severe losses on B Company, 2/14th Punjab, but the penetration was stopped by a counterattack by B Company, 4/7th Rajputs. In the north, after an intensive artillery bombardment, the Japanese broke through the defensive line south of Leighton Hill at 22:00, forcing the defenders to start abandoning their positions and retreat west to avoid encirclement.
At 08:00 on the 23rd the 5/7th Rajputs fell back leaving the 1st Middlesex units on Leighton Hill isolated and the Japanese bombarded them with mortar fire. Meanwhile, the remaining defenders on the north shore retreated west to Mount Gough. With the main water reservoirs now controlled by the IJA and with artillery damage to pipes, water supplies began to run out.
On the 24th the Royal Rifles were withdrawn to the defensive lines at Stanley. The IJA forces attacked down the Tai Tam Road but were repulsed. A second attack began at 21:00 supported by three Type 94 tankettes, two of which were destroyed by a 2-pounder fire. The outer defensive line broke and No 2 Company HKVDC was forced back to Stanley Village with heavy losses. At midnight the Japanese penetrated the second defense line and entered the field hospital at St. Stephen's College and in the St. Stephen's College massacre tortured and killed a large number of injured soldiers, along with the medical staff. On the north shore the 230th Regiment advanced through Wanchai, meeting resistance at the China Fleet Club but this was soon overcome and the regiment advanced on the dockyard. In Happy Valley, the remnants of the 5/7th Rajputs were pushed back from the Happy Valley Racecourse, off Mount Parish and out of Wanchai Market.
Fall of Hong Kong
On Christmas morning, Young informed Chan of his intent to surrender. Chan intended to break out and was given command of the five remaining MTBs; 68 men, including Chan, Hsu, and David Mercer MacDougall were successfully evacuated to Mirs Bay where they contacted Nationalist guerrillas and were escorted to Huizhou. For this feat, Chan was made an honorary Knight Commander of the Order of the British Empire.
By the afternoon of 25 December 1941, it was clear that further resistance would be futile and at 15:30 Governor Young and General Maltby surrendered in person to General Sakai at the Japanese headquarters on the third floor of the Peninsula Hotel. At Stanley, Wallis refused to surrender without a written order and this was received by him at 02:30 on the 26th. Isolated pockets held out even longer, and the Central Ordnance Munitions Depot (known as "Little Hong Kong") surrendered on 27 December. This was the first occasion on which a British Crown Colony had surrendered to an invading force. The garrison had held out for 17 days. This day is known in Hong Kong as "Black Christmas".
Aftermath
Casualties
The Japanese officially reported 675 men killed and 2,079 wounded; western estimates go as high as 1,895 dead and 6,000 casualties overall. Allied casualties were 1,111 men killed, 1,167 missing and 1,362 wounded (sources vary; other figures given include 1,045 killed, 1,068 missing and 2,300 wounded, as well as 1,560 killed or missing). Allied dead, including British, Canadian and Indian soldiers, were eventually interred at Sai Wan Military Cemetery and the Stanley Military Cemetery. Total battle casualties of "Indian Other Ranks" is given to be 1164 out of a total of 3893 military personnel from India who were garrisoned in Hong Kong. The 5/7 Rajput bore the heaviest losses recorded amongst the 6 combat regiments during the battle of Hong Kong: 156 killed in action or died from wounds, 113 missing, and 193 wounded. The 2/14 Punjab had 55 killed in action or died from wounds, 69 missing, and 161 wounded. C Force casualties in the battle were 23 officers and 267 other ranks killed or died of wounds, including five officers and 16 other ranks of the brigade headquarters, seven officers and 123 men of the Royal Rifles and 11 officers and 128 men of the Winnipeg Grenadiers. C Force also had 28 officers and 465 men wounded. Some of the dead were murdered by Japanese soldiers during or after surrender. Japanese soldiers committed a number of atrocities on 19 December, when the aid post at the Salesian Mission near Sau Ki Wan was overrun. A total of 1,528 soldiers, mainly Commonwealth (predominantly Indians and Canadians), are either buried or commemorated there. There are also graves of other Allied combatants who died in the region during the war, including some Dutch sailors who were re-interred in Hong Kong after the war.
At the end of February 1942, the Japanese government stated that numbers of prisoners of war in Hong Kong were: British 5,072, Canadian 1,689, Indian 3,829, others 357, a total of 10,947. They were sent to:
Sham Shui Po POW Camp
Argyle Street Camp for officers
North Point Camp primarily for Canadians and Royal Navy
Ma Tau Chung Camp for Indian soldiers
Yokohama Camp in Japan
Fukuoka Camp in Japan
Osaka Camp in Japan
Of the Canadians captured during the battle, 267 subsequently perished in Japanese prisoner of war camps, mainly due to neglect and abuse. In December 2011, Toshiyuki Kato, Japan's parliamentary vice-minister for foreign affairs, apologized for the mistreatment to a group of Canadian veterans of the Battle of Hong Kong.
Civilians were interned at the Stanley Internment Camp. Initially, there were 2,400 internees although this number was reduced, by repatriations during the war. Interned persons who died and prisoners executed by the Japanese are buried in Stanley Military Cemetery.
Massacres and Other War Crimes
An estimated 10,000 Hong Kong civilians were executed, while many others were tortured, raped, or mutilated.
Hong Kong Island
Three captured persons were executed at Quarry Bay, including a female air raid warden named Ada Baldwin who was with the local Air Raid Precautions (ARP).
After the fall of the medical station near the West Brigade command post, ten stretcher bearers of the St. John Ambulance within the station were killed, as well as a policeman and a medic from the Royal Army Medical Corps.
Four men of A Company Winnipeg Grenadiers were bayoneted after the battle at Jardine's Lookout. One grenadier, Private Kilfoyle, was killed on the forced march to North Point, according to witnesses.
Four men were killed in the so-called "Black Hole of Hong Kong", a mess hut at the Wongneichong AA Battery, including two Canadian officers.
In the evening of 18–19 December 1941, surrendered gunners of the 5th Battery, Hong Kong Volunteer Defence Corps (HKVDC) and 5th Heavy Anti-Aircraft Regiment at Sai Wan AA Battery were murdered by Japanese soldiers of No. 6 Company, the 2nd Battalion, 229th Infantry Regiment. In total 28 are killed, some may have died in the fight for the position.
In the morning of 19 December 1941, Japanese soldiers of the 2nd Battalion or 3rd Battalion, 229th Infantry Regiment murdered medical personnel and wounded soldiers who were captured at Salesian Mission, which was used as an emergency hospital. The Japanese soldiers attempted to kill all male prisoners of wars and released two female nurses. In total 16 were killed.
From 19 to 20 December 1941, surrendered British and Commonwealth soldiers from various units were kept in a small shed near the anti-aircraft gun battery without food, water, and medical assistance. They were hit by shells and some were killed as the result in Wong Nai Chung Gap. The Japanese troops responsible for this probably came from the 230th and 229th regiments. In total at least 16 were killed.
Around thirty civilians of different ethnicities were massacred at No. 42 Blue Pool Road on 22 December. When the soldiers of the 230th Infantry Regiment entered Blue Pool Road from the south, they murdered civilians, including local businessmen Lam Ming-fan and three male relatives of his family, as well a number of Ministry of Finance officials of the Nationalist Chinese government who took refuge in the houses along the road. Tang Shiu-kin, a prominent businessman and philanthropist who was at the same spot, survived the massacre.
On 23 December 1941, British and Commonwealth soldiers from various units, led by Lt. Col. Robert MacPherson, attempted to surrender but were killed by Japanese soldiers of the No. 6 Company, 2nd Battalion of the 229th Infantry Regiment at the Ridge in Repulse Bay. At least 47 were killed and most of the killed prisoners of war were wounded soldiers. Among the dead was Major Charles Sydney Clarke of China Command HQ, two men of the 12th and 20th Coastal Regiments of the Royal Artillery (RA), six men of the Royal Army Service Corps (RASC) and two of the Royal Canadian Army Service Corps (RCASC), nineteen men of the Royal Army Ordnance Corps (RAOC) and three of the Royal Canadian Ordnance Corps (RCOC) and fourteen men of the RASC Company of the HKVDC.
On 23 December 1941, wounded soldiers from various units were bayoneted at Overbays by Japanese soldiers of the 3rd Battalion, 229th Infantry Regiment; the Japanese troops also set fire on the building. The Japanese executed at least fourteen captives, men of the same units as at The Ridge but also including three Royal Rifles of Canada and an officer of the 1st Middlesex.
Ride, who was present at the surrender, stated later that he saw fifty bodies lying by the road, including six Middlesex men among them. These men may have been some of those attached to the Hong Kong Chinese Regiment. The Commonwealth War Graves Commission report also states that five men of the Royal Air Force went missing near The Ridge on 20 December, perhaps captured and killed.
On 23 December 1941, Canadian troops from A Company, Royal Rifles and troops from various units were murdered at Eucliff by soldiers of the 3rd Battalion, 229th Infantry Regiment after surrender. At least 7 were killed.
Six men of the Middlesex were killed defending PB 14 at Deepwater Bay Ride (Lyon Light). Most of them were killed after capture via beheading.
Another 36 known victims cannot be placed precisely at one of the three locations (Ridge, Overbays, Eucliffe).
In the evening of 24 December, Japanese soldiers of the 229th and 230th regiments stormed the Marynoll Mission position ; resistance continued until dawn. At least six officers and a number of other men were killed after capture at Maryknoll Mission. Four members of the 8th Coastal Regiment RA may have been killed here as well; estimates of the number of men murdered vary from 11 to 16.
In the evening of 24 December 1941, soldiers of the 1st Battalion, 229th Regiment stormed the field hospital of St. Stephen's College, murdering the medical personnel and the wounded soldiers. Nurses were raped and then murdered. This was the largest-scale war crime against the garrison during the battle.
Twelve nurses were raped at the emergency hospital at Happy Valley racecourse on 25 December.
From 25 to 28 December 1941, Japanese soldiers from various units (possibly include rear-area troops) looted and raped the civilians in Causeway Bay; they were sometimes stopped by Japanese Gendarmerie but there were not enough of them to stop the rampage.
Kowloon
One private (John Payne) and an Australian was captured by the Japanese in Kowloon on 12 December and executed.
New Territories
From 8–9 December 1941, Japanese soldiers from various units passed through the Fanling Orphanage and looted the place; nurses and amahs were raped and brutalized. At least one baby was killed during the process. The case, however, was not thoroughly investigated and the perpetuators were not identified and tried.
Subsequent Operations
Isogai Rensuke became the first Japanese governor of Hong Kong. This ushered in the three years and eight months of Imperial Japanese administration.
The 38th Infantry Division departed Hong Kong in January 1942. The Hong Kong Defence Force was established during the same month, and was the main Japanese military unit in Hong Kong throughout the occupation.
During the over three and a half years of occupation by the Japanese, an estimated 10,000 Hong Kong civilians were executed, while many others were tortured, raped, or mutilated. The local population in the rural New Territories, a mix of Hakka, Cantonese and other Han Chinese groups, waged a guerrilla war with limited success. The resistance groups were known as the Gangjiu and Dongjiang forces. The Japanese razed several villages in reprisal; the guerillas fought until the end of the Japanese occupation. General Takashi Sakai, who led the invasion of Hong Kong and served as governor for some time, was tried as a war criminal and executed by a firing squad in 1946.
Awards
Battalions from both Indian Army regiments earned Battle Honours for the defense of Hong Kong. In his despatch, Major-General C. M. Maltby, wrote about the conduct of troops under his command in Hong Kong and mentions the 5/7 Rajput Regiment: "This battalion fought well on the mainland and their repulse of the enemy attack on Devil's Peak was entirely successful. The full force of the enemy's initial attack on the island fell on this battalion and they fought gallantly until they had suffered heavy casualties (100% of British Officers and most senior Indian Officers being lost) and were run over".
Gander was a Newfoundland dog posthumously awarded the Dickin Medal, the "animals' Victoria Cross", in 2000 for his deeds in World War II, the first such award in over 50 years. He picked up a thrown Japanese hand grenade and rushed with it toward the enemy, dying in the ensuing explosion but saving the lives of several wounded Canadian soldiers.
Colonel Lance Newnham, Captain Douglas Ford and Flight Lieutenant Hector Bertram Gray were awarded the George Cross for the gallantry they showed in resisting Japanese torture in the immediate aftermath of the battle. The men had been captured and were in the process of planning a mass escape by British forces. Their plan was discovered but they refused to disclose information under torture and were shot by firing squad.
Captain Mateen Ansari of the 5/7th Rajput's was awarded the George Cross "for most conspicuous gallantry in carrying out hazardous work in a very brave manner". Despite numerous efforts by the Japanese to get him to renounce his allegiance to the British and assist them in spreading subversion amongst the Indian ranks held in Japanese POW camps (after the fall of the Colony), all efforts failed. Ansari was tortured and starved for over five months before being sentenced to death. He was executed by beheading on 20 October 1943.
Commemoration
The Cenotaph in Central commemorates the defense as well as war-dead from the First World War. The shield in the colonial Emblem of Hong Kong granted in 1959, featured the battlement design to commemorate the defense of Hong Kong during the Second World War. This Coat of Arms was in place until 1997, when it was replaced by the regional emblem. After the war, Lei Yue Mun Fort became a training ground for the British Forces until 1987, when it was vacated. In view of its historical significance and unique architectural features, the former Urban Council decided in 1993 to conserve and develop the fort into the Hong Kong Museum of Coastal Defence.
The memorial garden at Hong Kong City Hall commemorates those who died in Hong Kong during World War II.
Bibliography
Books
Banham, Tony (2005). Not the Slightest Chance: The Defence of Hong Kong, 1941. Hong Kong: Hong Kong University Press.
Carew, Tim (1960). Fall of Hong Kong. London: Anthony Blond Ltd.
Carroll, J. M. (2007). A Concise History of Hong Kong. Critical Issues in History. Lanham: Rowman & Littlefield.
Chi Man, Kwong; Yiu Lun, Tsoi (2014). Eastern Fortress: A Military History of Hong Kong, 1840–1970. Hong Kong: Hong Kong University Press.
Fung, Chi Ming (2005). Reluctant Heroes: Rickshaw Pullers in Hong Kong and Canton, 1874–1954 (illus. ed.). Hong Kong University Press.
Harris, John R. (2005). The Battle for Hong Kong 1941–1945. Hong Kong: Hong Kong University Press.
Horne, Gerald (2004). Race war : white supremacy and the Japanese attack on the British Empire. New York: New York University Press.
Ishiwari, Heizō (31 May 1956). Army Operations in China, December 1941 – December 1943 (PDF). Japanese Monograph. IV 17807.71-2. Washington, DC: Office of the Chief of Military History, Department of the Army.
Ko, Tim Keung; Wordie, Jason (1996). Ruins of War A Guide to Hong Kong's Battlefields and Wartime Sites. Joint Publishing (H.K.) Co.
Lai, Benjamin; Rava, Giuseppe (2014). Hong Kong 1941–45: First Strike in the Pacific War. Campaign. Osprey.
Mackenzie, Compton (1951). Eastern Epic: September 1939 – March 1943, Defence. Vol. I. London: Chatto & Windus.
Nicholson, Brian (2010). Traitor. Bloomington, IN: Trafford.
Roland, Charles G. (2001). Long Night's Journey into Day: Prisoners of War in Hong Kong and Japan, 1941–1945. Waterloo, ON: Wilfrid Laurier University Press.
Stacey, C. P. (1956) [1955]. Six Year of War: The Army in Canada, Britain and the Pacific (PDF). Official History of the Canadian Army in the Second World War. Vol. I (2nd rev. online ed.). Ottawa: By Authority of the Minister of National Defence.
Turner, John Frayn (2010) [2006]. Awards of the George Cross 1940–2009 (online, Pen & Sword, Barnsley ed.). Havertown, PA: Casemate.
White, Barbara-Sue (1994). Turbans and Traders : Hong Kong's Indian Communities. Oxford University Press.
Woodburn Kirby, S.; et al. (2004) [1957]. Butler, J. R. M. (ed.). The War Against Japan: The Loss of Singapore. History of the Second World War United Kingdom Military Series. Vol. I (Naval & Military Press ed.). London: HMSO.
Journals
Macri, David (2011). "The Fall of Hong Kong: The Condon Report". Canadian Military History. 20 (2): 65–80.
Roland, Charles G. (26 July 2016). "Massacre and Rape in Hong Kong: Two Case Studies Involving Medical Personnel and Patients". Journal of Contemporary History. 32 (1): 43–61. doi:10.1177/002200949703200104.
Newspapers
"(Associated Press) Japan Apologizes to Canadian POWs from H. K. Battle". Japan Times. 10 December 2011. p. 2. ISSN 0289-1956.
Further Reading
Banham, Tony (2009). We Shall Suffer There: Hong Kong's Defenders Imprisoned, 1942–1945. Hong Kong: Hong Kong University Press.
Burton, John (2006). Fortnight of Infamy: The Collapse of Allied Airpower West of Pearl Harbor. Annapolis, MD: US Naval Institute Press.
Snow, Philip (2003). The Fall of Hong Kong: Britain, China and the Japanese Occupation. New Haven, CT: Yale University Press.
 |
| The First Canadian Contingent lands at Hong Kong 16 November 1941. |
 |
| Japanese field guns and gunners on Braemar Hill. Taken between 19-25 December 1941. |
 |
| Stonecutters; looking from a Japanese plane. |
 |
| Japanese troops at Kai Tak; the RAF Kai Tak and the offices clubhouse (the building on the slope, now Hong Kong Baptist University Kai Tak Campus) at the background. |
 |
| Indian troops on contractors' trucks near Murray Barracks. The use of local drivers who had not received military training proved to be problematic during the battle, and explained why many post-war Hong Kong Chinese soldiers were trained as drivers. |
 |
| A destroyed British 60 Pounder at North Point, facing HK & Whampoa Dockyard. The gun belonged to the 965th Defence Battery. |
 |
| Japanese troops at North Point; the HK and Whampoa Shipyard at the background. |
 |
| Gunners manning a 6-inch gun of the Pak Sha Wan Battery. (Imperial War Museum) |
 |
| Second batch of the Hong Kong gunners being trained in Stanley; picture taken in Spring 1939. |
 |
| Mount Kellett. The Missions étrangères de Paris, War Memorial Hospital, and Matilda Hospital could be seen in the picture. Mount Kellett witnessed some shelling during the battle, but not as heavily as other mountains near in the Peak area. |
 |
| The Central Ordnance Depot (also known as Little Hong Kong) was the largest ammunition depot of the garrison. During the battle, it was bypassed by the Japanese troops and was held by the garrison until the surrender. |
 |
| Japanese vessels entering Urmston Road. |
 |
| A destroyed Vickers Vildebeest of the RAF Kai Tak flight. |
 |
| Sandbagged walls of the Supreme Court Building. The building was used as a Kempeitai headquarters during the Japanese occupation. |
 |
| Japanese gunners on Braemar Hill. Taken between 19-25 December 1941. |
 |
| The 9.2-inch gun at Stanley Battery; it turned towards the land side to fire at the Japanese forces on the Island. |
 |
| Japanese troops looking at Hong Kong Island from Tai Wan Tsun (now Kowloon Bay). |
 |
| Colonel Tanaka Ryosaburo, OC 229i, overlooking Lyemun and Aldrich Bay. |
 |
| Japanese fighters strafing civilian airliners at Kai Tak, 8 December 1941. |
 |
| Japanese troops marching into Victoria through Hennessey Road. The two officers at the front were Lieutenant General Takashi Sakai of the 23rd Army and Vice Admiral Masaichi Niimi of the 2nd China Fleet. |
 |
| Sham Shui Po Barracks and the police station nearby. |
 |
| Aerial bombardment of Mount Davis Fort on 16 December by IJA heavy bombers. Despite the spectacle, the batteries remained operational. |
 |
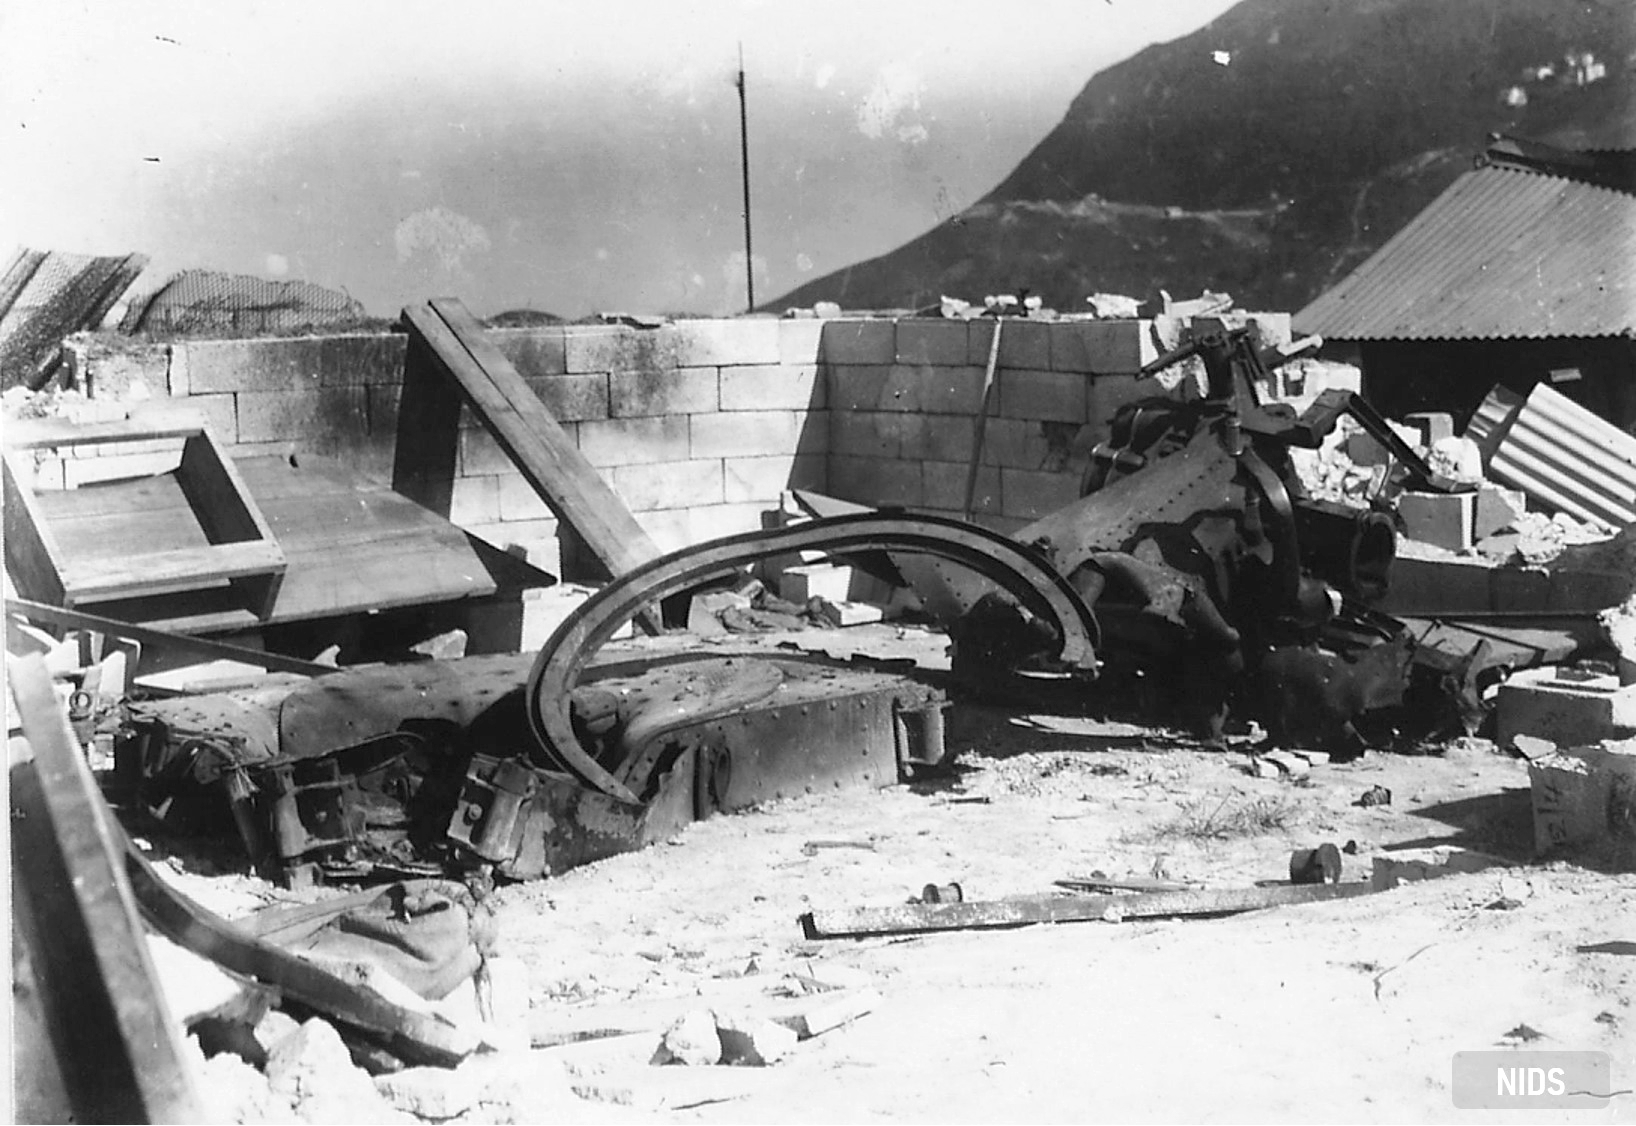
| The badly damaged 4.7-inch gun at Belcher Battery. |
 |
| Japanese invasion of Hong Kong, December 18–25, 1941. |
 |
| Tactical map, Battle of Hong Kong, 18-25 December 1941. |
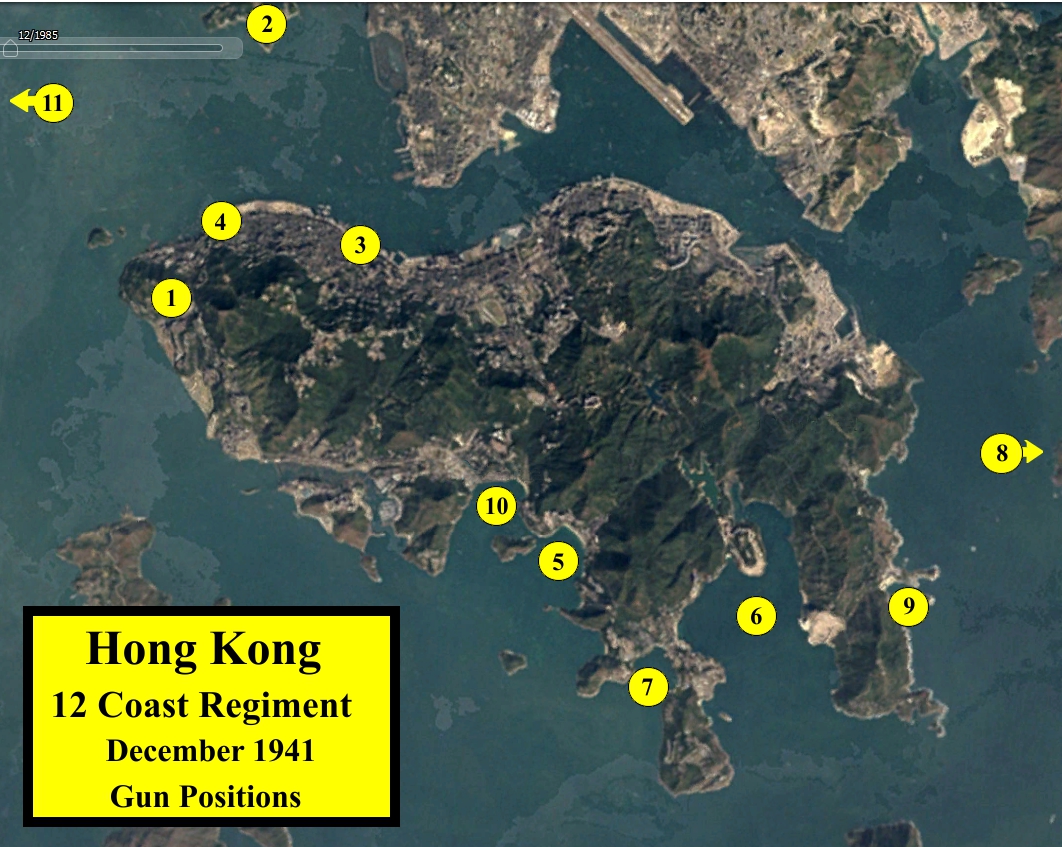 |
| Hong Kong, 12 Coast Regiment Gun Positions, December 1941. |
December 1940: 12 Heavy Regiment was renamed 12 Coast Regiment and were transported to Hong Kong, There were three batteries 20, 24, 35 included in the regiment.
February 1941: The 35 battery was renamed 965 Defence Battery.
December 1941: The 20 Coast Battery was converted to Hong Kong Singapore RA (HKS) due to lack of British coast artillery personnel.
Re-designated 26 battery Hong Kong Singapore (HKS) RA.
Batteries then set up positions at:
1: Mount Davies - 24 Battery with 3 x 9.2 inch Guns.
2: Stone Cutters - 26 Battery with 3 x 6 inch Guns and 2 x 60 pounder Guns.
3: Jubilee - 26 Battery with 3 x 6 inch Guns.
4: Belcher’s Upper - 965 Battery with 1 x 6 inch Gun; Belcher’s Lower - 965 Battery with 2 x 4.7 inch Guns.
5: Repulse Bay - 965 Battery with 2 x 18 pounder Guns.
6: Tytam Bay - 965 Battery with 2 x 18 pounder Guns.
7: Stanley Bay - 965 Battery with 2 x 18 pounder Guns.
8: Promontory Bay - 965 Battery with 1 x 2 pounder Gun.
9: Island Bay - 965 Battery with 1 x 2 pounder Gun.
10: Deepwater Bay - 965 Battery with 1 x 2 pounder Gun.
11: Tai Ho Wan - 965 Battery with 1 x 2 pounder Gun.
 |
 |
| Japanese troops on the march in Hong Kong. |
 |
| Soldiers of the Winnipeg Grenadiers on the move. |
 |
| The leaders of the colony met with the Japanese General Staff to officially sign the surrender of the colony on December 25, 1941. |
 |
| Ki-32 aircraft flying in formation over Hong Kong, Dec 1941. |
 |
| Troops of 228th Regiment of Japanese 38th Division marching into Hong Kong, mid-Dec 1941. |
 |
| Takashi Sakai and Masaichi Niimi leading Japanese troops on a march on Queen's Road, Hong Kong, 26 Dec 1941. |
 |
| Takashi Sakai and Masaichi Niimi leading Japanese troops on a march on Queen's Road, Hong Kong, 26 Dec 1941. |
 |
| Chan Chak with British and Chinese personnel who had recently escaped from Hong Kong, Huizhou, Guangdong Province, China, 29 Dec 1941. |
 |
| Western bankers and businessmen being rounded up by the Japanese, Hong Kong, Dec 1941-Jan 1942. |
 |
| Dongjiang Column communist Chinese guerrilla fighters firing from a ditch, Hong Kong or Guangdong Province in China, circa 1942-1945. |
 |
| Indian gunners manning a 9.2-inch naval artillery gun at Mount Davis Battery on Hong Kong Island. |
 |
| Three weeks before the battle, a Canadian military contingent arrived to reinforce the garrison |
 |
| Japanese artillery fires shells at the British colony of Hong Kong. |
 |
| Japanese artillery in North Point. |
 |
| Japanese war criminals captured by British forces in Hong Kong. |
 |
| After capturing Guangzhou and other cities in Guangdong Province in the Canton Operation in October 1938, the Japanese imposed a blockade of British Hong Kong by holding the Guangdong side of the Lo Wu Bridge, the land border of British Hong Kong connecting mainland China. The purpose of the blockade is to cut Allied supplies reaching the Chinese Nationalist Army. The Guangzhou–Kowloon through train (pictured at the center), which run through Lo Wu Bridge, could not get across the border. In the photo, people in the front are Japanese solders, stepping on the soil of Bao'an County, mainland China. This photo is taken between 22 October 1938 and 16 November 1938. Three years later, in December 1941, six hours after the Attack on Pearl Harbor, Japanese launched the Battle of Hong Kong. |
 |
| Japanese troops in North Point., 19 December 1941. |
 |
| The 3rd company of Hong Kong Volunteer Defence Corps. Most of them died on 18 December 1941 in Wong Nai Chung Gap, the day that inflicted most casualties during the Battle of Hong Kong. |
 |
| Air raids on Hong Kong by the allied powers on 16 October 1944. At the center of this photo, Japanese-held Kowloon Docks is on fire. To the left of the fire, a Japanese plane, probably a Mitsubishi A6M Zero (Zeke), is fighting back. In this mission, the US Fourteenth Air Force sent out 28 B-24 heavy bombers, 33 P-51 fighter-bombers and 18 P-40 fighters to Japanese-occupied Hong Kong. These planes most probably departed from Kweilin Airfield, 530 km (330 miles) northwest from Hong Kong.While the US Fourteenth Air Force attacked the Japanese in Hong Kong, major Chinese forces were busy elsewhere: the Chinese National Revolutionary Army was fighting the Japanese in the Battle of Guilin–Liuzhou in Operation Ichi-Go; the forces of the Communist-controlled China was in North China Plain. The broad sweep of open land in the middle right was Japanese-controlled Kai Tak airfield. The Kai Tak Bund residential area had been knocked down and, together with Po Kong to the north of the airport, was incorporated into the airport zone. Compared to the pre-war time, the total area of the airport was doubled. |
 |
| Air raids on Hong Kong by the allies (the US) at 13:45, 16 October 1944. In this mission, the US Fourteenth Air Force sent out 28 B-24 heavy bombers, 33 P-51 fighter-bombers and 18 P-40 fighters to Japanese-occupied Hong Kong. These planes most probably departed from Kweilin Airfield, 530 km (330 miles) northwest from Hong Kong. |
 |
| Air raids on Hong Kong by the allies (the US) on 16 October 1944. In this mission, the US Fourteenth Air Force sent out 28 B-24 heavy bombers, 33 P-51 fighter-bombers and 18 P-40 fighters to Japanese-occupied Hong Kong. These planes most probably departed from Kweilin Airfield, 530 km (330 miles) northwest from Hong Kong. |
 |
| Canadian and British prisoners-of-war in the Battle of Hong Kong awaiting liberation by the landing party from HMCS Prince Robert. Circa 30 August 1945. (Library and Archives Canada 3403285) |
 |
| Air raid wardens take up position at the entrances to public shelters, during an exercise in the last days before Japan invasion of Hong Kong. December 1941. |
 |
| British and Canadian troops training on the hills in Hong Kong, Nov-Dec 1941. |
 |
| British and Hong Kong Chinese soldiers on exercise in inflatable boats in Hong Kong, 1941. (Imperial War Museum) |
 |
| Hostility between the Hong Kong Defensing Force and the Japanese army at the border of Hong Kong. British Army setup roadblocks on the bridge at Lo Wu, 26 Nov 1938. |
 |
| A Hong Kong Chinese messenger serving in the British Army in Hong Kong before World War II. |
 |
| Expropriated civilian truck carrying British Indian Army troops to the front line, Dec 1941. |
 |
| Canadian soldiers on exercise in the hills on Hong Kong Island before the Japanese invasion, 1941. (Imperial War Museum KF 189) |
 |
| Japanese aerial attack. |
 |
| HKVDC Vickers machine gun training in 1938. |
.jpg) |
| Royal Navy Linnet-class minelayer HMS Redstart taken some time between 1938 and 1941. |
 |
| The Hong Kong Chinese Regiment established on 4 November 1941, a month prior to the battle of Hong Kong. |
 |
| Imperial Japanese Army Air Service attacking Hong Kong, 8 Dec 1941. |
 |
| The Imperial Japanese Army is advancing along Sir Cecil's Ride Trail on Hong Kong Island, Dec 1941. |
 |
| Japanese landing group charges into Hong Kong after successful landing on Hong Kong Island, Dec 1941. (Imperial War Museum) |
 |
| Japanese troops celebrating occupation of Hong Kong Anniversaries in the Hong Kong Cricket Club in 1942. |
 |
| Japanese troops hold Mrs. C.R. Lee (the wife of a senior official in Hong Kong) as hostage, 13 Dec 1941. |
 |
| Japanese troops invade New Territories, Hong Kong, 8 Dec 1941. |
 |
| Japanese troops invade Pak Shing Street in Tai Po, 8 Dec 1941. |
 |
| Japanese Troops landing at North Point. |
 |
| Japanese troops in street fighting with British Forces on Hong Kong Island, 24 Dec 1941. |
 |
| Hong Kong Volunteers Defense Corps marching outside the Southern Stadium in Wan Chai. |
 |
| Sir Mark Aitchison Young, the Governor of Hong Kong inspecting defense work after arriving at Hong Kong in September 1941. |
 |
| Two Japanese Type 94 tankettes on a street in Hong Kong Island after the Imperial Japanese occupation of Hong Kong. |
 |
| Two soldiers returning to their units in the Hong Kong Volunteer Defence Corps, 1941. |
 |
| Infantrymen of C Company, Royal Rifles of Canada, boarding H.M.C.S. PRINCE ROBERT en route to Hong Kong. Vancouver, British Columbia, Canada, 26 October 1941. One and a half months later, Battle of Hong Kong broke out. |
 |
| Infantrymen of C Company, the Royal Rifles of Canada, and their mascot Gander the dog en route to Hong Kong. The photo was taken in Vancouver, British Columbia, circa 27 October 1941. In the Battle of Hong Kong two months later, Gander the dog was killed in action when running away with a picked up grenade thrown towards the Royal Rifles of Canada. For this act, Gander was posthumously awarded the Dickin Medal, the "animals' Victoria Cross". |
 |
| Inspection of Canadian Brigade in Hong Kong on the day of arrival, 16 November 1941 (pictured), after spending 20 days on HMT Awatea, departed from Vancouver on 27 October. Under sealed orders, most did not know their port of destination until arriving Hong Kong. The Canadian politicians and military expected these troops would see only garrison (non-combat) duty, however, within three weeks of arrival, the Battle of Hong Kong began. (Library and Archives Canada C-049745) |
 |
| Infantrymen of "C" Company, Royal Rifles of Canada, disembarking from H.M.C.S. PRINCE ROBERT, Hong Kong, 16 November 1941. (Library and Archives Canada 3396534) |
 |
| Hong-Kong defences, site at Wong Nai Chong Gap where West Brigade Headquarters, and Winnipeg Grenadiers were over-run by Japanese forces in the Battle of Hong Kong, 19 Dec. 1941. Brig. Gen. John K. Lawson was killed in action here. (Library and Archives Canada 3995680) |
 |
| Canadian Chief Petty Officer Harold Kelly and Leading Seaman Nick Kryway of HMCS Prince Robert, Hong Kong, September 1945. These Canadian soldiers were sent to handle prisoners-of-war in Battle of Hong Kong. (Library and Archives Canada 3227635) |
 |
| Landing party from H.M.C.S. ONTARIO marching towards the Chinese Hotel, Hong Kong,13 September 1945. (Library and Archives Canada 3205098) |
 |
| Infantrymen of C Company, Royal Rifles of Canada, aboard H.M.C.S. Prince Robert en route to Hong Kong, 15 November 1941. The black dog at the center was the famous Gander. They already entered Hong Kong waters and landed the next day. Three weeks later, many died in the Battle of Hong Kong, including Gander the dog for picking up a Japanese grenade thrown toward the Canadians. (Library and Archives Canada 3228792) |
 |
| Liberated Canadian prisoners-of-war arriving in Manila, Philippines, 13 September 1945. |
 |
| The Winnipeg Grenadiers at Hong Kong on the day of their arrival, 16 November 1941 (pictured), after spending 20 days on HMT Awatea, departed from Vancouver on 27 October. Under sealed orders, most did not know their port of destination until arriving Hong Kong. The Canadian politicians and military expected these troops would see only garrison (non-combat) duty, however, within three weeks of arrival, the Battle of Hong Kong began. The commander of the Winnipeg Grenadiers was L. Col. John Louis Robert Sutcliffe (August 29, 1898, Elland, England - April 6, 1942, Hong Kong). (Imperial War Museum) |
 |
| Personnel of the Winnipeg Grenadiers board a Canadian Pacific troop train en route to Vancouver, and ultimately, Hong Kong, 25 October 1941. |
 |
| Personnel of the Winnipeg Grenadiers and Corps Troops entraining en route to Hong Kong (Canada. Dept. of National Defence/Library and Archives Canada/PA-161202). |
 |
| Mainland Positions, Hong Kong, December 1941. |
 |
| Company Sergeant-Major J.R. Osborn of “A” Company, The Winnipeg Grenadiers, Jamaica, ca. 1940-1941. Killed in action at Hong Kong on 19 December 1941, CSM Osborn was posthumously awarded the Victoria Cross (Canada. Dept. of National Defence / Library and Archives Canada / PA-37483). |
 |
| Canadian troops dig in in Hong Kong's rocky mountainous ground (Imperial War Museum KF 193) |
 |
| Brigadier John K. Lawson (right) confers with Major-General Christopher Maltby during the Battle of Hong Kong. |
 |
| Canadian Prisoners of War captured during the battle of Hong Kong, 25 December 1941. Individuals shown here were part of a group sent from Hong Kong to Japan on 19 January 1943. |
 |
| Lieutenant-Commander Fred Day of the HMCS Prince Robert with liberated Canadian prisoners of war at Sham Shui Po Camp, Hong Kong, August 1945. (Library and Archives Canada/PA-151738) |
 |
| Major-General Okada handing over his sword during a ceremony marking the surrender of Japanese forces in Hong Kong, 16 September 1945. (Department of National Defence/Library and Archives Canada/PA-114815) |
 |
| Japanese artillery in action on Jardine's lookout firing over Wong Nei Chong Gap. |
 |
| Lieutenant General Takashi Sakai (left) at Quarry Bay pier in December 1941. |
 |
| Members of the party that escaped from Hong Kong after the surrender on December 25, 1941, including (from left) General Chu Lai-chuen, David MacDougall (Ministry of Information), Commander Hugh Montague, General Yu Hanmou, Admiral Chan Chak, Colonel H. Owen Hughes and a Chinese soldier, shortly after their arrival in Free China. |
 |
| QF 18 Pounder, Field Gun, Quick-firing (QF). This gun was introduced to the British and Indian Army before the First World War and was one of the main British field guns throughout the war. It was more powerful than the French (the 75 gun) and German (77mm gun) counterparts and was mass-produced during the war. A number of them were sent to Hong Kong as first as field guns and later replaced by larger pieces. In December 1941 they were deployed as beach defense guns and manned by the 965th Defence Battery. Hong Kong Chinese gunners were seen being trained to use this weapon. Most of these guns were destroyed during the battle, and a few were captured and used by the Japanese forces. |
 |
| BL 6-inch Howitzer, Field Howitzer, Breech Loading (BL). First used in 1915, this kind of howitzer saw extensive service during the First World War. It was the largest mobile gun of the garrison and were manned by the gunners of the Hong Kong Singapore Royal Artillery. They were deployed in prepared positions on the Island such as Victoria Peak, Mount Gough, and Chai Wan. A number of these pieces were captured by the Japanese forces after the battle and were reused. |
 |
| Brick Hill AA Battery. |
 |
| Wong Nai Chung AA Battery. |
 |
| Mount Davis AA Battery. |
 |
| Sai Wan AA Battery. |
 |
| Type 89 150mm Cannon. This was the largest mobile cannon of the Japanese Army. It was deployed in Kowloon to fire at fixed British targets such as coastal and anti-aircraft batteries on Hong Kong Island. After the landing on the Island they were redeployed to the eastern part of the Island, shelling British gun positions in the Peak area. |
 |
| "Battle of Hong Kong" painting by Koiso Ryohei, 1942. |
 |
| "The Battle of Hong Kong" painting by Saburo Miyamoto, 1942. |
 |
| Japanese soldiers advancing through Hong Kong. |
 |
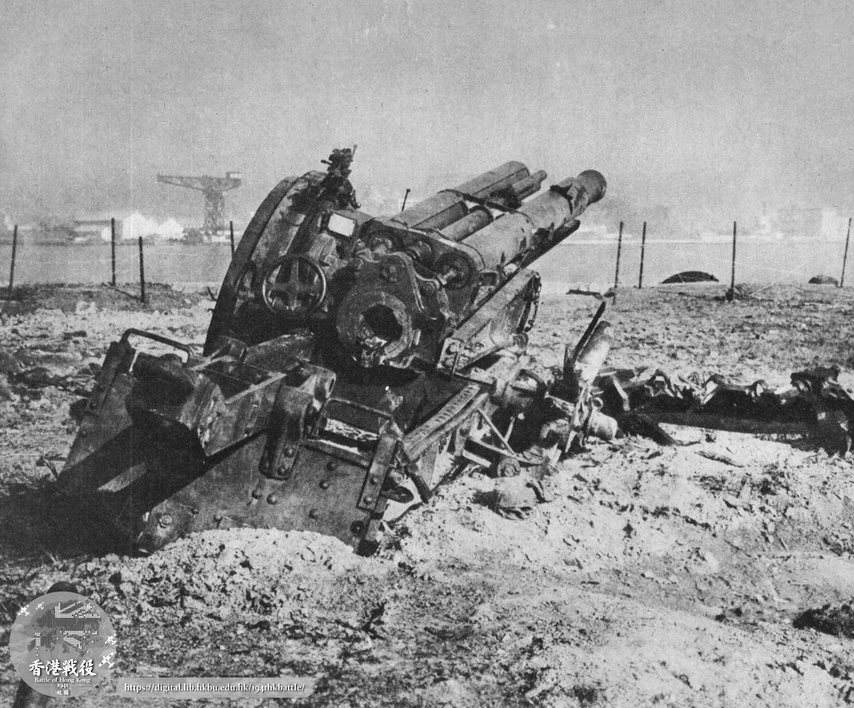
| One of the three coastal defense gun at Mount Davis, this F1 gun, a 9.2in MK 10 gun on MK 5 mounting. These guns were used to fire into Kowloon when the Japanese invaded HK. |
 |
| Sai Wan AA Battery. |
 |
| Stanley AA Battery. |
 |
| Mount Davis AA Battery. |
 |
| Pinewood AA Battery. |
 |
| QF 4-inch Coastal Gun, Coastal Defence Gun, Quick-firing (QF). 4-inch BL (Breech Loading Gun) was never deployed in Hong Kong for coastal defense except for the two war emergency batteries at Cape D’Aguilar and Aberdeen. The guns were put into service from the naval stores in Hong Kong and manned by HKVDC gunners. |
 |
| Belcher Battery (Upper and Lower). |
 |
| Belcher Battery (Upper and Lower). |
 |
| Pak Sha Wan Battery near Lyemun Redoubt. 6" Mk-VII x 2 on Mk-II Mountings; 4th Battery, HKVDC. |
 |
| Bluff Head Battery. |
 |
| Stanley Fort Coastal Defence Battery/ Counter Bombardment Battery. |
 |
| Pak Sha Wan Battery, Close Defence Battery (Coastal), Pak Sha Wan near Lyemun Redoubt. 6" Mk-VII x 2 on Mk-II Mountings; 4th Battery, HKVDC. |

