 |
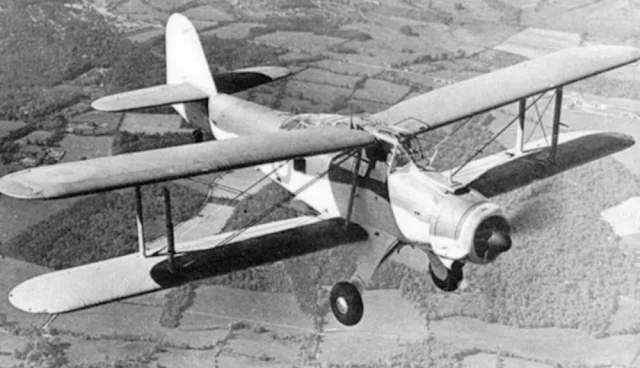
| L7075, the second prototype of the Fairey Albacore in flight. The markings place it around 1940. (Royal Air Force) |
The Fairey Albacore is a single-engine biplane torpedo bomber designed and produced by the British aircraft manufacturer Fairey Aviation. It was primarily operated by the Royal Navy Fleet Air Arm (FAA) during the Second World War.
The Albacore, popularly known as the "Applecore", was conceived as a replacement for the Fairey Swordfish, an earlier biplane introduced during the mid 1930s. It was typically operated by a crew of three and was designed for spotting and reconnaissance as well as level, dive, and torpedo bombing. First flown on 12 December 1938, the Albacore was in production between 1939 and 1943, and entered FAA service with 826 Naval Air Squadron during March 1940. The type was initially operated from land bases, being dispatched on attack missions against enemy shipping and harbors in the vicinity of the English Channel. The first operations on board an aircraft carrier commenced in November 1940.
At its height, 15 first-line FAA squadrons flew the Albacore. The type was much used in the Mediterranean, participating in the Battle of Cape Matapan, the Second Battle of El Alamein, as well as the landings at Sicily and Salerno. Despite the intention to replace the Swordfish, the Albacore served with it and was eventually retired before it, both aircraft having been replaced by a pair of monoplane designs, the Fairey Barracuda and Grumman Avenger. In addition to the FAA, the Royal Air Force (RAF) and the Royal Canadian Air Force (RCAF) operated the type.
Design and Development
Background
The origins of the Albacore can be traced back to the issuing of Specification S.41/36 by the Air Ministry on 11 February 1937, as well as the earlier Specification M.7/36. The latter had sought a three-seat TSR (torpedo/spotter/reconnaissance) aircraft with which to replace the Fairey Swordfish in Fleet Air Arm (FAA) service. It was required to be capable of speeds between 58 and 183 knots while also carrying a single 18-inch Mark XIIA torpedo; furthermore, it was to be fitted with dual flight controls, have a powered rear turret, comprehensive facilities for observation and navigation, and incorporate soundproofing and heating measures.
In response, Fairey Aviation decided to work on its own design. Early activities included the wind tunnel testing of various biplane models at RAE Farnborough between November 1936 and June 1937. These tests reportedly influenced designs regarding the fitting of flaps upon the wings. The company produced both biplane and monoplane configurations to fulfill the requirement, officials dismissed the monoplane proposal as it raised uncertainties for the role it was to be tasked with at that time. Accordingly, Fairey focused its efforts onto the biplane configuration.
The Albacore, otherwise designated TBR (torpedo/bomber/reconnaissance), was a single-bay all-metal biplane. Its fuselage was of a semi-monocoque design and was equipped with a split undercarriage. In comparison to the Swordfish, the Albacore was furnished with a more powerful engine that drove a Constant-speed propeller, while the fuselage was also more aerodynamically refined. The engine that powered the early Albacores was a single Bristol Taurus II radial engine, capable of 1,065 hp, while those built later on received the more powerful Taurus XII, capable of 1,130 hp, instead.
Furthermore, the Albacore provided numerous amenities for the benefit of its crew, such as its fully enclosed cockpit, a central heating system, a windscreen wiper for the pilot, and lavatory. In the event of a water landing, the aircraft was also fitted with an automatic life raft deployment system to assist in the crew's survival. The armament of the Albacore typically included a single fixed forward-firing machine gun in the upper starboard wing, while the rear cockpit was provided with either a single or twin Vickers K machine gun. It could carry a maximum under-wing bomb load of four 500 lb (230 kg) bombs.
The wings of the Albacore were of an equal span and were foldable for more compact stowage onboard aircraft carriers. These wings, which were covered by fabric, featured relatively large flaps that were hydraulically-actuated and could also act as air brakes during dives. Akin to the preceding Swordfish, it was capable of dive bombing; it was capable of diving at speeds of up to 215 knots (400 km/h) IAS irrespective of the positioning of the flaps. According to the wartime pilot Eric Brown, the Albacore was relatively steady throughout the dive, while the recovery was typically both smooth and relatively easy to perform.
Into Flight
On 12 December 1938, the first of two prototypes performed its maiden flight from the Great West Aerodrome, flown by F. H. Dixon. During April 1939, the second prototype made its first flight, joining its sibling in the flight test program shortly thereafter. Both prototypes had not been ordered under individual contracts, but had instead been the first two of a production batch of 100 aircraft. There were some differences from subsequent production aircraft, such as their initial outfitting with non-tapered engine cowlings and wheel-spats.
While the Albacore had been developed as a carrier-capable land plane, there was interest in its potential as a floatplane, thus the first prototype was later outfitted with floats and was experimentally configured for catapult-assisted takeoffs. The Marine Aircraft Experimental Establishment (MAEE) tested it in early 1940, during which its water-handling was less than favorable, although it retained acceptable airborne characteristics, save for its reportedly poorly-harmonized flight controls.
During 1939, quantity production of the first batch of 98 aircraft commenced; the start of production had been delayed on account of production slippages of the Taurus engine. During February 1940, testing of the Albacore and Taurus II engine alike commenced at RAF Boscombe Down. During these tests, the prototype demonstrated its ability to attain a maximum speed of 160 mph (140 kn; 260 km/h), at an altitude of 4,800 ft (1,463 m), at 11,570 lb (5,259 kg), which was achieved while carrying four depth charges underneath its wings, while its maximum speed without the depth charges was 172 mph (149 kn; 277 km/h). An Albacore fitted with the Taurus II engine and carrying a torpedo weighed 11,100 lb (5,045 kg).
Some minor criticisms of the Albacore were produced during its 1940 evaluation flights; issues included the excessive heat of the forward cockpit during the summer months, while the rear cockpit was cold and subject to persistent drafts. The stall characteristics were described as uncomfortable, while the crew boarding process was also seen as somewhat hazardous. However, the only notable change in the specification was the replacement of the Taurus II engine with the improved Taurus XII counterpart.
A total of 800 Albacores were built, including the two prototypes, which were all manufactured at Fairey's Hayes factory. Production came to an end in 1943. They were typically test flown from London's Great West Aerodrome, what has since been expanded into London Heathrow Airport.
Type: Torpedo bomber
National origin: United Kingdom
Manufacturer: Fairey Aviation
Primary users:
Royal Navy
Royal Air Force
Royal Canadian Air Force
Number built: 800
Introduction date: 1940
First flight: 12 December 1938
Retired: 1949
Specifications (Albacore with Taurus XII)
Crew: 2 (torpedo bomber) or 3 (reconnaissance mission)
Length: 40 ft 1+1⁄8 in (12.221 m) in tail-up rigging position
Wingspan: 50 ft 0 in (15.24 m)
Width: 17 ft 9 in (5.41 m) wings folded
Height: 12 ft 10+1⁄2 in (3.924 m) tail down, propeller tip down
Wing area: 623 sq ft (57.9 m2)
Empty weight: 7,250 lb (3,289 kg) torpedo bomber
Gross weight: 10,460 lb (4,745 kg) torpedo bomber
Maximum takeoff weight: 12,830 lb (5,820 kg)
Powerplant: 1 × Bristol Taurus XII 14-cylinder sleeve-valve radial piston engine, 1,130 hp (840 kW) for take-off
Propellers: 3-bladed constant-speed propeller
Maximum speed: 161 mph (259 km/h, 140 kn) torpedo bomber at 4,500 ft (1,400 m)
Cruise speed: 140 mph (230 km/h, 120 kn) maximum
Stall speed: 54 mph (87 km/h, 47 kn) flaps down
Range: 710 mi (1,140 km, 620 nmi) with torpedo
Ferry range: 930 mi (1,500 km, 810 nmi)
Service ceiling: 18,800 ft (5,700 m)
Time to altitude: eight minutes to 6,000 ft (1,800 m)
Armament
Guns:
1 × fixed, forward-firing 0.303 in (7.7 mm) M1919 Browning machine gun in starboard wing
1 or 2 × 0.303 in (7.7 mm) Vickers K machine guns in rear cockpit.
Bombs: 1 × 1,670 lb (760 kg) torpedo or 2,000 lb (910 kg) of bombs
Operational History
During March 1940, No. 826 Naval Air Squadron was specially formed to operate the first Albacores; within weeks, the type had begun operations, attacking harbours and shipping in the English Channel, operating from shore bases, as well as providing convoy escort for the rest of 1940. HMS Formidable's 826 and 829 Squadrons were the first to operate the Albacore from an aircraft carrier, operations commencing in November 1940. The Albacore suffered from reliability problems with the Taurus engine, although these were later solved, so that the failure rate was no worse than the Pegasus equipped Swordfish. The Albacore remained less popular than the Swordfish, as it was less maneuverable, while the controls were considered to be too heavy for a pilot to perform much evasive action after dropping a torpedo.
Eventually, there were 15 first-line FAA squadrons equipped with the Albacore which operated widely in the Mediterranean. In March 1941, Albacores made torpedo attacks during the Battle of Cape Matapan, inflicting severe damage on the Italian battleship Vittorio Veneto despite the presence of heavy anti-aircraft fire. The type also played a prominent role in the ill-fated raid on Kirkenes and Petsamo during July 1941. Albacores also participated, with greater success, in the fighting at El Alamein, dropping flares to mark targets for RAF night bombers.
Between September 1941 and June 1943, No. 828 Squadron, based at RAF Hal Far, Malta, operated a squadron of Albacores under severe blitz conditions during the Siege of Malta. The type employed a mixture of mines and bombs to attack Italian shipping, including convoys, along with shore targets in Sicily, mainland Italy, and North Africa. Albacores also supported the landings at Sicily and Salerno, guarding against enemy submarines and raiding key enemy facilities such as airfields and forts.
On 9 March 1942, twelve Albacores from HMS Victorious attacked the German battleship Tirpitz at sea near Narvik. Based on information from one of a search force of six Albacores that had been launched earlier, Albacores from 817 and 832 Squadrons launched torpedoes. One attack came within 20 yd (18 m) of Tirpitz, but the attack failed for the loss of two aircraft.
During 1943, the Albacore was replaced in FAA service by the newer Barracuda. The final Albacore squadron of the FAA, No. 841 Squadron, which had flown numerous shore-based attacks against shipping in the English Channel for the whole of its career with the Albacore, was disbanded in late 1943.
The Royal Air Force deployed some Albacores; 36 Squadron based at Singapore acquired five to supplement its Vickers Vildebeests at RAF Seletar in December 1941. The remnants of the squadron was captured by the Japanese in March 1942. During 1943, No. 415 Squadron RCAF was equipped with Albacores (presumably ex-FAA) before the Flight operating them was transferred and reformed as 119 Squadron at RAF Manston in July 1944. The squadron deployed later to Belgium and their Albacores were disposed of in early 1945, due to spares shortages, in favor of the inferior but ASV radar-equipped Swordfish Mk.IIIs that the squadron kept until the end of the war on 8 May. This was to combat German mini-submarines attacking Allied shipping entering the River Scheldt on its way to the Port of Antwerp. The Aden Communication Flight used 17 Albacores between the middle of 1944 and August 1946. Some of these were delivered by sea on the SS Empire Arun in December 1945 (all from Royal Navy stock).
The Royal Canadian Air Force took over the Albacores and used them during the Normandy invasion, for a similar role until July 1944. The Albacore was the last biplane to be used in combat by the RCAF.
Operators
Canada
Royal Canadian Air Force
No. 415 Squadron RCAF
United Kingdom
Royal Air Force
No. 36 Squadron RAF
No. 119 Squadron
Royal Navy Fleet Air Arm
700 Naval Air Squadron
733 Naval Air Squadron
747 Naval Air Squadron
750 Naval Air Squadron
753 Naval Air Squadron
754 Naval Air Squadron
756 Naval Air Squadron
763 Naval Air Squadron
766 Naval Air Squadron
767 Naval Air Squadron
768 Naval Air Squadron
769 Naval Air Squadron
771 Naval Air Squadron
774 Naval Air Squadron
775 Naval Air Squadron
778 Naval Air Squadron
781 Naval Air Squadron
782 Naval Air Squadron
783 Naval Air Squadron
785 Naval Air Squadron
786 Naval Air Squadron
787 Naval Air Squadron
788 Naval Air Squadron
789 Naval Air Squadron
791 Naval Air Squadron
793 Naval Air Squadron
796 Naval Air Squadron
797 Naval Air Squadron
799 Naval Air Squadron
810 Naval Air Squadron
815 Naval Air Squadron
817 Naval Air Squadron
818 Naval Air Squadron
820 Naval Air Squadron
821 Naval Air Squadron
822 Naval Air Squadron
823 Naval Air Squadron
826 Naval Air Squadron
827 Naval Air Squadron
828 Naval Air Squadron
829 Naval Air Squadron
830 Naval Air Squadron
831 Naval Air Squadron
832 Naval Air Squadron
841 Naval Air Squadron
Surviving Aircraft
Only one Albacore is known to survive, on display at the Fleet Air Arm Museum, which was built using parts of Albacores N4389 and N4172 recovered from crash sites.
Bibliography
Bridgman, Leonard, ed. (1944). Jane's all the World's Aircraft 1943-44. London: Sampson Low, Marston & Co.
Brown, Eric (CBE, DCS, AFC, RN); Green, William; Swanborough, Gordon (1980). Wings of the navy : flying allied carrier aircraft of World War Two. Janeʼs.
Harrison, W.A. Warpaint Series No.52: Fairey Albacore. Bedfordshire: Warpaint Books Ltd 2004.
Kostam, Angus. Sink the Tirpitz 1942–44: The RAF and Fleet Air Arm duel with Germany's mighty battleship. Oxford: Osprey Publishing, 2018.
Lawrence, Joseph (1945). The Observer's Book Of Airplanes. London and New York: Frederick Warne & Co.
Mason, Francis K. (1994). The British Bomber Since 1914. London: Putnam Aeronautical Books.
Shores, Christopher; Cull, Brian; Izawa, Yasuho (1992). Bloody Shambles: Volume One: The Drift to War to the Fall of Singapore. London: Grub Street.
Taylor, H.A. Fairey Aircraft Since 1915. London: Putnam, 1974.
Further Reading
Smith, Peter C. (1982). Dive bomber : an illustrated history. Annapolis, Maryland: Naval Institute Press.
Taylor, H.A. (1974). Fairey aircraft since 1915. London: Putnam & Company Ltd.
 |
| Albacore, Fleet Air Arm. |
 |
| Albacore, Fleet Air Arm. |
 |
| Albacore in flight circa 1940. |
 |
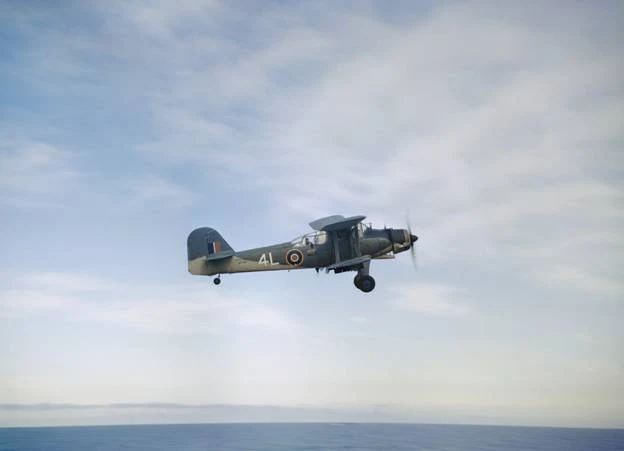
| A Fairey Albacore Mk I (BF759/4L) of 820 Squadron in flight operating from HMS Formidable during the North African landings, November 1942. (Imperial War Museum TR 296) |
 |
| Fairey Albacore stationed on Malta. Airman at left appears to be performing maintenance while the officer in the center appears to be conducting training with the aircraft's rear gunner. |
 |
| Another view of the Fairey Albacore stationed on Malta with the officer conducting training with the aircraft's rear gunner. |
 |
| Loading a torpedo onto a Fairey Albacore of the Fleet Air Arm stationed at Malta. |
 |
| Fairey Albacore Mk.I. |
 |
| Markings of Albacore N4389, 827 Naval Air Squadron, HMS Victorious, which was shot down in the raid on Kirkenes, July 1941. Salvaged, rebuilt and now on display in the Fleet Air Arm Museum. |
 |
| Albacore (N4389) at the Fleet Air Arm Museum. Taken on December 31, 2008. |


