|
| M3 Stuart light tanks during training at Fort Knox, Kentucky, 1942. |
The M3 Stuart, formally Light Tank M3, is an American light
tank of World War II. It was supplied to British and Commonwealth forces under
lend-lease prior to the entry of the U.S. into the war. Thereafter, it was used
by U.S. and Allied forces until the end of the war.
The name General Stuart or Stuart given by the British comes
from the American Civil War Confederate General J.E.B. Stuart and was used for
both the M3 and the derivative M5 Light Tank. In British service, it also had
the unofficial nickname of Honey after a tank driver remarked “She’s a honey.”
To the United States Army, the tanks were officially known only as “Light Tank
M3” and “Light Tank M5.”
The M3 Stuarts were the first American-crewed tanks in World
War II to engage the enemy in tank versus tank combat.
Observing events in Europe, American tank designers realized
that the Light Tank M2 was becoming obsolete and set about improving it. The
upgraded design, with thicker armor, modified suspension and new gun recoil
system was called “Light Tank M3.” Production of the vehicle started in March
1941 and continued until October 1943. Like its direct predecessor, the M2A4,
the M3 was initially armed with a 37mm M5 gun and five .30-06 Browning M1919A4
machine guns: coaxial with the gun, on top of the turret in an M20
anti-aircraft mount, in a ball mount in right bow, and in the right and left
hull sponsons. Later, the gun was replaced with the slightly longer M6, and the
sponson machine guns were removed.
Internally, the radial engine was at the rear and the
transmission to the driving sprockets at the front. The prop shaft connecting
the two ran through the middle of the fighting compartment. The radial engine
compounded the problem, having its crankshaft high off the hull bottom. When a
turret floor was introduced, the crew had less room. The rear idler sprocket
was moved to a trailing (ground contact) position.
To relieve the demand for the radial aero-engines used in
the M3, a new version was developed using twin Cadillac V-8 automobile engines
and twin Hydra-Matic transmissions operating through a transfer case. This
variation was quieter, cooler and roomier. Owing to its automatic transmission
it also simplified crew training. The new model (initially called M4 but
redesignated M5 to avoid confusion with the M4 Sherman) also featured a
redesigned hull with sloped glacis plate and driver’s hatches moved to the top.
Although the main criticism from the units using it was that the Stuarts lacked
firepower, the improved M5 series kept the same 37 mm gun. The M5 gradually
replaced the M3 in production from 1942 and, after the M7 project proved
unsatisfactory, was succeeded by the Light Tank M24 in 1944.
The British Army was the first to use the Light Tank M3 as
the “General Stuart” in combat. From mid-November 1941 to the end of the year,
about 170 Stuarts (in a total force of over 700 tanks) took part in Operation
Crusader during the North Africa Campaign, with poor results. Although the high
losses suffered by Stuart-equipped units during the operation had more to do
with the better tactics and training of the Afrika Korps than the apparent
superiority of German armored fighting vehicles used in the North African
campaign, the operation revealed that the M3 had several technical faults.
Mentioned in the British complaints were the 37 mm M5 gun and poor internal
layout. The two-man turret crew was a significant weakness, and some British
units tried to fight with three-man turret crews. The Stuart also had a limited
range, which was a severe problem in the highly mobile desert warfare as units
often outpaced their supplies and were stranded when they ran out of fuel. On
the positive side, crews liked its relatively high speed and mechanical
reliability. The high reliability distinguished the Stuart from cruiser tanks
of the period, in particular the Crusader, which comprised a large portion of
the British tank force in Africa up until 1942.
In the summer of 1942, the British usually kept Stuarts out
of tank-to-tank combat, using them primarily for reconnaissance. The turret was
removed from some examples to save weight and improve speed and range. These
became known as “Stuart Recce.” Some others were converted to armored personnel
carriers known as the “Stuart Kangaroo,” and some were converted command
vehicles and known as “Stuart Command.” M3s, M3A3s, and M5s continued in
British service until the end of the war, but British units had a smaller
proportion of these light tanks than U.S. units.
The other major Lend-Lease recipient of the M3, the Soviet
Union, was even less happy with the tank, considering it under-gunned,
under-armored, likely to catch fire, and too sensitive to fuel quality. The
M3’s radial aircraft engine required high-octane fuel, which complicated Soviet
logistics as most of their tanks used diesel or low-octane fuel. High fuel
consumption led to a poor range characteristic, especially sensitive for a reconnaissance
vehicle. Also, compared to Soviet tanks, the M3’s narrower tracks resulted in a
higher ground pressure, getting them more easily stuck in the spring and autumn
mud and winter snow conditions on the Eastern Front. In 1943, the Red Army
tried out the M5 and decided that the upgraded design was not much better than
the M3. Being less desperate than in 1941, the Soviets turned down an American
offer to supply the M5. M3s continued in Red Army service at least until 1944.
The Soviets appreciated the high reliability of American tanks.
The U.S. Army initially deployed 108 Stuart light tanks to
the Philippines in September 1941, equipping the U.S. Army’s 194th and 192nd
Tank Battalions. The first U.S. tank versus tank combat to occur in World War
II, began on 22 December 1941, when a platoon of five M3s led by Lieutenant Ben
R. Morin engaged the Imperial Japanese Army (IJA) 4th Tank Regiment’s Type 95
Ha-Go light tanks north of Damortis. Lt. Morin maneuvered his M3 off the road,
but took a direct hit while doing so, and his tank began to burn. The other
four M3s were also hit, but managed to leave the field under their own power.
Lt. Morin was wounded, and he and his crew were captured by the enemy. M3s of
the 194th and 192nd Tank Battalions continued to skirmish with the 4th Tank Regiment’s
tanks as they continued their retreat down the Bataan Peninsula, with the last
tank versus tank combat occurring on 7 April 1942.
Due to the naval nature of the Pacific campaign, steel for
warship production took precedence over tanks for the IJA, creating by default
an IJA light tank that performed admirably in the jungle terrain of the South
Pacific. By the same measure, although the U.S. was not hampered by industrial
restrictions, the U.S. M3 light tank proved to be an effective armored vehicle
for fighting in jungle environments. At least one was captured in the
Philippines.
With the IJA’s drive toward India within the South-East
Asian theatre of World War II, the United Kingdom hastily withdrew their 2nd
Royal Tank Regiment and 7th Hussars Stuart tank units (which also contained
some M2A4 light tanks) from North Africa, and deployed them against the
Japanese 14th Tank Regiment. By the time the Japanese had been stopped at
Imphal, only one British Stuart remained operational. When the U.S. entered the
war in 1941, it began to supply China with AFVs including the M3 Stuarts, and
later M4 Shermans and M18 Hellcats, which trickled in through Burma and formed
part of the several well-equipped, well-trained armies that the Chinese
Nationalists could deploy. These units were responsible for stopping numerous
Japanese attacks during the later phases of the war.
Although the U.S. light tanks had proven effective in jungle
warfare, by late 1943, U.S. Marine Corps tank battalions were transitioning
from their M3/M5 light tanks to M4 medium tanks. With the less common
supplement of their Type 97 Chi-Ha medium tanks, the IJA was left to do battle
against U.S. Marine M4 Sherman medium tanks, with armor that had been designed
and fielded in the 1930s.
When the U.S. Army joined the North African Campaign in late
1942, Stuart units still formed a large part of its armor strength. After the
disastrous Battle of Kasserine Pass, the U.S. quickly followed the British in
disbanding most of their light tank battalions and subordinating the Stuarts to
medium tank battalions performing the traditional cavalry missions of scouting
and screening. For the rest of the war, most U.S. tank battalions had three
companies of M4 Shermans and one company of M3s or M5/M5A1s.
In Europe, Allied light tanks had to be given cavalry and
infantry fire support roles since their main cannon armament could not compete
with heavier enemy armored fighting vehicles. However, the Stuart was still
effective in combat in the Pacific Theater, as Japanese tanks were both relatively
rare and were lighter in armor than even Allied light tanks. Japanese
infantrymen were not well equipped with anti-tank weapons, and as such had to
use close assault tactics. In this environment, the Stuart was only moderately
more vulnerable than medium tanks. In addition, the terrain and poor roads
common to the theater were unsuitable for the much heavier M4 medium tanks, and
so initially, for both sides, it was advantageous to deploy light armor.
Heavier M4s were eventually brought to overcome heavily entrenched positions,
though the Stuart continued to serve in a combat capacity until the end of the
war.
Though the Stuart was to be completely replaced by the newer
M24 Chaffee, the number of M3s/M5s produced was so great (over 25,000 including
the 75mm HMC M8) that the tank remained in service until the end of the war,
and well after. In addition to the U.S, UK and Soviet Union, who were the
primary users, it was also used by France, China (M3A3s and, immediately
post-war, M5A1s) and Josip Broz Tito’s Partisans in Yugoslavia (M3A3s and few
M3A1).
After the war, some countries chose to equip their armies
with cheap and reliable war surplus Stuarts. The Chinese Nationalist Army
having suffered great attrition as a result of the ensuing civil war, rebuilt
their armored forces by acquiring surplus vehicles left behind in the
Philippines by the U.S. forces, including 21 M5A1s to equip two tank companies.
They would have their finest hours during the Battle of Kuningtou in 1949, for
which the tanks came to be known as the “Bear of Kinmen.”
The M5 played a significant role in the First Kashmir War
(1947) between India and Pakistan, including the battle of Zoji-la pass fought
at an elevation of nearly 12,000 ft. The vehicle remained in service in several
South American countries at least until 1996.
M3A3s were used by British forces in Indonesia during the
Indonesian National Revolution, where they suffered heavy losses due to the
Stuart’s thin armor plating. They were used until 1946, when the British left.
The M3A3s were then passed on to the KNIL, which used them until the end of the
fighting before passing on the tanks to the Indonesian National Army. The tank
saw action during the DI/TII rebellions in Aceh and Java, RMS rebellions in
South Maluku, PRRI rebellions in Sumatra, Permesta rebellions in Northern
Sulawesi and the fighting against the 30 September movement.
During the 1960s and 1970s, the Portuguese Army also used
some in the war in Angola, where its all-terrain capability (compared to
wheeled vehicles) was greatly appreciated. In 1967, the Portuguese Army
deployed three M5A1 Light Tanks – nicknamed “Milocas,” “Licas,” and “Gina” by
their crews – in northern Angola, which served with the 1927th Cavalry
Battalion commanded by Cavalry Major João Mendes Paulo, stationed at
Nambuangongo. The vehicles were mostly employed for convoy escort and recovery
duties, and limited counterinsurgency operations against National Liberation
Front of Angola (FNLA) guerrillas, who dubbed them “Elefante Dundum.” “Milocas”
was destroyed by an accidental fire in 1969, while “Gina” and “Licas” were
withdrawn from active service in 1972, the former being sent to Luanda and the
latter ended up in 1973 as an airfield security pillbox in the Portuguese Air
Force’s Zala airfield. Period photographs show some modifications to the basic
design, namely the omission of the bow machine gun, re-installed on a pintle
mount in the roof of the turret, and a small searchlight fitted in front of the
commander’s cupola.
During the Football War, El Salvador invaded Honduras in an
all-out-war strike using the M3 Stuart as the main battle tank. The use of the
Stuart will prove success to El Salvador Army because of the rough terrain and
the agility the vehicles have. El Salvador captured 8 major cities with the
help of Stuarts.
The South African Armoured Corps continued to use M3A1s in a
reserve role until 1955. Some were refurbished locally in 1962 and remained in
service as late as 1964. The fleet was withdrawn in 1968, owing to parts
shortage.
The M3 Stuart is still on the active list in the Armed
Forces of Paraguay, with ten of the tanks being overhauled in 2014 to provide a
training capability.
Variants
U.S. Variants
M3 (British
designation “Stuart I”): 5,811 vehicles were produced. 1,285 M3s had
Guiberson diesel installed and were called “Stuart II” by British. Late
production M3s were fitted with turret developed for M3A1, though without
turret basket. These tanks were dubbed “Stuart Hybrid.”
Type: Light tank
Place of origin: United States
Produced: 1941–1944
Number built: 25,000
M3A1 (Stuart III): 4,621
were produced from May 1942 to February 1943. New turret with turret basket and
no cupola. Gun vertical stabilizer installed. Sponson machine guns were
removed. M3A1s with Guiberson diesel were called “Stuart IV” by British.
M3A3 (Stuart V): 3,427
produced. Put into production to integrate hull improvements brought by the M5
into the M3 series. Turret with rear overhang to house SCR-508 radio. Welded
hull with sloped armor, 20° in from the vertical, on front and sides.
Weight: 32,400 lb (14,700 kg)
Length: 14 ft 2.4 in (4.33 m)
Width: 8 ft 1.2 in (2.47 m)
Height: 7 ft 6 in (2.29 m)
Crew: 4 (Commander, gunner,
driver, co-driver)
Armor: 13–51 mm (0.51–2.01 in)
Main armament: 37 mm M6 in M44
mount, 174 rounds
Secondary armament: 3 × .30-06
Browning M1919A4 MG, 7,500 rounds
Engine: Continental W-670-9A, 7
cylinder air-cooled radial, 250 hp (190 kW)
Power/weight: 17.82 hp/ton
Suspension: Vertical volute spring
Operational range: 74 mi (119 km)
Speed:
36 mph (58 km/h) on road
18 mph (29 km/h) off-road
M5 (Stuart VI): 2,075
produced. Twin Cadillac engines. Redesigned hull similar to M3A3, but with
vertical sides and raised engine deck. Turret as for M3A1.
M5A1 (Stuart VI): 6,810
produced. M5 with the turret of the M3A3; this was the major variant in U.S.
units by 1943.
75mm Howitzer Motor
Carriage M8: 1,778 units produced. Based on M5 chassis. The gun was
replaced with the 75 mm M2/M3 howitzer in open turret and a trailer hook was
fitted so an ammunition trailer could be towed. Provided fire support to
cavalry reconnaissance squadrons.
75mm Howitzer Motor
Carriage M8A1: M8 HMC variant based on M5A1 chassis.
T18 75 mm Howitzer
Motor Carriage: Self-propelled gun based on M3 chassis. 75 mm M1A1 pack
howitzer was mounted in a boxy superstructure. The project started in September
1941 and was abandoned in April 1942. Only two were produced, 75 mm Howitzer
Motor Carriage M8 was chosen to be produced instead.
T82 Howitzer Motor
Carriage: Self-propelled 105 mm howitzer based on M5A1 chassis. Development
began in 1943. Two prototypes built and tested in August 1944 at Aberdeen
Proving Grounds. Project was discontinued on June 21, 1945.
T56 3in Gun Motor
Carriage: Self-propelled gun based on M3A3 chassis. The engine was moved to
the middle of the hull and a 3-inch gun was mounted in a superstructure in the
rear. The project started in September 1942 and was abandoned in February 1943.
T57 3in Gun Motor
Carriage: Variant of T56 with Continental engine of the Medium Tank M3.
Also dropped in February 1943.
T27 / T27E1 81 mm
Mortar Motor Carriage: M5A1 with turret replaced by superstructure in which
an 81 mm mortar was installed. Also carried .50 cal Browning M2HB machine gun.
The project was abandoned in April 1944 because of inadequate crew and storage
space.
T29 4.2in Mortar
Motor Carriage: Design similar to T27, with 4.2 inch (107 mm) mortar. Was
abandoned for the same reason.
T81 Chemical Mortar
Motor Carriage: M5A1-based 4.2 inch (107 mm) chemical mortar carrier.
M3 with Maxson
Turret: Anti-aircraft variant developed in 1942. Was armed with four .50
cal. machine guns in a turret developed by Maxson Corp. The project was
rejected because of the availability of the M16 MGMC.
40 mm Gun Motor
Carriage T65: Anti-aircraft vehicle based on lengthened M5A1. Was armed
with Bofors 40 mm gun. Was ordered into production, but on Light Tank M24
chassis, so became the M19 Gun Motor Carriage.
20 mm Multiple Gun
Motor Carriage T85: Anti-aircraft vehicle based on same chassis as T65
(M5A1). Was armed with quad Oerlikon 20 mm cannons.
M3/M5 Command Tank: M3/M5
with turret replaced by small superstructure with a .50 cal. machine gun.
T8 Reconnaissance Vehicle:
M5 with turret removed and mounting for .50 cal machine gun.
M3 with T2 Light Mine
Exploder: Developed in 1942, was rejected.
M3/M3A1 with Satan
Flame-gun: Ronson flamethrower installed instead of the main gun. 20 tanks
were converted for U.S. Marine Corps in 1943.
M5A1 with E5R1-M3
Flame Gun: Flame thrower was installed instead of the hull machine gun.
M3A1 with E5R2-M3
Flame-gun: Flame thrower was installed in place of hull machine gun.
M5 Dozer: M5 with
dozer blade. Turret was usually removed.
M5 with T39 Rocket
Launcher: T39 launcher with 20 7.2” rockets mounted on the top of the turret.
Never reached production.
M5A1 with E7-7 Flame
Gun: Flame thrower was installed instead of the main gun.
M5A1 with E9-9
Flame-throwing equipment: Prototype only.
M5A1 with E8
Flame-gun: Turret replaced by boxy superstructure with flame thrower in a
smaller turret. Prototype only.
UK Variants
Stuart Recce: Reconnaissance
vehicle based on turretless Stuart.
Stuart Command: Stuart
Kangaroo with extra radios.
Stuart artillery
tractor: Another turretless variant similar in appearance to the Recce and
Kangaroo. Used to tow the Ordnance QF 17 pounder. Not to be confused with the
U.S. M5 Tractor.
Brazilian Variants
In the 1970s, the Brazilian company Bernardini developed a
series of radical Stuart upgrades for the Brazilian Army.
X1A: Based on
M3A1, this design had new engine (280 hp (210 kW) Saab-Scania diesel), improved
suspension, new upper hull armor, fire controls and DEFA 90 mm gun in a new
turret. 80 vehicles were produced.
X1A1: An X1A with
improved suspension with three bogies (instead of two) each side and raised
idler. Didn’t reach production.
X1A2: Based on
the X1A1, this version retained almost nothing of the original Stuart as even
its hull was redesigned. The vehicle weighed 19 short tons (17 t), had crew of
3, was armed with 90 mm gun and powered by Saab-Scania 300 hp (220 kW) diesel.
30 vehicles were produced in 1979–1983.
Operators
Australia
Belgium
Brazil: 350
M3A3/A5
Canada: Stuart V
(M3A3) tanks were widely used in recce troop of armored regiments. In 2 Canadian
Armoured Brigade after the Normandy landings, the establishment for each
regiment was 49 Sherman tanks, both 75mm and 17pdr, and up to 9 Stuart tanks.
Chile
People’s Republic of
China: Captured from Chinese Civil War
Republic of China
Colombia
Cuba
Czechoslovakia
Dominican Republic
Ecuador
El Salvador
France
Haiti: Eight M3A1
and five M5A1
Hungary: Captured
at least 3 from the Soviets
India
Indonesia: M5A1
from Netherlands
Italy
Japan: Operated captured
vehicles, for example in the Philippines and at the Battle of Imphal.
Mexico
Netherlands
New Zealand
Nicaragua: Four
M3A1 still in service with the National Guard (Nicaragua) in 1979
Paraguay: 12
still in service; 5 are operational in 2.R.C. 2010
Philippines: Until
1959
Portugal: 70
vehicles in service with the Portuguese Army and other 20 with the Republican National
Guard from 1956 to 1972
South Africa
Southern Rhodesia
Turkey
United Kingdom
Uruguay
United States
Soviet Union
Venezuela
Yugoslavia
In the Media
The 1941 U.S. military propaganda short film The Tanks Are
Coming features the M3 and its manufacturing process.
In the 1945 Mexican film comedy “Un día con el diablo” (A
Day with the devil), several Mexican army M3s appear - one of them is driven by
the comic actor Mario Moreno “Cantinflas”
Modified Stuarts were used in the movie Attack! as German
tanks.
An M3 Stuart tank was the center piece of The Green Hornet
episode “Seek, Stalk, & Destroy” (airdate: January 6, 1967).
A “24k Gold” M3 Stuart tank was created from gold bullion
with plans stolen from the Hexagon (by The Penguin and Marsha Queen of
Diamonds) in Batman episode “Penguin’s Disastrous End” (airdate: February 2,
1967). It was stopped with the “Batzooka.”
Season 5 of the Twilight Zone TV series had an episode “The
7th Is Made Up of Phantoms” featuring an M3 Stuart tank and its crew going back
in time fighting the Battle of Little Big Horn.
“The Haunted Tank”
was a DC Comics feature that appeared in G.I. Combat starring an M3 Stuart
scout tank commanded by Lieutenant Jeb Stuart, a direct descendant and namesake
of the Civil War cavalry general J.E.B. Stuart. The tank was haunted by the
Confederate officer, who would appear to warn his kinsman of impending danger
or offer (usually cryptic) advice on how to handle a combat action. The
original series ran from 1961 to 1987.
A heavily modified M5A1 Stuart was
featured in the movie Tank Girl as the eponymous heroine’s tank.
 |
| Light Tank M3 Stuart cross section view. |
 |
| Light Tank M3 Stuart. The turret ring rested on a trio of turret support rollers spaced 120° apart. The turret rotating mechanism was bolted to the turret, and the pinion of this mechanism was in constant mesh with the gear of the circular track. Lateral and vertical movement of the turret was prevented by bearings and rollers which contacted the side and upper surface, respectively, of the turret ring. The bearings and rollers were installed in eight brackets which were bolted to the hull at unevenly spaced intervals. |
 |
| Details of the left sponson machine gun mount in a M3 Light Tank. |
 |
| Light Tank M3 Stuart. The right sponson machine gun is shown here. The sponson guns were fired by the driver via switches near the top of his steering levers, with the left and right levers controlling the left and right sponson machine guns, respectively. |
 |
| The driver’s compartment and controls in a M3 Light Tank. |
 |
| Light Tank M3 Stuart. The driver's instruments were spread across two panels. The front panel is detailed here. |
 |
| Light Tank M3 Stuart. The second instrument panel was to the driver's right. |
 |
| Light Tank M3 Stuart. The combination gun mount M22 is seen here from the lower left. The semi-circular padded gunner's shoulder rest is at the upper right of the image; the gun mount could be disconnected from the elevation and traverse gears and the gunner could use his body via the shoulder rest to control the guns. Note that there is a traverse control handwheel in addition to a turret rotating handwheel. The traverse control was used to traverse the gun mount up to 10° in either direction independently of the turret. The commander would rotate the turret onto a rough bearing using the turret rotating mechanism, from which the gunner would then take over using his controls. The coaxial machine gun was fired by a button in the middle of the traverse control. |
 |
| Light Tank M3 Stuart. The opposite side of the gun mount is the subject of this picture. |
 |
| Light Tank M3 Stuart. The bulkhead at the rear of the fighting compartment is shown here. The driver's transmission shift lever can be seen to the lower left. |
 |
| Light Tank M3 Stuart. The Continental's accessories are labeled in this image. The engine was 42.375" (107.63cm) in diameter and weighed 1,107lb (502.1kg) with accessories. |
 |
| Light Tank M3 Stuart. This is a top-down view into the engine compartment with the engine removed. |
 |
| Light Tank M3 Stuart. An exploded view of the vehicle's clutch is provided here. A. Inner hub bearing. B. Flywheel. C. Unlined plate. D. Lined plate. E. Unlined plate. F. Lined plate. G. Unlined plate. H. Spindle. J. Spindle bearing. K. Spring housing cap screw. L. Spring housing. M. Driven hub. N. Washer. P. Nut. |
 |
| Light Tank M3 Stuart. Details of the front suspension bogie are provided in this image. |
 |
| Light Tank M3 Stuart. The suspension bogies were trunnioned on axles bolted to the hull sides and floor. The bushings that acted as the suspension's bearing surfaces were made of hardened steel. |
 |
| Light Tank M3 Stuart. The right-side final drive has been disassembled in this picture. |
 |
| Light Tank M3 Stuart. The transmission is shown here in the process of being removed. Using arm personnel were permitted to remove and reinstall an engine or transmission, but their replacement with a different engine or transmission required authorization from ordnance personnel. |
 |
| Light Tank M3 Stuart. The complete transmission gearing is shown here. First and reverse were sliding gears, while second through fifth gears were synchromesh. |
 |
| Light Tank M3 Stuart. An exploded view of the steering differential is provided in this image. |
 |
| Light Tank M3 Stuart. A vertical 28gal (110L) fuel tank was installed on rubber spacers in a wooden-lined pocket at each side of the forward engine compartment. In the Continental-engine tanks, as illustrated above, the tanks were connected so that either or both could be used. Fuel was drawn from the tank to the carburetor via a fuel pump, and excess was returned to the top of the right fuel tank. The priming pump on the instrument panel was also fed from the right tank. |
 |
| Light Tank M3 Stuart. The compartment for the 12-volt storage battery was in the right rear sponson and was only accessible from the outside. Radio take-off terminals were supplied for 12, 8, and 2 volt requirements. |
 |
| Light Tank M3 Stuart. A protectoscope in one of the drivers' doors is detailed in this picture. A. Headless set screw. B. Window No. 1. C. Ledge. D. Brass countersunk screw. E. Fastening pins. F. Headrest. G. Door. |
 |
| Light Tank M3 Stuart. A turret pistol port protectoscope is seen here from the tank's interior. To open the pistol port door, the lever locking the spring catch was moved down, then raised until the knurled knob dropped into the notch in the lever. The cover bolt was unlatched, then the lever was pulled down until the knurled knob dropped into place again, locking the door open. |
 |
| Light Tank M3 Stuart. The 37mm gun M6 is shown here from each side. It weighed 185lb (83.9kg) total, with the tube itself weighing 138lb (62.6kg). The vertical sliding breechblock weighed 7.5lb (3.4kg). |
 |
| Light Tank M3 Stuart. The different assemblies that made up the gyrostabilizer are labeled. |
 |
| Light Tank M3 Stuart. The lower end of the gyrostabilizer cylinder and flexible shaft bracket are shown here. A. Firing pin cable. B. To upper cylinder connection. C. Set screw and lock nut. D. Elbow. E. Cylinder. F. Clamp screw. G. Flexible shaft. H. Flexible shaft bracket. J. To lower pump connection "B." K. Oil return line. L. Collar. M. To upper pump connection. |
 |
| Light Tank M3 Stuart. A stabilizer-equipped gun mount M23 is shown here from the right. |
 |
| Light Tank M3 Stuart. The opposite side of the gun mount is the subject of this picture. |
 |
| Light Tank M3 Stuart. The opposite side of the gun mount is the subject of this picture. |
 |
| Light Tank M3(diesel) Stuart. A closer look at the accessory case is given in this image. |
 |
| Light Tank M3(diesel) Stuart. The propeller shaft housing has been removed in this picture. |
 |
| Light Tank M3(diesel) Stuart. The propeller shaft housing has been removed in this picture. |
 |
|
Light Tank M3(diesel) Stuart. Internal stowage is detailed
in these sketches. 1. Bow gunner's seat. 2. Bracket for 2-45 cal. [sic] drums. 3. Protectoscope box. 4.
Power tunnel. 5. Canvas bucket. 6. Driver's seat. 7.
Door handle bracket. 8. Diesel engine crank
bracket. 9. Steering levers. 10. Flashlight clip. 11. Compass.
12. 37 mm gun. 13. Bow
gun. 14. Bracket for 2 spare barrels. 15. Water can. 16. Fire
extinguisher, fixed. 17. Oil cooler. 18. 37mm [sic] ammunition box. 19. Power tunnel. 20. Tool box. 21. Portable fire extinguisher. 22. Ration box, excess rations in right rear equipment
box. 23. First aid box bracket. 24. Oil can bracket. 25.
45 cal. [sic] Thompson sub machine gun bracket. 26.
3-30cal. [sic] ammunition boxes. 27. Cal. .30
ammunition boxes. 28. Canteen racks-2. 29. Handle for jettison tanks. 30. Signal flags behind 37 mm ammunition box. 31. Box for 50 rounds 45 cal. [sic] drums. 32. Binocular box. 33.
Pistol port. 34. Radio. 35.
Hand grenade box.
|
 |
| Light Tank M3A1 Stuart. Stowage and the upper surfaces are visible in this picture. |
 |
| Light Tank M3A1 Stuart. The internal arrangement of the M3A1 can be contrasted with the earlier tank above. Note the turret basket and the power traverse mechanism under the turret seats. |
 |
| Light Tank M3A1 Stuart. Ammunition stowage is diagrammed in this sketch. |
 |
| Light Tank M3A1 Stuart. The turret interior layout is diagrammed here. |
 |
| Light Tank M3A1 Stuart. The Logansport turret traverse mechanism is diagrammed here. |
 |
| Light Tank M3A1 Stuart. A competing turret traverse mechanism was manufactured by Oilgear. |
 |
| Light Tank M3A1 Stuart. This picture show details of the combination gun mount M23. |
 |
| Light Tank M3A1 Stuart. Components of the stabilizer system mounted around the gun mount are labeled in this image. |
 |
| Light Tank M3A1 Stuart. The Continental engine's fuel system is diagrammed in this sketch. The tanks were interconnected, but the right tank needed to be used until about 75% empty, as if both tanks were used the excess fuel return line could potentially overfill the right tank. |
 |
| Light Tank M3A1 Stuart. Transmission removal involved removing the front sloping armor after unfastening the slotted-head cap screws, hex-head bolts, and hex-head nuts that secured the plate to the hull. |
 |
| Light Tank M3A1 Stuart. When rubber tracks were fitted, the trailing idler originally was an all-metal wheel, while when steel tracks were mounted the idler was to have a rubber facing. By late 1943, however, the steel wheels were being replaced by rubber-faced wheels no matter what tracks were mounted. |
 |
| Light Tank M3A3 Stuart. The gun shield is shown removed from the turret in the left image, and the turret front without the gun shield is on the right. The shield attached to the trunnion yokes and moved as part of the gun. |
 |
| Light Tank M3A3 Stuart. Transmission removal now required the disassembly of more armor pieces, including the upper section front armor plate, two triangular sections of side armor, and the lower front armor plate. |
 |
| Light Tank M3A3 Stuart. A cross-sectional view of the M3A3 is shown here. Due to the propeller shaft, the turret traverse mechanism was mounted to the floor of the turret basket. |
 |
| M3A3 Light Tank cross section. |
 |
| Light Tank M3A3 Stuart. Ammunition stowage is detailed in this sketch. The thirty 37mm rounds in the right sponson were omitted in command tanks. |
 |
| Light Tank M3A3 Stuart. Seen from the opposite angle compared to the image above, the opening to the engine air intake for portable fire extinguisher discharge is shown ready for use. |
 |
| Light Tank M3A3 Stuart. The vehicle is facing to the left in this image. The fuel tanks were mounted in wooden-lined pockets on wooden spacers, and were attached to the hull via a nut on the filter. The under-armor air cleaners are also shown here. |
 |
| Light Tank M3A3 Stuart. The new turret is sectioned in this drawing, showing the utility of the new bustle in allowing the radio to be mounted. |
 |
| Light Tank M3A3 Stuart. The turret is shown in the process of being removed, revealing the turret basket and crew positions. |
 |
| Light Tank M3A3 Stuart. A closer look at the hydraulic and electrical equipment in the turret basket is provided here. |
 |
| M5 Light Tank. |
 |
| M5 Light Tank turret interior. |
 |
| M5 Light Tank front-mounted transfer unit. This assembly was connected by the universal joints at the bottom of the image to the propeller shafts that came from the transmissions and combined the two power flows into one. It also provided a two-speed hydraulic-controlled gear reduction. |
 |
| M3A1 light tank of the 7th Armored Division on exercise in the U.S. in 1942. Note the lack of turret cupola on the power-traversed cast turret. This particular tank has a welded hull but retains the side-mounted machine guns usually deleted on this model. |
 |
| The first Light Tank M3 produced. The sponson machine guns are mounted in this tank, and the driver’s viewing doors are open. There are windscreens with integral wipers fitted in front of the drivers; these would not be used in a combat area. |
 |
| M3 Light Tank. |
 |
| M3 Light Tank with a seven-sided welded turret and a riveted hull. |
 |
| M3 Light Tank. |
 |
| M3 Light Tank. |
 |
| British Stuart I, who developed the welded turret. |
 |
| Stuart I Light Tank with welded turret and modification with sand skirts for the tracks. |
 |
| Stuart I Light Tank with welded turret, 5th Canadian Armoured Regiment, 5th Canadian Armoured Division, England, 1943. |
 |
| Another view of Stuart I Light Tank with welded turret, 5th Canadian Armoured Regiment, 5th Canadian Armoured Division, England, 1943. |
 |
| M3 Light Tanks with welded turret and M3 Medium Tank in Russian service, Stalingrad, November 1942. Note soldier with PPSh-41 submachine gun. |
 |
| Soviet M3 Light Tank (6221) with welded turret. |
 |
| M3 Light Tank with welded hull. |
 |
| M3 Light Tank with rounded homogeneous welded turret. |
 |
| M3 Light Tank purchased in July 1942, with war bonds, by the community of Banning, California. |
 |
| M3 Light Tank. |
 |
| M3 Light Tank. |
 |
| M3 Light Tank. |
 |
| M3 Light Tank, Nimitz Museum, circa 1970s. |
 |
| M3 Light Tank on display at the Fort Polk Military Museum outdoor park, 1983. |
 |
| British Stuart I Light Tank (T27983) being inspected by a British and American delegation. |
 |
| Stuart Light Tank, U.S. Army Ordnance Museum, Aberdeen Proving Ground, Maryland, 2007. |
 |
| Stuart Light Tank, U.S. Army Ordnance Museum, Aberdeen Proving Ground, Maryland, 2007. |
 |
| M3E2 Light Tank. |
 |
| First production model M3A1 Light Tank. |
 |
| M3A1 Light Tank with a diesel engine, Aberdeen Proving Ground, Maryland. |
 |
| M3A1 Light Tank. |
 |
| M3A1 Light Tank (3024903), Norfolk, Virginia, 3 August 1943. |
 |
| British Stuart (M3A1) Light Tank (T156766) with deep water wading equipment. The smaller stack behind the turret is for engine cooling and the larger stack at the hull rear is for exhaust. |
 |
| M3A3 Light Tank, Aberdeen Proving Ground, Maryland. |
 |
| M3A3 Light Tank. |
 |
| M3A1 Light Tank in Yad la-Shiryon Museum, Israel, 2005. |
 |
| M3A1 Light Tank in Yad la-Shiryon Museum, Israel. 2005. |
 |
| M3A1 Light Tank in Yad la-Shiryon Museum, Israel, 2005. |
 |
| M3A1 Light Tank in Yad la-Shiryon Museum, Israel, 2005. |
 |
| M3A3 Light Tank. |
 |
| M3A3 Light Tank. |
 |
| British Stuart V (M3A3) Light Tank. |
 |
| British Stuart V Light Tank (T213745) with wading equipment. |
 |
| M3A3 Light Tank, Belgrade Military Museum, Serbia. |
 |
| Two jeeps, joined by a Tandem Hitch, have the power to pull an M3 Light Tank, circa 1944. |
 |
| Light Tank M3 Stuart. |
 |
| Light Tank M3 Stuart. |
 |
| Light Tank M3 Stuart. |
 |
| Light Tank M3 Stuart. |
 |
| Light Tank M3 Stuart. Parts of the antiaircraft machine gun mount are labeled here. The elevation lock was located on the machine gun cradle, while the traverse lock was inside the cupola itself. |
 |
| Light Tank M3 Stuart. The assistant driver's 3.5" (8.9cm) machine gun mount is illustrated in this picture. |
 |
| Light Tank M3 Stuart. The flywheel end of the Continental W-670-9A was considered the front, and left and right were determined by looking at the engine from the rear. |
 |
| Light Tank M3 Stuart. The rear of the engine is shown here, without the exhaust manifolds and piping mounted |
 |
| Light Tank M3 Stuart. Seen again from the rear with accessories present, the engine's bore and stroke were 5.125" and 4.625" (13.02cm and 11.75cm), respectively, for a displacement of 667.86in³ (10.944L). |
 |
| Light Tank M3 Stuart. The master rod and one articulated rod are shown here with their bushings. The master rod received the knuckle pins of the six articulated rods, and the entire assembly was installed onto the crankshaft journal. 1. Master rod. 2. Master rod pin bushing. 3. Articulated rod. 4. Articulating rod piston pin bushing. 5. Knuckle pin bushing. 6. Crankshaft journal bearing. 7. Knuckle pin circlip. 8. Knuckle pin. 9. Woodruff key. |
 |
| Light Tank M3 Stuart. The differential case has been opened, revealing the gearing and steering brakes. |
 |
| Light Tank M3 Stuart. The controlled differential is further illustrated in this picture. When moving straight ahead, the entire assembly driven by the bevel pinion rotated as one. The differential pinions did not rotate in their bearings, and the main drive shaft gears turned at equal speeds. The steering drum gears and brake drums turned as one with the entire differential. When making a right-hand turn, the right steering lever was pulled back, contracting the brake band and stopping the right brake drum (10). The right-hand external (4) and internal (2) pinions with their shafts in their bearings would then rotate with the crown wheel (7). This would cause the left-hand pinions (1, 3) to turn in opposite directions. The right-hand external pinions (4) would then be rotating around the stationary brake drum gear (6) and turning the same direction, which would make the right main drive shaft gear (8) and shaft turn at a slower speed. The left differential pinions (1) would then be rotating in the opposite direction to the crown wheel (7) with the entire assembly turning in the same direction as before so that the left main drive shaft gear (9) and shaft rotate faster than the crown wheel since the right main shaft gear (8) and shaft have been slowed. Hence, when the right hand brake drum was stopped, the right main drive shaft spun at a slower rate while the speed of the left was increased. |
 |
| Light Tank M3 Stuart. As opposed to earlier machines, this tank features protectoscopes in the turret pistol ports and the drivers' doors. Protected peepholes for the drivers remained inboard and below the protectoscopes. No peepholes are present in the commander's cupola. |
 |
| Light Tank M3 Stuart. The protectoscopes in the drivers' doors are cross-sectioned here. A recess in the deflector behind mirror #2 prevented bullets or fragments from ricocheting into the lower mirrors and windows or into the user's eyes. |
 |
| Light Tank M3 Stuart. The gyrostabilizer components are installed; the breech of the 37mm gun can be seen in the lower left quadrant of the image. A. Worm bearing adjustment. B. Grease fittings. C. Piston rod pivot pin. D. Shielded conduit. E. Multi-prong connector. F. Gyro control mounting bolts. G. Gyro control unit. H. Piston cylinder assembly. J. Set screws. K. Gear cover plate. L. Mounting bracket assembly. |
 |
| Light Tank M3(diesel) Stuart. The Guiberson T-1020-4 engine is shown here. It displaced 1,021in³ (16.73L). |
 |
| Light Tank M3(diesel) Stuart. The rear of the Guiberson illustrated here, including the exhaust manifolds. |
 |
| Light Tank M3(diesel) Stuart. Both the gasoline and diesel engines were required to be turned over by hand before starting. Late Guiberson-engined tanks a hand cranking ratchet on the propeller shaft. A. Propeller shaft turning wrench. B. Propeller shaft ratchet. C. Propeller shaft housing. D. Hand cranking aperture cover |
 |
| Light Tank M3(diesel) Stuart. The Guiberson was equipped with a starter that spun the engine by gas pressure generated from the firing of a cartridge. The starter breech assembly, located in the driver's compartment, is shown here in the open position. The cartridge was given three attempts to fire, and if all failed it was left in the breech for at least five minutes before removal. The breech and starter assemblies were to be replaced after 100 hours of operation. |
 |
| Light Tank M3A1 Stuart. In contrast, this later-production machine has a welded hull. |
 |
| Light Tank M3A1 Stuart. The short air intake tubes indicate this is a gasoline-fueled tank. |
 |
| Light Tank M3A1 Stuart. The crowded nature of the turret basket can be seen. The gearbox shifter lever activated either the manual or hydraulic traverse systems: when pushed towards the turret wall, manual traverse was selected, and when pushed away from the turret wall, the hydraulic system was selected. |
 |
| Light Tank M3A1 Stuart. The gunner's controls are shown here. The turret traversing control handle was turned clockwise to traverse to the right, and vice-versa. The safety trigger on the handle needed to be squeezed to enable the firing of the guns, either electrically via the triggers on the handle or manually via a trigger on the elevation wheel. |
 |
| Light Tank M3A1 Stuart. The lower portion of the gunner's position is shown here. |
 |
| Light Tank M3A1 Stuart. The stabilizer assemblies on the gun mount are detailed here. |
 |
| Light Tank M3A1 Stuart. This is the interior portion of a turret pistol port. |
 |
| Light Tank M3A1 Stuart. The principle of the protectoscope found in the turret pistol ports is drawn here. A pocket was designed to catch any incoming fire or fragments, protecting the eyes of the observer. Both the prism and window could be replaced without the use of tools. |
 |
|
Light Tank M3A1 Stuart. The
front of the driver's compartment is shown here. A. Transmission oil
pressure gage. B. Engine hour meter. C. Oil dilution switch. D. Starting
switch. E. Oil dilution chart. F. Booster switch. G. Hand
throttle. H. Engine oil pressure gage. J. Compass.
K. Brake adjusting aperture plug. L. Tachometer.
M. Engine oil temperature gage. N. Ammeter.
P. Voltmeter. Q. Siren button. R. Clutch
pedal. S. Steering levers. T. Footrest. U. Foot
throttle. V. Light switch. W. Gearshift lever. X. Headlight
dimmer switch. Y. Priming pump. The oil dilution switch operated a valve
below the engine compartment door sill that allowed gasoline from the fuel pump
to mix with the engine oil inlet pipe connection at the bottom of the oil tank.
This eased starting in colder temperatures. The booster switch activated a booster
coil wired through the right magneto that provided a "hot" ignition
spark when the engine was started. However this only applied if scintilla
magnetos were installed; if Bosch magnetos were present the booster coil was
not connected.
|
 |
| Light Tank M3A1 Stuart. The rear of the Continental engine is shown in this image. |
 |
| Light Tank M3A1 Stuart. The auxiliary engine was a single-cylinder, 4-cycle, air-cooled, gasoline unit that operated a 6-pole, 12-volt, 750-watt DC generator. |
 |
| Light Tank M3A1 Stuart. This exploded view shows parts of a bogie assembly. |
 |
| Light Tank M3A3 Stuart. The entirely new hull design of the M3A3 Stuart can be discerned here. The drivers were provided with direct vision ports in the hull front, and these were closed with the plugs as seen. The frames in front of the driver are for mounting the foul weather driving hood, and a ventilator is positioned between the drivers. The gunner's telescope was mounted higher in the gun mount M44 versus the earlier gun mount M23. |
 |
| Light Tank M3A3 Stuart. The drivers' and turret doors are open on this machine. Although the assistant driver now had his own hatch, the drivers' doors could foul on the 37mm gun if the turret was traversed to an unlucky angle in an emergency. |
 |
| Light Tank M3A3 Stuart. Details found on the front of the tank are labeled here. |
 |
| Light Tank M3A3 Stuart. The flat rear deck helps to differentiate it from the M5 Stuart, and the new turret features the radio bustle which was later incorporated into the turret of the M5A1. Track grousers are stored on the turret, and an antenna mount is present on the turret rear. Sandshields and a rear stowage box are mounted on this tank. |
 |
| Light Tank M3A3 Stuart. This image shows rear stowage. |
 |
| Light Tank M3A3 Stuart. The tank is seen here from above. |
 |
| Light Tank M3A3 Stuart. This is a schematic of the fuel system, showing the two additional horizontal sponson fuel tanks compared to earlier generations. The valving allowed fuel to be consumed from a single tank or from two tanks, one on each side. |
 |
| Light Tank M3A3 Stuart. The driver's instruments were now all located in a single panel to his front, which was also in view of the assistant driver. |
 |
| Light Tank M3A3 Stuart. A close-up of the instrument panel is provided in this picture. |
 |
| Light Tank M3A3 Stuart. In the M3A3, the battery compartment was moved from the right sponson location of earlier tanks to behind the driver's seat. Battery access was only possible via the driving compartment. |
 |
| Light Tank M3A3 Stuart. The assistant driver had neither driving controls nor a sight for his machine gun, which was aimed via tracers and impacts. |
 |
| Light Tank M3A3 Stuart. The hydrospring recoil system of the gun mount M44 is diagrammed in action. When fired, the force exerted on the breechblock by the propellant gases drove the gun to the rear by about 8" (20cm). The piston attached to the gun slowed the rearward motion via the resistance of the recoil oil as the oil flowed through holes opened by pressure exerted on the piston valve and also into the hollow portion of the piston rod that was uncovered as the rod moved away from the tapered counterrecoil buffer. The counterrecoil spring helped arrest the rearward motion and then return the gun to battery. |
 |
| Light Tank M3A3 Stuart. The spotlight is shown here mounted on its operating handle. It could also be removed and attached to a pistol grip with an integral 10-foot (3m) extension cord. The pistol grip had a signaling trigger-type switch so the commander could use the lamp as a signal light. |
 |
| M3 Light Tank’s rounded homogeneous turret. |
 |
| M3 Light Tank’s pistol port and protectoscope. |
 |
| M44 Gun Mount in M3 Light Tank. |
 |
| M3 Light Tanks on assembly line. |
 |
| August 1941. U.S. tank production. Assembling and attaching the turrets to Stuart M3 light combat tanks. |
 |
| M3 Light Tanks sans weapons ready for testing at factory. |
 |
| M3 Light Tank undergoing testing at factory. |
 |
| M3 Light Tank, Aberdeen Proving Grounds, Maryland. |
 |
| M3 Light Tank. |
 |
| Crew of same M3 Light Tank as above, with all of their weapons, equipment and personal belongings. |
 |
| M3 Light Tanks on maneuvers. |
 |
| 1st Armored Division M3 Light Tanks (early model) ford Otter Creek at Fort Knox, Kentucky, 1941. This maneuver was filmed for the short recruitment movie “The Tanks Are Coming” released in 1941. The movie was remade as a World War II feature drama and re-released in October 1951. |
 |
| M3 Light Tanks, 1st Armored Division, on flat cars en route to Rock Hill, South Carolina, from Fort Knox, Kentucky, to take part in First Army maneuvers, 31 October 1941. |
 |
| M3 Light Tank, Company C, 81st Reconnaissance Battalion, advancing through woods, First Army maneuvers, 18 November 1941. |
 |
| M3 Light Tank being offloaded onto an LCM. |
 |
| M3 Light Tank moves off landing craft during training. |
 |
| M3 Light Tank unloaded from a landing craft during joint Army-Marine Corps amphibious exercises, New River, North Carolina, August 1941. |
 |
| M3 Light Tanks leaving an LST to go ashore, 11 March 1943. |
 |
| M3 Light Tank. |
 |
| M3 Light Tank in training at Fort Knox, Kentucky, June 1942. |
 |
| M3 Light Tank used at Fort Knox, Kentucky, for training the armored forces. June 1942. |
 |
| M3 Light Tank, Fort Knox, Kentucky, June 1942. |
 |
| Another view of M3 Light Tank in training at Fort Knox, Kentucky, June 1942. |
 |
| M3 Light Tanks, Fort Benning, Georgia, 1942. |
 |
| M3 Light Tank during training. |
 |
| M3 Light Tank exits smokescreen, Camp Funston, 1942. |
 |
| M3 Light Tank during war games in Tennessee. |
 |
| M3 Light Tank being camouflaged by crew with netting and foliage, 1942. |
 |
| M3 Light Tanks during desert maneuvers in southwest U.S., as Douglas A-20 Havoc light bombers fly close air support. |
 |
| M3 Light Tanks. |
 |
| M3 Light Tank, 2nd Armored Division. |
 |
| Marine signalman atop a M3 Light Tank during an exercise in the United States, 1942. |
 |
| In this still image from the 1942 motion picture “To the Shores of Tripoli,” an M3 Light Tank of Company B, 2nd Tank Battalion, negotiates the driving course at Camp Elliott. None of the machine guns are mounted in this tank. |
 |
| In this still image from the 1942 motion picture “To the Shores of Tripoli,” the same tank as in the above photo negotiates the driving course at Camp Elliott. Most Marine Corps vehicles were painted forest green, which is clearly evident in these two photos. |
 |
| Marine Private Howard Brown (left), of Jackson, Mississippi, and Arthur Williams, Atlantic City, New Jersey, during M3 Light Tank training at Camp Lejeune, North Carolina, where African-Americans took Marine Corps basic training at the time. Circa April 1943. |
 |
| Another view of the same M3 Light Tank as in the previous photo. |
 |
| M3 Light Tank (3023874), 71st Infantry Division. |
 |
| M3 Light Tanks, Toole, Utah, depot, 1942. Jeep and truck in background. |
 |
| Blue-sealing of turret of M3 light tank prior to overseas shipment, Newport News, Virginia, 2nd Armored Division, 13 October 1942. |
 |
| Blue-sealing port on tank prior to overseas shipment, Newport News, Virginia, 12 October 1942. |
 |
| Greasing port on tank to prevent damage during shipment, 2nd Armored Division, Newport News, Virginia, 13 October 1942. |
 |
| Greasing of light on tank prior to shipment, 2nd Armored Division, Newport News, Virginia, 13 October 1942. |
 |
| M3 light tanks with deep wading equipment, 756th Tank Battalion, AP-71 in background, Newport News, Virginia, 20 October 1942. |
 |
| M3 Light Tanks with deep wading equipment, 756th Tank Battalion, AP-71 in background, Newport News, Virginia, 20 October 1942. |
 |
| Three soldiers of 756th Tank Battalion calmly waiting their departure for North Africa, Newport News, Virginia, 20 October 1942. M3 light tanks with deep wading equipment in background. |
 |
| 2nd Lt. Edwin B. Olson, with M3 Light Tanks with deep wading equipment, 756th Tank Battalion, 3rd Infantry Division, Newport News, Virginia, 20 October 1942. |
 |
| M4A1 Medium Tank awaiting loading while an M3A3 Light Tank is lifted in the air, Hampton Roads Port of Embarkation, Newport News, Virginia, 28 February 1943. |
 |
| SS Matt Ranson (HR-118), stowing M3 light tank in aft hold, Newport News, Virginia, 28 February 1943. |
 |
| M3A3 Light Tanks awaiting shipment to destination code BLOT, Pier 2, Hampton Roads Port of Embarkation, Newport News, Virginia, 27 February 1943. |
 |
| M3 Light Tank being loaded onto a railroad car in the Middle East en route to Russia, 1943. |
 |
| 26th Cavalry passes M3 light tank, Philippines, 1941. |
 |
| M3 Light Tank being inspected by Japanese soldiers, Luzon. |
 |
| Another view of the M3 Light Tank being inspected by Japanese soldiers, Luzon. |
 |
| Captured M3 Light Tank with two Japanese soldiers, probably with the Japanese 8th Independent Anti-tank Gun Company. This photo taken 23 January 1942 in the Manila area. This anti-tank company test fired their two types of anti-tank guns (Type 94 and Type Ra 37mm) at a different tank which was also left near Manila. Japanese 37mm anti-tank guns were accurate but were weak in armor piercing. |
 |
| Four ex-American M3 Light Tanks, 3rd Company, 7th Tank Regiment. Other tanks in the distance are Type 97 Improved Medium Tanks Shinhoto Chi-Ha. 3 June 1942. The symbol on the turrets of the second and third M3s are Umebachi (Ume blossom), a traditional coat of the Imperial Japanese Army. The ume it is Japanese plum. This sign is similar to the Ohka symbol, cherry blossom, so they are easily confused. The racks on the rear of the hull of the M3s were added by the Japanese and may have been to carry fuel containers. |
 |
| Still from the 1943 Japanese propaganda movie “Dawn of Freedom” showing a ex-American M3 Light Tank used in the film. |
 |
| Ex-American M3 Light Tank recaptured by the cavalrymen of I Company, 12th Cavalry Regiment, 1st Cavalry Brigade, in front of the Manila Hotel on 21 February 1945. Notice the 37mm gun and machine guns are missing. After abandoning vehicles the Japanese often removed all the weapons. |
 |
| M3 Light Tank being unloaded in an Australian port. |
 |
| Eastern Australia, 3 September 1943. U.S. Army maneuvers. Crews of American M5A1 Light Tanks during a spell in large scale maneuvers in eastern Australia. |
 |
| Eastern Australia, 3 September 1943. U.S. Army maneuvers. An American M5A1 Light Tank used in large scale maneuvers in eastern Australia. |
 |
| Marines of the 7th Defense Battalion, one of the “RAINBOW Five,” give their new M3 Light Tank a trial run at Tutuila, American Samoa, in the summer of 1942. |
 |
| M3 Light Tank of Company B, 2nd Tank Battalion, USMC, offloading at Tutuila, Pago Pago, American Samoa, January 1942. |
 |
| Australian Company Sergeant Major McCominski and Private M. Daniels wait as the accompanying Stuart Light Tank attacks a Japanese pillbox, Giropa Point, near Buna, New Guinea, late December 1942. |
 |
| Stuart Light Tank manned by an Australian crew smashed through Japanese pillboxes in the final assault on Buna. This picture, taken during the actual fighting, shows an infantry commander jumping on the tank to warn the crew of a pillbox at the right, while the tank blasts away at another ahead. |
 |
| Australian Stuart Light Tank, C Squadron, 2/6th Australian Armoured Regiment, pulling a B Squadron Stuart from a bog. |
 |
| M3 Light Tanks, 9th Marine Defense Battalion, near the base of Bibilo Hill, Munda, New Georgia, August 1943. |
 |
| After three days of fighting on the front lines on Munda, the crew of a Marine M3 Light Tank take a rest, during which their machine guns are overhauled. This platoon wiped out 30 Japanese pill boxes. Left to right are: Pfc. Arnold McKenzie, Los Angeles, Calif.; Joseph Lodico, Sharon, Mass.; Pvt. Noel M. Billups, Columbus Ohio; and Staff Sgt. Douglas Ayres, Los Angeles. 11 September 1943. |
 |
| 165th Infantry Regiment M3A1 Light Tanks on Butaritari Island, Makin Atoll, Gilbert Islands, on D-Day, 20 November 1943. Tank in foreground had bogged down in a water-filled bomb crater and is about to be pulled out by the M3 Light Tank behind it. |
 |
| USMC M3A1 Light Tank, Company C, 2nd Tank Battalion, south of Beach Red 2, Betio Island, November 1943. |
 |
| The crew of an M3A1 Light Tank, “Death-Hell and Destruction,” of the 3rd Tank Battalion poses with their vehicle and small arms on Bougainville, late 1943. Every tanker was armed with an M1911A1 pistol. Additionally, each tank was assigned a Thompson submachine gun for close-in defense. |
 |
| Marines sitting atop a M3 Light Tank, Cape Gloucester, New Britain, Bismarck Archipelago, late December 1943. |
 |
| The crew of Diamond 1, 3rd Platoon, Able Company, 3rd Tank Battalion, with their M3A1 Light Tank, in the field on Guadalcanal, 1944, prior to the campaign for Guam. |
 |
| Men of the 7th Light Cavalry, 23rd Indian Division, clambering on their Stuart III Light Tank, Burma, 1944. |
 |
| Ex-British Stuart Light Tank used in Burma by the Japanese 14th Tank Regiment. British modifications can be seen on the turret. |
 |
| Ex-British Stuart Light Tank used in Burma, probably by the Japanese 215th Infantry Regiment, 33rd Division, 1942, showing modifications made by the British, including sponson machine gun deleted, extra stowage bins and sand shields have also been fitted. On the side of the hull extra track sections were used for added protection, and special guide folding stands for the distribution maps on the open hatch. |
 |
| Chinese M3A3 Light Tank. |
 |
| Chinese M3A3 Light Tanks on the Ledo Road, China. |
 |
| Chinese M3A3 Light Tanks. |
 |
| Chinese M3A3 Light Tank in Burma, 1944. |
 |
| Chinese M3A3 Light Tanks, southern China, circa 1944-1945. |
 |
| M4A4 Medium Tanks and an M3A3 Light Tank (foreground) driven by American-trained Chinese soldiers making a sharp horseshoe turn on the road to Bhamo, December 1944. |
 |
| Chinese M3A3 Light Tank (possibly postwar Chinese Communist). |
 |
| British Stuart Light Tanks on railroad flatcars on their way to the front in Algeria. |
 |
| British Stuart I Light Tank (T27983), Eighth Army, Libya. |
 |
| British Stuart Light Tank (T37417), North Africa. Leaning against the vehicle is the main gun’s canvas protective cover. |
 |
| British Stuart Light Tank, “Bellman,” North Africa. |
 |
| British Stuart I Light Tank (T28078) knocked out during fighting in North Africa, April 1941. |
 |
| British Stuart Light Tank, North Africa. |
 |
| British Stuart I Light Tanks, Eighth Army, Sidi Rezegh, December 1941. |
 |
| British Stuart Light Tank, North Africa, 1942. |
 |
| The commander of a British Stuart Light Tank scans the ground ahead through field glasses before giving the order to advance, Cyrenaica, November 1942. |
 |
| British Stuart Light Tank being refueled from an RAF fuel bowser outside Sidi Barrani, 15 November 1942. |
 |
| German troops surrender to the crew of a British Stuart Light Tank near Frendj, Tunisia, 6 May 1943. |
 |
| Afrika Korps soldiers examine abandoned British Stuart Light Tank, North Africa. Their vehicle is on the other side of the Stuart, and they are towing a 3.7cm PaK anti-tank gun. |
 |
| Ex-British Stuart III Light Tank in German service. |
 |
| Ex-British Stuart Light Tank captured in November 1941 during Operation Crusader. Several were captured intact and repainted in overall sand color. They were then used to guard Rommel’s headquarters. |
 |
| In German service they were known as Infanterie Panzerkampfwagen Mk III 749 (e). Being loaded on to flatcars for transport. |
 |
| Ex-British Stuart III Light Tank in German service. This Stuart was abandoned by the 2nd Armoured Brigade in July 1942 and put into service by Beutepanzerkompanie AOK Afrika. |
 |
| M3 Light Tank landing in North Africa. |
 |
| M3 Light Tank, North Africa. |
 |
| M3 Light Tank, North Africa. |
 |
| M3 Light Tank in Casablanca. |
 |
| Knocked out M3 Light Tank, 1st Armored Division, being inspected by German troops, Tunisia, 1942. |
 |
| M3 Light Tank, 70th Tank Battalion (Light), on guard duty near Rabat, Morocco, 19 December 1942. |
 |
| M3 Light Tank outside Maknassy, Tunisia, 1943. |
 |
| M3 Light Tank, El Guettar, North Africa, 1943. |
 |
| Ex-American M3 Light Tank in German service captured at Kasserine Pass from the 1st Armored Division. |
 |
| Ex-American M3 Light Tank in German service captured at Kasserine Pass from the 1st Armored Division. |
 |
| Another ex-American M3 Light Tank in German service captured at Kasserine Pass from the 1st Armored Division. |
 |
| M3 Light Tank captured by German forces, North Africa. |
 |
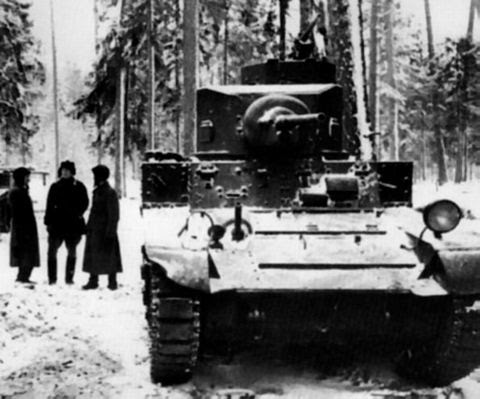
| M3 Light Tank in Soviet service. |
 |
| Soviet tankers defend their M3 Light Tanks from air attack. The tanker in the foreground is using a Thompson submachine gun with a 50-round drum. |
 |
| Soviet M3 Light Tank, Kalinin Front, 1943. |
 |
| M3 Light Tank, provided to the Soviets via Lend-Lease, captured and in use by Hungarian troops to tow a PzKpfw 38(t), Don region, summer 1942. |
 |
| M3 Light Tank captured from Soviets and in German service when knocked out by Soviet forces. Estonia, Saarema Island, 1944. |
 |
| Another view of M3 Light Tank knocked out by Soviet forces. Estonia, Saarema Island, 1944. |
 |
| Another view of M3 Light Tank knocked out by Soviet forces. Estonia, Saarema Island, 1944. |
 |
| Another view of M3 Light Tank knocked out by Soviet forces. Estonia, Saarema Island, 1944. |
 |
| Another view of M3 Light Tank knocked out by Soviet forces. Estonia, Saarema Island, 1944. |
 |
| Another view of M3 Light Tank knocked out by Soviet forces. Estonia, Saarema Island, 1944. |
 |
| Another view of M3 Light Tank knocked out by Soviet forces. Estonia, Saarema Island, 1944. |
 |
| M3 Light Tank, 1st Free French Motorized Infantry Division, San Andrea, Italy, 1944. |
 |
| M3 Light Tank, moving past a barbed wire road block, Italy, 1944-45. |
 |
| Ex-American M3 Light Tank in German service, re-captured by American soldiers. |
 |
| Ex-American M3 Light Tank in German service, re-captured by American soldiers. |
 |
| Another photo of the same M3 Light Tank. In German service it was designated Leichter Panzerkampfwagen M3 (a). |
 |
| Another view of the same ex-American M3 Light Tank in German service, re-captured by American soldiers. |
 |
| Another view of the same ex-American M3 Light Tank in German service, re-captured by American soldiers. |
 |
| Knocked out M3 Light Tank. |
 |
| M3 Light Tank, “Cindy Lee,” knocked out after hitting a mine. |
 |
| British Stuart Light Tank, Northwest Europe. |
 |
| M3A1 Light Tanks with E5R2-M3 Flame Gun. |
 |
| M3A1 light tank with flamethrower in lieu of the bow machine gun. Note spare fuel tank and removable PSP (Perforated Steel Plank) sections for added armor protection. |
 |
| A Satan flamethrowing tank on Saipan of the 4th Tank Battalion, 1944. The 2nd and 4th Tank Battalions formed provisional D companies for the Marianas campaigns, composed of a mix of Satans and M3A1s. The Satan carried 170 gallons of fuel mixture onboard. Carbon dioxide served as the propellant. The flamethrower had a range of 60-80 yards with about two minutes of capacity. |
 |
| A Satan burns out a suspected enemy emplacement. This photo demonstrates one of the chief drawbacks of this vehicle. Its short effective range forced the crew to approach dangerously close to the target. Based on a modified M3 Light Tank, the Satan was highly vulnerable to all types of enemy weaponry. Saipan, 1944. |
 |
| Amphibious M3 light tank. |
 |
| Amphibious M3 light tank on a test run. |
 |
| M3 Light Tank converted to mount a Maxson quad .50 caliber machine gun turret. |
 |
| M3 Light Tank with quadruple .50 caliber machine guns in place of turret. |
 |
| British Stuart I Light Tank, right, with a field modified British Stuart I Light Tank carrying a British 18-pdr gun, North Africa. |
 |
| 75mm Howitzer Motor Carriage T18. Mounting the same gun as the T3 carriage, and shown here at APG in 1941. Assembled by the Firestone Company, changing requirements caused the project to be cancelled just prior to the unit’s final delivery for testing. The vehicle was kept on display at Aberdeen until 1947 and then destroyed. |
 |
| Another view of the T18 Howitzer Motor Carriage: 75 mm howitzer in cast hull on M3 Light Tank chassis. |
 |
| Another view of the T18 Howitzer Motor Carriage: 75 mm howitzer in cast hull on M3 Light Tank chassis. |
 |
| T56 3-inch Gun Motor Carriage. |
 |
| T57 3-inch Gun Motor Carriage. |
 |
| T82 105mm Howitzer Motor Carriage. |
 |
| T8E1 Reconnaissance Vehicle. |
 |
| T8E1 Reconnaissance Vehicle. |
 |
| British Stuart V Kangaroo command vehicle, North Africa. |
 |
| British Stuart I command tank with Montgomery onboard. |
 |
| British Stuart V Light Tank conversion to Kangaroo or Recce. |
 |
| British Kangaroo, Italy. |
 |
| British Kangaroo, “Hell-Cat,” on the move to Pontecorvo, Italy, May 1944. |
 |
| British Kangaroo, Arrezzo, Italy July 1944. |
 |
| British Stuart Recce, “Curse of Scotland,” Burma, 1944. Note anti-grenade net over the open crew space. |
 |
| British Stuart Recce with a canvas top. |
 |
| Two Stuart V Recce, 23 May 1945, when the 5th Canadian Armoured Division held a march-past at Groningen, Holland. They are crewed by men of the Royal Canadian Artillery, 4th Canadian Anti-tank Regiment. |
 |
| T27 Mortar Carrier: Forward firing 81 mm mortar on turretless M5A1 Light Tank. |
 |
| M3 Light Tank, Mojave Desert, Indio, California, 1942. |
 |
| M3 Light Tank, Fort Riley, Kansas. |
 |
| M3 Light Tank mounting twin .50-caliber machine guns in place of its turret. |
 |
| M3 Light Tank, 1st Armored Division, Tunisia. |
 |
| Soviet M3 Light Tank, near Riga, October 1944. |
 |
| Captured Soviet M3 Light Tank, summer 1943. |
 |
| M3 Light Tank with T2 Light Mine Exploder. |
 |
| Another ex-British Stuart III Light Tank in German service. |
 |
| An ex-American M3 Light Tank captured at Kasserine Pass from the 1st Armored Division. |
 |
| Another ex-American M3 Light Tank captured at Kasserine Pass from the 1st Armored Division. |
 |
| Ex-British Stuart III Light Tank in German service. |
 |
| M3 Light Tank in Soviet service used as an artillery tractor, knocked out and burned |
 |
| M3 light tank in the Aleutians. |
 |
| M3 Light Tanks that were furnished to Australia under Lend-Lease, March 1943. |
 |
| M3 Light Tank supporting infantry attack in the Solomon Islands, February 1943. |