 |
| This painting of the nocturnal Battle of the Java Sea shows the torpedoed Dutch light cruiser De Ruyter burning as the cruiser HMAS Perth turns to avoid a collision, followed by the heeling USS Houston (CA-30), on February 27, 1942. One night later, the Perth, along with the USS Houston would go down in the Battle of the Sunda Strait. |
 |
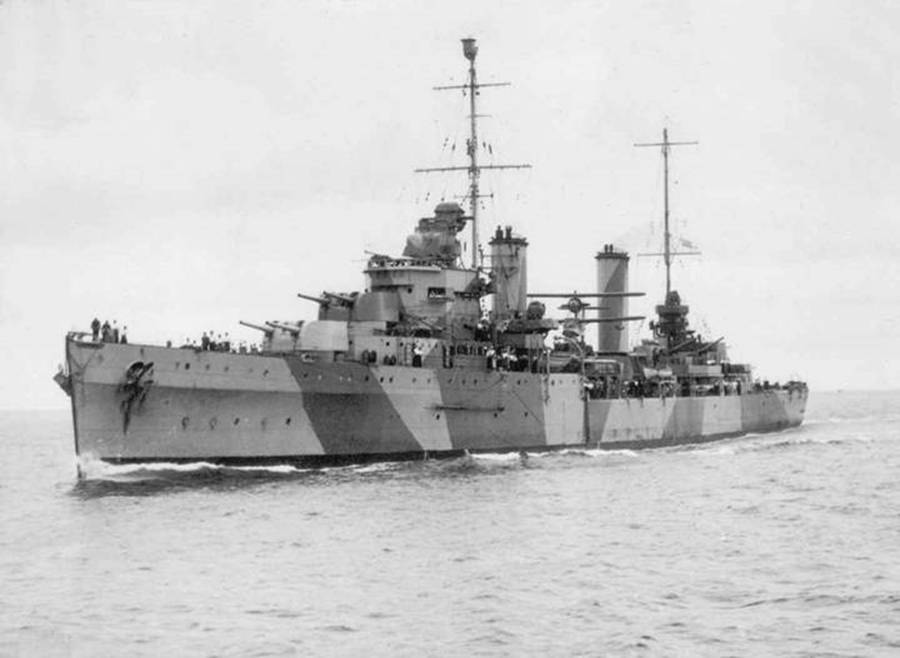
| Aerial starboard bow view of the cruiser HMAS Sydney (II) (ex HMS Phaeton). Note the spar projecting forward of the bridge and single 4-inch AA guns amidships, which distinguished the Sydney from her two sisters. Her Seagull amphibian is embarked (Seagull was an early name for the Walrus). |
 |
| Minesweeper HMAS Cairns J183 seen in early 1945. |
 |
| Ammunition ship Neptunia explodes at her wharf at Port Darwin during a Japanese air raid. A second ammunition ship, Zealandia, is seen at right, with a floating dry dock in the middle distance. |
 |
| August 3, 1942: After hammering Port Moresby for two days, Japanese bombers finally sank this Australian transport which sends up a cloud of smoke. She drifted onto a reef and heeled over. Flaming oil can be seen at left. The men in a small boat, foreground, are looking for survivors. |
 |
| HMAS Perth arriving in Port Jackson, Sydney for the first time. |
 |
| HMAS Perth. |
 |
| Quad .50″ cal AA mount, on HMAS Perth. |
 |
| Italian Breda 20mm mounted on HMAS Perth. |
 |
| HMAS Australia heavy cruiser, 1946. |
 |
| HMAS Australia (II), 4 September 1944. |
 |
| HMAS Australia (II), May 1935. |
 |
| HMAS Australia (II) at sea during target practice at the start of World War II, in the Philippines, 19 October 1939. |
 |
| HMAS Australia (II) in Sydney Harbor for the arrival of Her Majesty Queen Elizabeth II with His Royal Highness Prince Phillip The Duke of Edinburgh on the 3 February 1954. |
 |
| HMAS Australia (II). |
 |
| HMAS Australia (II). |
 |
| HMAS Australia (II). |
 |
| HMAS Australia (II). |
 |
| HMAS Australia (II). |
 |
| HMAS Australia (II). |
 |
| HMAS Australia (II). |
 |
| HMAS Australia (II). |
 |
| HMAS Australia (II). |
 |
| HMAS Australia (II). |
 |
| HMAS Australia (II) with HMAS Stuart at Garden Island NSW. |
 |
| HMAS Australia (II). |
 |
| HMAS Australia (II). |
 |
| HMAS Australia (II). |
 |
| HMAS Australia (II). |
 |
| HMAS Australia (II). |
 |
| HMAS Australia (II) in dry dock, Malta, December 1935. |
 |
| HMAS Australia (II). |
 |
| HMAS Australia (II). |
 |
| HMAS Australia (II). |
 |
| HMAS Australia (II). |
 |
| HMAS Australia comes under air attack during the battle of the Coral Sea, an Allied victory many credit with saving Australia from a Japanese invasion. |
 |
| MV Neptuna explodes in Darwin Harbor with her load of depth charges and other munitions during the Japanese carrier attack on Darwin. HMAS Deloraine, victor over I-124, is in the foreground, 19 February 1942. |
 |
| Australian coastwatcher Reg Evans, who saw a strange burst of flame on the water from his post on Kolombangara. It was the PT-109 exploding after being hit by a Japanese destroyer. |
 |
| HMAS Hobart (D63), light cruiser. |
 |
| HMAS Hobart (D63) light cruiser, 1942. |
 |
| HMAS Hobart (D63) light cruiser, 1944. |
 |
| HMAS Hobart (D63) light cruiser. |
 |
| HMAS Hobart (D63) light cruiser. |
 |
| HMAS Sydney (II) light cruiser, 1938. |
 |
| HMAS Perth, a modified Leander class light cruiser. |
 |
| HMAS Sydney (II) light cruiser, Geraldton, October 1941. |
 |
| HMAS Perth light cruiser, 1940. |
 |
| HMAS Perth light cruiser, Gatun Lake, Panama Canal, 1940. |
 |
| HMAS Perth light cruiser, March 1940. |
 |
| HMAS Australia heavy cruiser, 1946. |
 |
| HMAS Sydney (II) light cruiser, 1941. |
 |
| HMAS Canberra County class heavy cruiser. |
 |
| HMAS Canberra County class heavy cruiser. |
 |
| HMAS Canberra County class heavy cruiser. |
 |
| HMAS Swan (II) Grimsby class sloop. |
 |
| HMAS Swan (II) (U74) Grimsby class sloop. |
 |
| HMAS Swan (II) Grimsby class sloop, circa 1946. |
 |
| HMAS Yarra (II) Grimsby class sloop. |
 |
| HMAS Yarra (II) Grimsby class sloop, 1940-41. |
 |
| HMAS Yarra (II) Grimsby class sloop, 1941. |
 |
| HMAS Waterhen (D22). |
 |
| HMAS Waterhen (D22). |
 |
| HMAS Vendetta (D69). |
 |
| HMAS Australia heavy cruiser. |
 |
| HMAS Australia heavy cruiser. |
 |
| HMAS Australia in Sydney harbor. |
 |
| HMAS Australia heavy cruiser. |
 |
| HMAS Australia heavy cruiser, 1932. |
 |
| HMAS Australia heavy cruiser, 1936. |
 |
| HMAS Australia heavy cruiser, 1937. |
 |
| HMAS Sydney (II) light cruiser. |
 |
| HMAS Sydney (II) light cruiser. |
 |
| HMAS Sydney (II) light cruiser, 1936. |
 |
| HMAS Sydney (II) light cruiser, 1941. |
 |
| HMAS Sydney (II) light cruiser, 1941. |
 |
| HMAS Perth light cruiser, 1939. |
 |
| HMAS Perth light cruiser, 1939. |
 |
| HMAS Perth light cruiser, 1941. |
 |
| HMAS Perth light cruiser, 1941. |
 |
| HMAS Perth light cruiser, 1941. |
 |
| HMAS Perth light cruiser, 1941. |
 |
| HMAS Perth light cruiser, 1941. |
 |
| HMAS Vendetta (D69), 1925. |
 |
| HMAS Vendetta (D69). |
 |
| HMAS Vendetta (D69), circa 1940-41. |
 |
| HMAS Perth (I) under a full head of steam. The image is undated, but the presence of the Supermarine Walrus suggests it is after her first arrival in Australia on 31 March 1940. |
 |
| HMAS Australia (II) in dry dock, probably at Malta during her sojourn with the Royal Navy Mediterranean Fleet's First Cruiser Squadron during the Abyssinian Crisis, 1935-36. |
 |
| The two County Class cruisers, HMAS Canberra (foreground) and HMAS Australia (II) the two heavy cruisers whose orders in the 1920s were at the fore of Australia's naval defense planning, along with a new Royal Navy base at Singapore. The Great Depression intervened, and the fleet to be based at Singapore never came into being. |
 |
| Heavy cruiser HMAS Canberra (I) in the pre-World War II period. |
 |
| Minelayer HMAS Bungaree and the delicate operation of laying mines. As the only minelayer in the South West Pacific there was huge demand and pressure for HMAS Bungaree to lay defensive minefields around the approaches to Northern Australia, New Guinea, the Dutch East Indies, and New Zealand. In combat areas such as the Solomons U.S. Forces began laying mines through the rather random process of dropping them from aircraft (creating a major clearance challenge when the war was over). The production of mines, which were manufactured in Australia, was also hard-pressed to keep up with demand. New Zealand, increasingly concerned about delays in having HMAS Bungaree lay defensive fields around its major ports, became involved in extended and sometime testy correspondence with the Australian government on the subject. |
 |
| Not a terribly inspiring sight, but this 1943 photograph is one you may otherwise never see. It is down below on the mine deck of the RAN's only minelayer, HMAS Bungaree (which was herself ironically to fall victim to a mine, many years later, in the Saigon River on 26 May 1966). The 3,155 ton former Adelaide Steamship Company freighter Bungaree was fitted out to carry 423 mines, and by mid-1942 had laid 3,190 mines in defensive fields around Australian ports and approaches in Northern Australia (note, some references say Bungaree laid a total of 19,000 mines). Ironically, while important as a static deterrent and defensive measure, their only known victim was the minesweeper corvette HMAS Warrnambool, which was lost while clearing the minefields with other ships in 1947. |
 |
| A bird's eye view of the bridge of the World War II destroyer, HMAS Waterhen. We are not told when this was taken, probably pre-World War II, and clearly seen from a much taller structure alongside, be it a ship, the upper gallery of a pier or a crane. You can gain an idea of the size of the bridge by reference to the only person there, the man leaning into the sheltered chart table on the far side of the bridge. Completed for the Royal Navy on 17 July 1918, and lost without casualties during World War II to a bomb near-miss that holed her engine room, off Salum, Libya, on 29 June 1941. On a run to Tobruk at the time, she was the RAN's first loss to enemy action. |
 |
| The Australian amphibious LSI Landing Ship Infantry HMAS Kanimbla at anchor at Morotai Island (Indonesia) 2 June 1945 during a rehearsal for landings on the island of Borneo, which took place on 10-11 June 1945. |
 |
| The Australian landing ship HMAS Westralia in Sydney Harbour before being sent to the place of disembarkation for the soldiers, who are already on board, 3 July 1944. |
 |
| HMAS Norman (G49) in stormy seas in the Pentland Firth. |
 |
| HMAS Perth in February 1942. |
 |
| Australian sailors row to their ship, the cruiser HMAS Perth, in the Mediterranean August 1941. |
 |
| Two signalmen keeping a visual lookout in Alexandria Harbor, Egypt, 1941. HMAS Perth. |
 |
| Forward armament of HMAS Perth. |
 |
| HMAS Australia (II). |
 |
| Anti-aircraft gun on an Australian warship. |
 |
| The damage inflicted on cruiser HMAS Australia after being hit by five kamikaze aircraft during the Lingayen Gulf landings, January 1945. |
 |
| The District vessel Waiai, used by Australian coastwatchers Donald Kennedy and Geoffrey Kuper in their early Coastwatching work. She was later trapped and burned by the Japanese. |
 |
| A Supermarine Seagull V amphibian aircraft, serial number A2-7, of No. 9 (Fleet Cooperation) Squadron RAAF embarked on the modified Leander class cruiser HMAS Hobart of the RAN being positioned on the catapult fitted to the ship and used for launching the aircraft. 1939. |
 |
| A Supermarine Walrus taking off at Mers-el-kebir, with the SS Empress of Australia in the background. 20 January 1943, Mers-el-kebir. |
 |
| HMAS Australia in Brisbane, 17 July 1937. A Supermarine Walrus is sitting on the ship's aircraft catapult. |
 |
| Supermarine Walrus on the HMAS Hobart, 1930s. |
 |
| HMAS Albatross, RAN, and two of her six Supermarine Seagull III amphibians, flown by the specially-trained No 101 RAAF Fleet Co-operation Flight, formed at Point Cook RAAF base in June 1926. In August the same year the Flight moved to Richmond, NSW. The six Seagulls, together with five pilots and 412 airmen were embarked on HMAS Albatross on 25 February 1929. Albatross had a capacity for nine aircraft, but only ever carried the six in RAN service. As a result of the economic depression, she paid off into reserve in March 1933, after only four years service. Despite her somewhat ungainly appearance, Albatross was an ambitious initiative by the Australian Government and the RAN in its early years - a warship that was listed in a special reserved category under the Washington Naval Treaty, and one that required the negotiation of a special dispensation to retain her. Albatross was also had excellent sea-keeping qualities, and was regarded as a comfortable berth. She was transferred to the RN in 1938 as part payment for the cruiser HMAS Hobart [ex-HMS Apollo]. |
 |
| The various aircraft carried on HMAS Australia (II), RAN, had a number of adventures until the ship ceased carrying them in late 1944, the last RAN cruiser to do so. During the Abyssinian Crisis of 1936, Australia's aircraft, along with that of HMAS Sydney (II) and similar spotter aircraft from the Royal Navy's First Cruiser Squadron, engaged in massed patrols over North Africa. In September 1940, at the end of the second three-day attack on the French fleet at Dakar, HMAS Australia's Supermarine Walrus was shot down astern of the withdrawing British fleet, All three of her crew were lost (Lt. CMDR. F.K. Fogarty, RAN; Flight Lt. G.J.I. Clark, RAAF; and Telegraphist C.K. Burnett, RAN). |