|
| Royal Hamilton Light Infantry carriers move through the Dutch village of Krabbendijke on the Beveland Causeway, 27 October 1944. (Libarary and Archives Canada) |
The Battle of Walcheren Causeway (Operation Vitality) was an
engagement of the Battle of the Scheldt between the 5th Canadian Infantry
Brigade, elements of the British 52nd (Lowland) Infantry Division and troops of
the German 15th Army in 1944. It was the first of many conflicts on and around
Walcheren Island during the Scheldt battles. It was also the second major
battle fought over a terrain feature known as the Sloedam during the Second
World War.
Background
After the breakout from Normandy by the Allied armies,
beginning August 13, 1944, the German forces held on stubbornly to the French
and Belgian English Channel ports. This forced the Allies to bring all supplies
for their rapidly advancing armies from the artificial harbor they had
constructed off the beaches of Normandy, and from Cherbourg. Because of its
port capacity Antwerp became the immediate objective of the British 21st Army
Group commanded by Field Marshal Bernard Montgomery. While Antwerp fell to
Montgomery on September 4 no supplies could be landed there until the German
forces holding the lower reaches of the Scheldt, between Antwerp and the North
Sea, were removed.
Tactical Importance
A feature known as the Sloe Channel separated the island of
Walcheren from the South Beveland isthmus. A narrow causeway connected the two,
known to the Dutch as the Sloedam (it literally dammed the Sloe Channel) and in
English as the Walcheren Causeway. The causeway carried a rail line from the
mainland onto the island and to the port of Vlissingen (or Flushing, as it was
known in English). A paved road also ran the length of the causeway, which was
about 40 meters (130 ft) wide and a kilometer (0.6 mile) long. On either side
of this causeway, which was elevated only a few meters (feet) above sea level,
marsh, mud-flats and deep water all hindered movement between Walcheren and
South Beveland.
Prelude
As the Allies had to secure a port of the capacity of
Antwerp before they could contemplate the invasion of Germany itself, the Battle
of the Scheldt involved bitter fighting.
By 31 October 1944, all land surrounding the Scheldt estuary
had been cleared of German control except for Walcheren Island, from where
coastal batteries commanded the approaches to the waterway. These guns prevented
the Allies from making use of the port facilities of Antwerp to alleviate their
logistical concerns.
The island's dykes had been breached by attacks from RAF
Bomber Command: on 3 October at Westkapelle, with severe loss of civilian life;
on 7 October at two places, west and east of Vlissingen; and on 11 October at
Veere. This flooded the central part of the island, forcing the German
defenders onto the high ground around the outside and in the towns.
The 2nd Canadian Infantry Division had marched west down the
South Beveland isthmus and by 31 October had cleared all German opposition from
South Beveland. Walcheren Island was connected to South Beveland by a narrow
causeway, 40 meters wide and 1600 meters long.
Plans to employ assault boats over the Sloe Channel were
thwarted by muddy conditions unsuitable for water craft. The Calgary
Highlanders had been selected for this amphibious operation, as they had
received stormboat training in the UK in anticipation of an opposed water
crossing of the Seine River, which invasion planners had predicted would be
necessary approximately 90 days after the landings in Normandy. In the event,
the ground was too boggy to employ the boats, and the Highlanders were utilized
as conventional infantry in a landward attack directly over the causeway.
Battle
"C" Company of The Black Watch (Royal Highland
Regiment) of Canada took heavy casualties on the afternoon and evening of 31
October 1944 in an attempt to "bounce" the Causeway.[2][page needed]
During their attack, the existence of a deep crater on the causeway was
discovered; this crater had been blown by German engineers as an anti-tank
obstacle. It was later utilized by the Canadians as a company command post
during the battle as it developed.
"B" Company of The Calgary Highlanders were
ordered forward just before midnight and were similarly stopped halfway down
the causeway.
A new fireplan was drawn up and Major Bruce McKenzie's
"D" Company inched forward under intensive gunfire, reaching the west
end, and securing it, at dawn on 1 November.
German counterattacks were heavy and prolonged, and included
the use of flame weapons on the Canadians. At one point, all Calgary Highlander
officers in one company were wounded or killed, and the brigade major, George
Hees took command of a company.
Company Sergeant Major "Blackie" Laloge of the
Calgary Highlanders was awarded the Distinguished Conduct Medal for his actions
at Walcheren Causeway, at one point throwing back German hand grenades before
they could explode among his men.
Two platoons of Le Régiment de Maisonneuve took over the
bridgehead on Walcheren Island on 2 November, but were forced back onto the
Causeway. A battalion of Glasgow Highlanders were ordered to pass through, but
they also were unable to expand the bridgehead on the island.
Aftermath
Landings by British Commandos of the 4th Commando Brigade
eventually sealed the fate of the German defenders on Walcheren Island,
attacking from seaward at Flushing and Westkapelle. The battle for the causeway
itself had been a costly, and ultimately unnecessary, diversion.
The 2nd Canadian Infantry Division went into reserve in the
first week of November, moving into the Nijmegen Salient for the winter. The
Calgary Highlanders suffered 64 casualties in the 3 days of fighting at
Walcheren Causeway. Le Régiment de Maisonneuve had one man killed and 10
wounded. The Black Watch suffered 85 casualties in the period 14 October to 1
November 1944, the bulk of them suffered on the causeway.
Legacy
The Battle of Walcheren Causeway is commemorated annually by
The Calgary Highlanders and Regimental Pipes and Drums with a parade and church
service on the Wednesday night or weekend closest to the anniversary of the
battle. Representatives and members of the local Dutch community in Calgary are
usually invited to attend the service. The battle was selected from among the
Regiment's 20 Second World War battle honors as being most representative of
the spirit of determination displayed by the unit's forerunners, the 10th Battalion,
CEF, whose counterattack at St. Julien during the Second Battle of Ypres is
also commemorated annually by the Regiment.
A permanent monument was erected at the causeway and
dedicated in the 1980s. The causeway itself no longer exists as such; land on
both sides of the former railway embankment has been reclaimed and the Sloe
Channel is now farmland. Remnants of German concrete fortifications still exist
both on Walcheren Island and South Beveland.
In the 21st century, the monuments were moved due to rail
and road construction. A large monument dedicated to the French troops that
fought a battle there in May 1940 predominates, overlooking memorials to both
the 52nd (Lowland) Division and the 5th Canadian Infantry Brigade who fought
there in the autumn of 1944.
The assault on Walcheren Causeway is depicted in the 2020
Dutch film The Forgotten Battle.
Other Battles
g had occurred in the vicinity of the causeway and
Arnemuiden in May 1940 during the German invasion of the Netherlands.
Bibliography
Copp, Terry, The Brigade.
Further Reading
Brooks, Richard (21 June 2011). Walcheren 1944 : storming
Hitler's island fortress. Botley, Oxford: Osprey Pub. Co.
 |
| The Walcheren Causeway 31 October-2 November 1944. |
 |
| The Capture of Walcheren, 1-8 November 1944. |
 |
| Aerial photograph taken shortly after the daylight attack on the sea-wall at Westkapelle, Walcheren (the Netherlands), showing a breach in the wall at the most westerly tip of the island. The Allies decided that the dykes had to be breached before the Allied assault in order to flood the inland areas and restrict movement by the German defenders. On 3 October 1944, 252 Avro Lancasters and seven De Havilland Mosquitoes of the RAF Bomber Command attacked the sea wall and dykes at Westkapelle, Flushing and Veere. (Imperial War Museum C 4668) |
 |
| The bombing of Walcheren in October, by RAF Bomber Command, had breached the dykes around the island turning it into a massive lagoon, rimmed by long stretches of intact dykes. German gun emplacements on the unaffected areas virtually provided a continuous fortification bristling with guns of every caliber. Imperial War Museum) |
 |
| Westkapelle landing plan beaches. No 48 (RM) Commando, under Lt-Colonel J L Moulton DSO, would come ashore south of the gap. From there, they would advance on Zoutelande, two miles to the south. |
 |
| No 47 (RM) Commando, under Lt-Colonel CF Phillips DSO, would land behind No 48 and to meet up with No 4 Commando near Flushing. |
 |
| British assault troops landed on Walcheren at dawn on 1 November 1944 and most of Flushing was included in the first bridgehead. The landings were supported by fire from British warships. The object of the assault is to silence the enemy guns menacing the Scheldt passage to the port of Antwerp. This image shows troops advancing along the waterfront near Flushing with shells bursting ahead. (Imperial War Museum BU 1255) |
 |
| The Battle for Walcheren Island: An aerial photograph of bombs exploding on the Walcheren dyke, Holland during RAF Bomber Command's raid on the island, 1944. (Imperial War Museum C 4669) |
 |
| Landing craft tanks carrying Royal Marine Commandos on way to beach during the landing by Royal Marine commandos on the island of Walcheren at Westkapelle, the most western point of the island, during the final phase of the battle to free the Belgian port of Antwerp. In the foreground is landing craft tank LCT 979 followed by LCT 980 further LCTs are behind whilst another long line of LSTs can be seen in the background. (Imperial War Museum A 26274) |
 |
| The Nolle Dyke gap during Operation Infatuate. |
 |
| Captain W.A. Teed (foreground) of the North Shore Regiment, Embarkation Staff Officer of the 8th Canadian Infantry Brigade, talking with Captain C.J. Aendry, commanding officer of an Alligator amphibious vehicle, near Terneuzen, Netherlands, October 13, 1944. |
 |
| Landing craft and vehicles of the Canadian First Army engaged in clearing the Scheldt estuary near Antwerp. |
 |
| Amphibians (Buffalos) coming ashore at Westkapelle. |
 |
| As they continue to battle German troops for control of the Scheldt Estuary, Canadian soldiers traverse a flooded area in an amphibious vehicle. |
 |
| In the Breskens Pocket across the West Scheldt from Walcheren Island, German soldiers man a machine gun position that is partially camouflaged with tree branches. |
 |
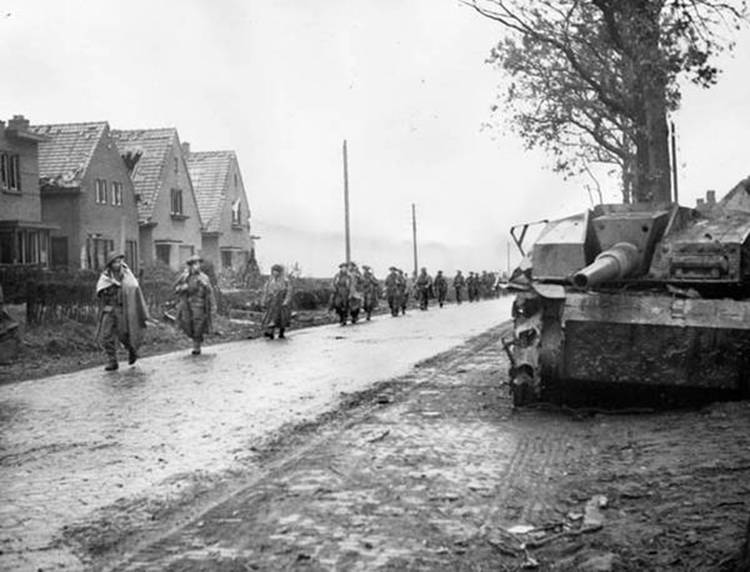
| Canadian soldiers of the Calgary Highlanders march past a German Sturmgeschütz assault gun that has been knocked out during earlier fighting. This photo was taken in South Beveland during the advance against stubborn German resistance on Walcheren Island in October 1944. |
 |
| Personnel of the Toronto Scottish Regiment (M.G.) aboard a motorboat en route from Beveland to North Beveland, Netherlands, November 1, 1944. |
 |
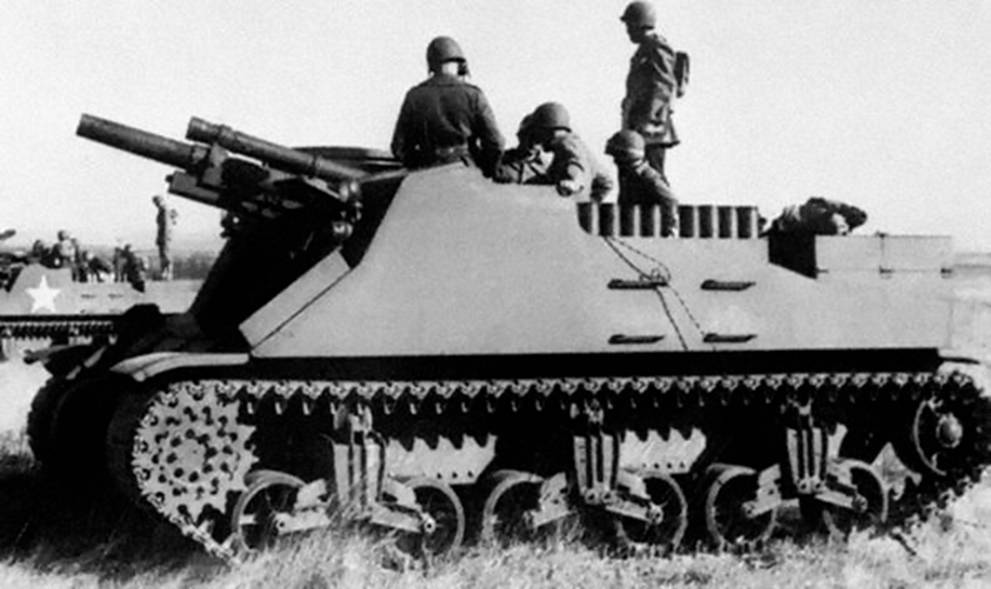
| Sherman and Stuart tanks, Priest and assorted other vehicles of the 5th Canadian Armoured Division. |
 |
| As the sound of sniper fire rings out, Scottish soldiers of the 52nd Lowland Division crouch behind a piece of heavy equipment in Flushing on Walcheren Island. |
 |
| As the hard-fought campaign to clear the Scheldt Estuary of German resistance draws to a close, British commandos round up surrendering enemy soldiers in Westkapelle. |
 |
| Lt.General Wilhelm Daser, Commander of the 70th Infantry Division and Fortress Commander of Walcheren, led into captivity accompanied by Major Hugh Johnston of the Royal Scots. |
 |
| Lieutenant Colonel Mike Vernon, CD, Commanding Officer of The Calgary Highlanders, ponders the monument to the 5th Canadian Infantry Brigade erected at the site of the Walcheren Island Causeway, in memory of the sacrifice of the three Canadian regiments, as well as soldiers of the 52nd (Lowland) Division of the British Army who fought a pitched battle there beginning on Hallowe'en night 1944. The Calgary Highlanders sent a contingent to visit European battlefields in June 2010 to mark the centennial year of the regiment. In the background, the Regimental Pipes and Drums play at the site of monuments erected to the memory of Allied soldiers who fell fighting the Germans in the vicinity during the invasion of 1940. (Michael Dorosh) |