|
| The Consolidated B-24D Lady Be Good as it appeared when discovered from the air in the Libyan desert. 1958. |
Lady Be Good is a B-24D Liberator bomber that disappeared without a trace on its first combat mission during World War II. The plane, which was from 376th Bomb Group of the United States Army Air Forces (USAAF), was believed to have been lost—with its nine-man crew—in the Mediterranean Sea while returning to its base in Libya following a bombing raid on Naples on April 4, 1943. However, the wreck was accidentally discovered 710 km (440 mi) inland in the Libyan Desert by an oil exploration team from British Petroleum on November 9, 1958. A ground party in March 1959 identified the aircraft as a B-24D.
Investigations concluded that the first-time (all new) crew failed to realize they had overflown their air base in a sandstorm. After continuing to fly south into the desert for many hours, the crew bailed out when the plane's fuel was exhausted. The survivors then died in the desert trying to walk to safety. All but one of the crew's remains were recovered between February and August 1960. Parts from Lady Be Good were salvaged for use in other aircraft following its rediscovery, while the majority of the wreckage of the aircraft was removed from the crash site in August 1994 and taken to a Libyan Air Force base for safekeeping.
Circumstances
Mission
In 1943, Lady Be Good was a new B-24D Liberator bomber that had just been assigned to the 514th Bomb Squadron of the United States Army Air Forces (USAAF) on March 25. The squadron was part of the 376th Bombardment Group (Heavy) based at Soluch Field in Soluch in Libya. The plane, which had the AAF serial number 41-24301, had the group identification number 64 stencil-painted on its nose. Its given name, Lady Be Good, was hand-painted on the starboard, front side of the forward fuselage.
Lady Be Good's crew were also new, as they had only arrived in Libya a week before on March 18. On April 4 they flew their first mission together, one of twenty-five B-24s assigned to bomb the harbor of Naples in a two-part late afternoon attack. The first wave of twelve B-24s was followed by a second wave of thirteen planes, including Lady Be Good. After the attack, all planes were expected to return to their bases in North Africa.
Operation
Lady Be Good, which was one of the last planes of the second wave to depart, took off from Soluch Field near Benghazi at 2:15 p.m. It joined the formation and continued on to Naples. However, a sandstorm caused eight B-24s to return to Soluch, leaving four aircraft to continue the operation. When Lady Be Good arrived over Naples at 7:50 pm at 25,000 ft (7,600 m), poor visibility obscured the primary target. Two B-24s attacked their secondary target on the return trip while the other two aircraft dumped their bombs into the Mediterranean Sea to reduce weight and save fuel.
Disappearance
Lady Be Good flew alone on its return trip to its home base in Libya. At 12:12 a.m. the pilot, Lt. William Hatton, radioed to say his automatic direction finder was not working and asked for a location of base. The crew apparently overflew their base, failing to see the flares fired to attract their attention. They continued southward over North Africa, deeper into the Sahara Desert, for the next two hours. At 2 a.m., as fuel became critically low, the crew parachuted to the ground. The abandoned Lady Be Good flew a further 26 km (16 mi) before it crash-landed into the Calanscio Sand Sea.
Largely because it was believed that the aircraft had probably crashed at sea, a subsequent search and rescue mission from Soluch Field failed to find any trace of the aircraft or its crew. The disappearance of Lady Be Good became a mystery.
Discovery
Wreckage: 1958
After the crew abandoned the aircraft, it continued flying southward. The mostly intact wreckage and evidence showing that one engine was still operating at the time of impact suggests that the aircraft gradually lost altitude in a very shallow descent and reached the flat, open desert floor and landed on its belly.
The first reported sighting of the crash site was on November 9, 1958, by a British oil exploration team working for British Petroleum (BP) in the northeast of Libya's Kufra District. The team contacted authorities at Wheelus Air Base, but no attempt to examine the aircraft was made as no records existed of any plane believed to have been lost in the area. However, the location of the wreckage was marked on maps to be used by oil-prospecting teams that were due to set out to explore the Calanscio Sand Sea the next year.
On February 27, 1959, British oil surveyor Gordon Bowerman and British geologists Donald Sheridan and John Martin spotted the wreckage near 26°42′45.7″N 24°01′27″E, 710 km (440 mi) southeast of Soluch. This followed up the first sighting from the air on May 16, 1958, by the crew of a Silver City Airways Dakota, piloted by Captain Allan Frost, and another flight on June 15. A recovery team made initial trips from Wheelus Air Base to the crash site on May 26, 1959.
Although the plane was broken into two pieces, it was immaculately preserved, with functioning machine guns, a working radio, and some supplies of food and water. A thermos of tea was found to be drinkable. No human remains were found on board the aircraft nor in the surrounding crash site, nor were parachutes found.
Most of the evidence from the wreckage indicated that the men had bailed out. However, the log book of the navigator 2nd Lt Dp [sic] "Deep" Hays, which was still on board, made no mention of the aircraft's movements after the crew commenced their return leg from Naples. Hays had been on his first combat mission.
Crew remains: 1960
In February 1960, the United States Army conducted a formal search of the area for the remains of the crew. Five bodies – those of Hatton, 2nd Lt. Robert F. Toner, Hays, T/S Robert E. LaMotte and S/Sgt Samuel E. Adams – were found on February 11. The team concluded that other bodies were likely buried beneath sand dunes after finding evidence that at least three of the surviving crew members had continued walking northward.
With the news that five bodies had been recovered, the US Air Force and US Army started an expanded search called Operation Climax in May 1960. The joint operation used a USAF C-130 cargo plane and two Army Bell H-13 helicopters. However, it was a British Petroleum exploration crew that found the remains of S/Sgt Guy E. Shelley, on May 12, 1960, 38 km (24 mi) northwest of the recovered five bodies. A US Army helicopter found the body of T/Sgt Harold J. Ripslinger on May 17, 1960, located 42 km (26 mi) northwest of Shelley's body, over 320 km (200 mi) from the crash site, but still 160 km (99 mi) from Soluch airbase. These two bodies were the only ones found during Operation Climax. Another British Petroleum oil exploration crew discovered the remains of 2nd Lt John S. Woravka in August 1960. His body was then recovered by the US Air Force.
The remains of one of the air gunners, S/Sgt Vernon L. Moore, have never been officially found. However, his remains may have been recovered and buried by a desert patrol of the British Army in 1953. As they were unaware that any Allied air crews were missing in the area, the human remains were recorded but then buried without further investigation. [In 1953, a British patrol on a desert-crossing exercise found human remains in the same area where those of Shelley and Ripslinger were later found. These were quickly photographed and buried on the spot. The patrol never asked for an investigation. In 2001, a member of the patrol recalled the incident and photographic forensic investigation of the remains concluded they had likely belonged to a male whose head may have been shaped like Moore's. However, both recovering these remains and making any meaningful identification is highly unlikely.]
Analysis and Conclusions
Subsequent examinations of the remains and personal items showed that eight of the nine airmen managed to parachute safely down to the desert from the aircraft. They then located each other by firing their revolvers and signal flares into the air.
However, one crew member, Woravka (the bombardier) did not rendezvous with the others. The configuration of the parachute found with his body suggested that it did not fully open, and that Woravka died as a result of an overly rapid descent.
A diary, recovered from the pocket of co-pilot Robert Toner, recorded the crew's suffering on the walk northward. It indicated that none of the men were aware they had been flying over land when they bailed out, or that they were 400 miles (640 km) inland. It has been speculated that the dark and empty desert floor may have resembled open sea.
The crew members who survived the descent had died while walking northward, because they believed they were fairly close to the Mediterranean coast. As they walked, the group left behind footwear, parachute scraps, Mae West vests and other items as markers to show searchers their path.
The diary also says the group survived for eight days in the desert, with only a single canteen of water to share. After walking 130 km (81 mi) from the crash site, the location of the remains of the five airmen shows they had waited behind while the other three (Guy Shelley, "Rip" Ripslinger and Vernon Moore) set off north, to try to find help. The body of S/Sgt Shelley was found 32 km (20 mi) away while 43 km (27 mi) further on were the remains of T/Sgt Ripslinger.
The official report in the American Graves Registration Service states:
The aircraft flew on a 150 degree course toward Benina Airfield. The craft radioed for a directional reading from the HF/DF station at Benina and received a reading of 330 degrees from Benina. The actions of the pilot in flying 440 miles [710 km] into the desert, however, indicate the navigator probably took a reciprocal reading off the back of the radio directional loop antenna from a position beyond and south of Benina but 'on course'. The pilot flew into the desert, thinking he was still over the Mediterranean and on his way to Benina.
The navigator on the Lady Be Good thought he was flying on a direct path from Naples to Benghazi. But the base's radio direction finder only had a single loop antenna. As the plane's direction finder could not distinguish between a signal in front or behind the aircraft, there was no way to identify reciprocal readings. The same bearing would be returned whether the plane was heading inbound from the Mediterranean or outbound inland.
The crew might have survived if they had known their actual location. If they had headed south the same distance they walked north, the group might have reached the oasis of Wadi Zighen. After the crew bailed out Lady Be Good continued flying south for 26 km (16 mi) before coming to land, and there was also a chance that the crew might have found the aircraft's relatively intact wreckage, with its meager water and food supplies. The aircraft's working radio could have been used to call for help.
Legacy
Parts and Crew Items
After the Lady Be Good was identified, some parts of the plane were returned to the United States for evaluation while the rest of the wreckage remained. In August 1994, the remains of the craft were recovered by a team led by Dr. Fadel Ali Mohamed and taken to a Libyan military base in Tobruk for safekeeping. They are now stored at Jamal Abdelnasser Air Force Base, Libya.
Over the years pieces of the plane were stripped by souvenir hunters. Today, parts can be seen at the National Museum of the United States Air Force. A propeller can be seen in front of the village hall in Lake Linden, the home of Robert E. LaMotte.
The U.S. Army Quartermaster Museum at Fort Gregg-Adams, Virginia has a collection of personal items, such as watches, silk survival maps, and flight clothing from the crew members who were recovered. Several of these items are on display. An altimeter and manifold pressure gauge were salvaged from the plane in 1963 by Airman Second Class Ron Pike and are on display at the March Field Air Museum near Riverside, CA. A Royal Air Force team visited the site in 1968 and hauled away components including an engine (later donated to the US Air Force) for evaluation by the McDonnell Douglas company.
After some parts were salvaged from the Lady Be Good and technically evaluated, they were reused in other planes belonging to the American military. However, some planes that received these spares developed unexpected problems. A C-54, which had several autosyn transmitters from the Lady Be Good installed, had to throw cargo overboard to land safely because of propeller difficulties. A C-47 that received a radio receiver crashed into the Mediterranean. A U.S. Army de Havilland Canada DHC-3 Otter with an armrest from the bomber crashed in the Gulf of Sidra. Only a few traces of the plane washed ashore and one of these was the armrest from the Lady Be Good.
Memorial
A stained-glass window was installed in the chapel at Wheelus Air Base to commemorate Lady Be Good and her crew. As part of the US withdrawal from Wheelus, the window was disassembled, shipped to the National Museum of the United States Air Force, and reassembled there.
Dramatic Portrayals
The episode Ghost Bomber: The Lady Be Good of Armstrong Circle Theater investigated the disappearance of the Lady Be Good. It includes dramatizations of key events and interviews with a pilot who flew on the same mission as the final one for the Lady Be Good and military officials who investigated the incident.
Movies and television shows with fictional events sharing similarities with the fate of 'Lady Be Good include:
"King Nine Will Not Return" is a 1960 episode of The Twilight Zone that told the story of a B-25 Mitchell crew member finding himself alone with the wreckage of his plane in the desert. In the episode, the marker on the grave of a member of the crew is dated "5 April 1943", the day on which Lady Be Good was lost.
The Flight of the Phoenix, a 1964 novel by Elleston Trevor about a group of oil workers who are forced to survive in a desert when their cargo plane crashes. The novel was the subject of a 1965 film and a 2004 film remake of the same name.
Sole Survivor is a 1970 made-for-TV movie about the ghost crew of the Home Run, a B-25 Mitchell medium bomber that crashed in the Libyan desert.
See Also
Bill Lancaster: British aviator William Newton Lancaster was lost in the Sahara desert and died 20 April 1933 while attempting to fly Avro Avian Southern Cross Minor on the England to South Africa route; his remains and his plane wreckage were found 12 February 1962.
Wind, Sand and Stars: a 1939 autobiography by French aviator Antoine de Saint-Exupéry that details his survival following a 1935 plane crash in the Sahara Desert between Benghazi and Cairo.
MM. 23881: an Italian Savoia-Marchetti SM.79 torpedo bomber which suffered a similar fate to Lady be Good in 1941, and was found in the Libyan Desert in 1960.
Tragedy at Kufra: eleven South African Air Force personnel died from thirst and exposure in May 1942 after their flight of three Bristol Blenheims crash landed in the Sahara.
Eastern Air Lines Flight 401: a Lockheed L-1011 that was similarly rumored to be cursed after parts from its remains were used in other aircraft.
 |
| The ill-fated crew of the Consolidated B-24D "Lady Be Good," from the left: 1Lt. W.J. Hatton, pilot; 2Lt. R.F. Toner, copilot; 2Lt. D.P. Hays, navigator; 2Lt. J.S. Woravka, bombardier; TSgt. H.J. Ripslinger, engineer; TSgt. R.E. LaMotte, radio operator; SSgt. G.E. Shelly, gunner; SSgt. V.L. Moore, gunner; and SSgt. S.E. Adams, gunner. |
 |
| Libyan location of the Lady Be Good crash site in relation to its airbase of the 376th Bombardment Group. |
 |
| Nose view of Consolidated B-24D Lady Be Good crash site. The plane made a surprisingly good pilotless belly landing and skidded 700 yards before breaking in half and stopping. 1960. (US Air Force) |
 |
| Tail turret view at Consolidated B-24D "Lady Be Good" crash site. 1960. (US Air Force) |
 |
| Top turret and center fuselage wreckage of the Consolidated B-24D "Lady Be Good." 1960. (US Air Force) |
 |
| Interview view of the "Lady Be Good" at the waist gunner position. (US Air Force) |
 |
| Aircraft parts were strewn by the Consolidated B-24D "Lady Be Good" as it skidded to a halt amid the otherwise emptiness of the desert. Note that the three remaining engines (numbers 1,2 and 3) had the propellers feathered. 1960. (US Air Force) |
 |
| Crew of the "Lady Be Good". (National Museum of the US Air Force) |
 |
| View of the "Lady Be Good" from the air. |
 |
| View of the "Lady Be Good" from the rear. Note the C-47 in the background. |
 |
| Another aerial view of the "Lady Be Good". |
 |
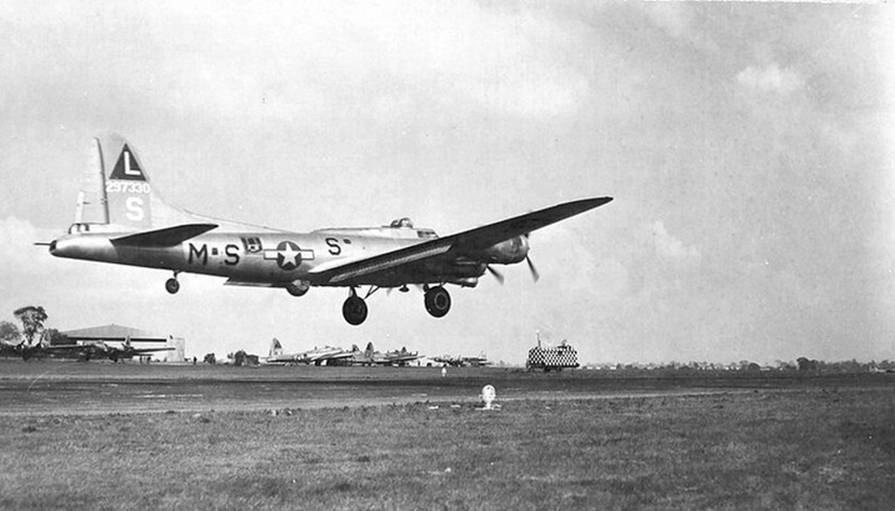
| B-24 (not the "Lady Be Good") taking off on the 4 April 1943 mission to Naples, Italy. |
 |
| Another view from the air of the "Lady Be Good" as seen from inside a C-47. |
 |
| Parachute found during the search for the crew members. |
 |
| Items abandoned by the crew members on their walk north. |
 |
| Recovery team members with a survival map and other items found in the desert. |
 |
| Recovered crew members in "remains pouches" reverently covered by U.S. flags. |
 |
| Section of map detailing the location of the plane and locations of where the crew members were found. |
 |
| Side view of the crashed Consolidated B-24D "Lady Be Good." (US Air Force photo) |
 |
| One of the four propellers and an engine from the "Lady Be Good" are on display in the World War II Gallery at the National Museum of the United States Air Force. The propeller was transferred from the 40th Troop Carrier Squadron. (US Air Force photo) |
 |
| Items found at the site of the "Lady Be Good" crash are on display in the World War II Gallery at the National Museum of the United States Air Force. (US Air Force photo) |
 |
| "Lady Be Good" nosewheel and tire on display in the World War II Gallery at the National Museum of the United States Air Force. Items were transferred from Wheelus Air Base, Libya. (US Air Force photo) |
 |
| The "Lady Be Good" Stained Glass Window from the Wheelus Air Force Base Chapel is now on display at the National Museum of the United States Air Force. (US Air Force photo) |
 |
| The "Lady Be Good" Stained Glass Window from the Wheelus Air Force Base Chapel is now on display at the National Museum of the United States Air Force. (US Air Force photo) |
 |
| "Lady Be Good" exhibit in the World War II Gallery at the National Museum of the United States Air Force. (US Air Force photo) |
 |
| The tail of the "Lady Be Good". (US Air Force) |
 |
| The tail turret of the "Lady Be Good". (US Air Force) |
 |
| A prayer service at the location of the bodies of the "Lady Be Good" crew members. (US Air Force) |
 |
| James W. Backhaus, William G. Woods, and Col. Stebbins Griffith. In the foreground is a U.S> military canteen. (US Air Force) |
 |
| The end of the trail is suggested mutely by this pair of US military issue shoes found near five bodies in the Libyan desert. The shoes were among many items of US military equipment and personal effects undisturbed in 17 years. |
 |
| A shoulder harness, a part of the B-24 "Lady Be Good" aircraft wreckage, with the name of the pilot, is discovered by a Libyan. (US Air Force) |
 |
| An important clue in determining that five bodies found in the Libyan desert are those of members of the crew of the "Lady Be Good". It is a case containing an undamaged pair of sunglasses of the type issued to US air crew during World War II. The case bears the name, still legible, of 2nd Lt. DP Hays. (US Air Force) |
 |
| B-24D "Lady be Good" 41-24301, 8th AF, 376th Bomb Group, 514th Bomb Squadron, 1943. |