Showing posts with label SAAF. Show all posts

Douglas Boston: American Light Bomber in View

When Boeing built a batch of DB-7B bombers as contract variants of the Douglas A-20 for a 1940 British order, a Boeing photographer used large format 4″x5″ Kodachrome film to capture one of the bombers. The pattern of notches in the lower left of the film is unique to Kodachrome sheet film to enable experienced darkroom technicians to identify the type of film in total darkness.

Douglas A-20 Boston.  The RCAF flew three at Suffield, Alberta, for "special" research operations.

Douglas Boston Mk. III, RCAF No. 418 Squadron, circa 1944.

Douglas Boston Mk. III (Intruder) (Z2240 TH-T) "Toronto", No. 418 (Intruder) Squadron, RCAF, circa November 1941-July 1943.

Douglas Boston, H for Humboldt, Saskatchewan, RCAF.

Douglas Boston, H for Humboldt, Saskatchewan, RCAF.

Douglas Boston formation, RCAF.

Douglas Boston Mk. III formation, No. 418 (Intruder) Squadron, RCAF, circa 1941-1943.

Douglas Boston Mk. III, T for Toronto, No. 418 (Intruder) Squadron, RCAF, with nine airmen, six of whom are from Toronto.  L-R: Sgt. H. J. Irving, Sgt. G. M. Riches, Sgt. J. W. Hutchison, Sgt. J. E. C. Pringle, P/O D. Duxfield (Timmins, Ontario), P/O E. Keyes (Ottwa, Ontario), Sgt. J. Field, Sgt. J. Sharples, and Sgt. G. Chabot (Sudbury, Ontario).  Photo taken at RAF Station Debden, Essex in the UK, February 1942.

Douglas Boston Mk. III,  No. 418 (Intruder) Squadron, RCAF, "B" Flight, taken at their home, RAF Station Debden, Essex in the UK, February 1942.

Douglas Boston Mk. III (W8358), No. 418 (Intruder) Squadron, RCAF, at RAF Debden, England.

Douglas Boston Mk. IV (W8268, TH-O, "Ottawa, Ontario"), No. 418 (Intruder) Squadron, RCAF, circa November-December 1941.

Douglas Boston Mk. IV (W8268, TH-O, "Ottawa, Ontario"), No. 418 (Intruder) Squadron, RCAF.


Douglas Boston pair, No. 418 (Intruder) Squadron, RCAF, 14 May 1943.

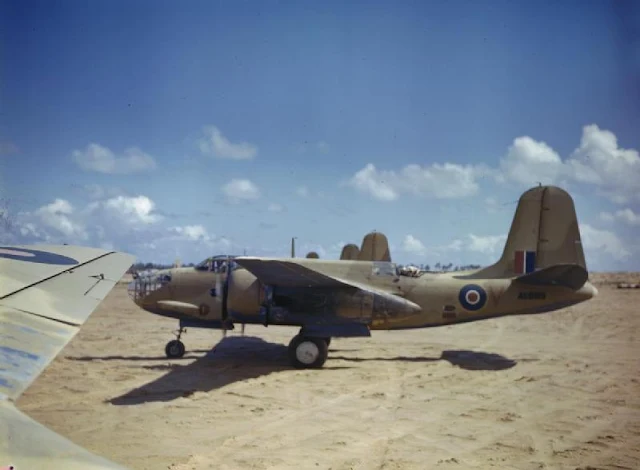
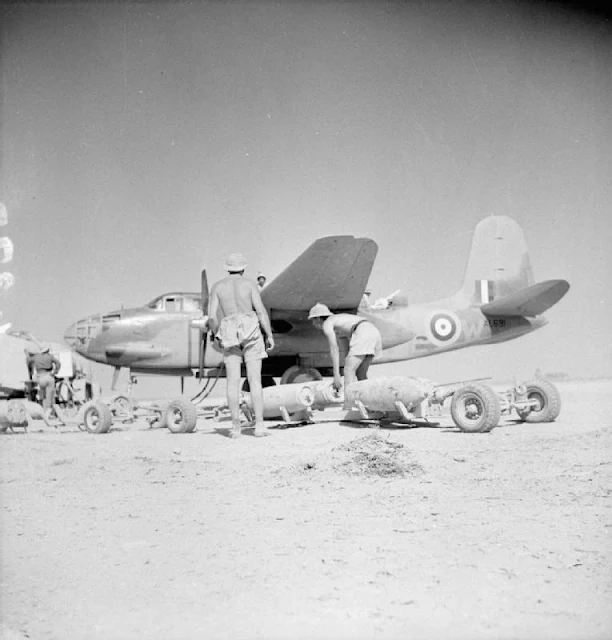
Western Desert, Libya. 4 June 1942. Bombs ready for loading into a Douglas DB-7B Boston Mk III bomber of the South African Air Force. This would be an aircraft of No. 24 Squadron SAAF. (Australian War Museum MED0450).

Noemfoor Island, Dutch New Guinea, c. August 1944. Leading Aircraftman (LAC) W. C. Turner (on top of plane) and LAC F. Baumer loading .50-caliber ammunition onto a Boston bomber aircraft of No. 22 Squadron RAAF prior to taking off on a strike over enemy territory. (Australian War Museum OG1540)

 Douglas Boston aircraft of No 24 Squadron, South African Air Force lined up at Zuara, Tripolitania. The nearest is AL683/`V'. 1943. (Imperial War Museum TR 838)

England, 31 July 1944. Australian aircrew who fly Boston aircraft of No. 88 Squadron RAF in the Second Tactical Air Force in front of the aircraft emblem “XXX BEER IS BEST”. Left to right: Flight Sergeant R. M. Brockhurst; T. M. Hood; Pilot Officer T. H. Simpson DFC, who received his decoration from the King when his Majesty visited the squadron; Warrant Officer F. D. Murphy. (Australian War Memorial UK1677)

Dummy Havoc aircraft, October 1943. (The National Archives)

Douglas DB-7 (Turbinlite) Havoc NF.II (Z2184), Boscombe Down, c. 1943. (Imperial War Museum MH5710)

Douglas Boston, RAF, January 1943. (Library of Congress 2017696116)

Douglas Boston, RAF, January 1943. (Library of Congress 2017696103)

Port Moresby, Papua, c. October 1942. A Douglas Boston bomber aircraft of No. 22 Squadron RAAF on the runway of the airfield at Port Moresby. (Australian War Memorial OG0060)

Douglas Boston aircraft of No. 22 Squadron RAAF in South West Pacific area. No. 22 was the only Australian squadron which was equipped with this type. It was later re-equipped with Beaufighters after most of its Bostons were caught on the ground, at night, by Japanese bombing at Morotai. (Australian War Memorial AC0031)

Havoc Mark I, AX910, on the ground. Part of an ex-French order for Bostons, all of which were converted to Havocs for RAF service. AX910 conducted armaments trials with the Aircraft Gun Mounting Establishment and the Air Fighting Development Unit, before a brief period of service with No. 25 Squadron RAF in July-August 1941. She finally served with No. 1453 (Fighter) Flight at Wittering, Huntingdonshire, before crashing at Aldwinkle St Peters, Northamptonshire, on 3 April 1942. (Imperial War Museum ATP10433C)

Havoc Mark I (Night Fighter), BL228 ‘VY-Y’, of No. 85 Squadron RAF based at Debden, Essex, taxying at an airfield in Britain.  85 Squadron used this aircraft for crew training, after which it was passed to No.1422 Flight, followed by No. 1454 Flight and No. 51 Operational Training Unit. (Imperial War Museum)

Boston Mark IIIAs (BZ389’RH-E’ nearest) of No. 88 Squadron RAF, fitted with smoke-laying equipment in the bomb-bays, prepare to take off from Hartford Bridge, Hampshire, on a smoke-laying sortie during Operation STARKEY. (Imperial War Museum)

Havoc Mark I (Turbinlite), AW400, on the ground at Burtonwood Repair Depot, Lancashire.  This aircraft served with Nos. 1422 and 1454 (Turbinlite) Flights, and with 1459 (Turbinlite) Flight/No. 538 Squadron RAF, before transfer to the USAAF in April 1943. (Imperial War Museum ATP10654C)

Ground crews of No. 114 Squadron RAF await the return of their Douglas Bostons from a raid on enemy targets in Tunisia, at Canrobert, Algeria.  A short distance from them, Boston Mark III, Z2205, undergoes servicing. (Imperial War Museum)

A Douglas Boston aircraft of the Royal Air Force is pictured in Algeria during operations in the Middle East and North Africa in 1943. This is a different aircraft than the one in the previous photo. (Imperial War Museum)

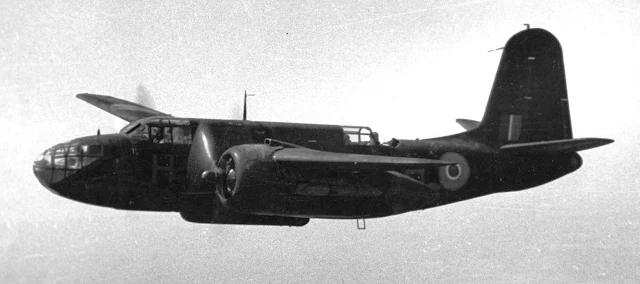
Douglas Boston, RAF.

 Douglas Boston III.

Douglas Havoc II, AH525, RAF.

Douglas Boston III, YP-F, No. 23 Squadron, RAF.

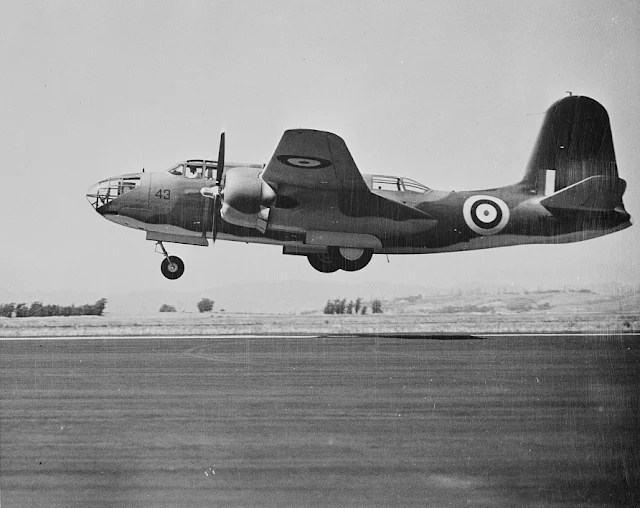
Douglas Boston III, factory-fresh on test flight.

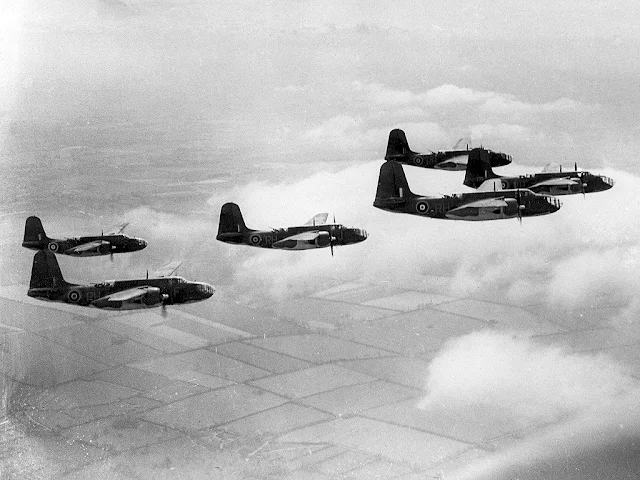
Douglas Bostons, No. 88 Squadron, RAF. Middle aircraft is RH-J.

 A Douglas Boston Mk. III, RH-F, of No. 88 Squadron, Royal Air Force, about 1942. The first Boston IIIs were delivered from the United States in the summer of 1941, and the first squadron to receive them was No. 88 Sqn. based at Swanton Morley, Norfolk, UK. This squadron flew the type until it was replaced in April 1945.

A Royal Air Force Douglas Havoc Mk.II (Turbinlite), serial AH470 "‘F"’, of No. 1459 (Fighter) Flight based at Hibaldstow, Lincolnshire (UK), on the ground. During World War II, the RAF utilized a series of flights, not squadrons, equipped with the "Turbinlite" system. These flights, like 1453 Flight and others, were independent units used for night fighting and later evolved into airborne early warning units. Some of these flights were later incorporated into squadrons like No. 532 Squadron when they were equipped with their own fighter aircraft. The Turbinlite system was primarily used to detect incoming aircraft at night. However, it was later deemed less effective due to the rapid development of AI radar.

The Dieppe Raid, 19 August 1942. Bombs being released from a Douglas Boston bomber over the target area. (Imperial War Museum C3081)

Operation JUBILEE, the Combined Forces raid on Dieppe, France. A Douglas Boston Mark III of No. 88 Squadron RAF, flying from Ford, Sussex, heads  inland over France after the bombing the German gun batteries defending Dieppe (seen at upper left). (Imperial War Museum CH6541)

Douglas Boston Mark IIIs of No. 88 Squadron RAF based at Oulton, Norfolk, flying at low level over the North Sea, in order to avoid detection by enemy radar, while on a daylight bombing sortie.  Beyond the four Bostons in view, are three escorting North American Mustang Mark Is. Boston RH-R in foreground. (Imperial War Museum CH7844)

A Douglas Boston Mark III of No. 114 Squadron RAF takes off from rain-soaked Celone, Italy, along a runway laid with pierced steel planking (PSP). (Imperial War Museum CNA2690)

Aircrews of No 88 Squadron RAF standing around a bomb trolley loaded with 500-lb GP bombs, before they are loaded into the Squadron's Douglas Boston Mark IIIs for a daylight sortie, at Attlebridge, Norfolk. (Imperial War Museum CH5595)

Douglas Boston Mark III, Z2303 'V', of No. 114 Squadron RAF based at Souk el Khemis ('Kings Cross') Tunisia, flies north of the Medjerda River (top right) to attack enemy airfields, during the practically continuous offensive operations mounted by the North-west African Tactical Air Force against enemy-held positions in northern Tunisia on 23 April 1943. (Imperial War Museum CNA479)

Douglas Boston Mark IIIs of No. 88 Squadron RAF breaking formation prior to landing at Hartford Bridge, Surrey, after a daylight raid on the engine sheds at Charleroi, Belgium. (Imperial War Museum C5454A)

Operation JUBILEE, the Combined Forces raid on Dieppe, France. Aircrews of either No. 88 or No. 107 Squadrons RAF of No. 2 Group, being briefed by their flight commander at Ford, Sussex, before taking off to bomb German gun batteries in support of the raid.  Parked in the background is a Douglas Havoc or Boston night intruder of No. 605 Squadron RAF. (Imperial War Museum CH6535)


 Royal Air Force Douglas Boston Mark IIIs of No. 88 Squadron RAF, lined up at RAF Attlebridge, Norfolk (UK). The airfield was used by No. 88 Squadron RAF from August 1941 to September 1942.

Douglas Boston Mark IIIs of No. 88 Squadron RAF based at Hartford Bridge, photographed over the English Channel while on their way to attack railway targets in northern France. (Imperial War Museum CH13125)

'Evelyn', a No 23 Squadron Havoc 'fighter-bomber', starts up at Ford at the beginning of another night sortie, 28 November 1941. (Imperial War Museum CH4048)

Douglas DB-7 Boston I AE458 being readied for an inspection by the Duke of Kent during a display of new aircraft types at the Aeroplane & Armament Experimental Establishment (A&AEE), Boscombe Down, Wiltshire, 28 August 1940. (Imperial War Museum CH1108)

A reconnaissance unit of the RAF Regiment patrols round the perimeter track at Bradwell Bay, Essex.  A  Morris Light Reconnaissance Car bearing the officer in charge, is followed by four airmen in a jeep as they pass a Douglas Havoc in a sandbagged revetment. (Imperial War Museum CH7917)

Douglas Boston Mark III, 'C for Charlie', of No. 88 Squadron RAF drops its bombs over the target during a daylight raid by aircraft of No. 2 Group on the engine sheds at Charleroi, Belgium. (Imperial War Museum C5454)

Daylight bombing raid on the railway yards at Tourcoing, France by aircraft of 2nd Tactical Air Force. Photograph taken by an RAF cameraman flying in one of the attacking Boston aircraft. (Imperial War Museum C4399)

An infra-red photograph of a Douglas Havoc Mark I (Intruder) of No. 23 Squadron RAF, preparing to start up for a sortie at Ford, Sussex. (Imperial War Museum CH2777)

Aircraft of the Empire Central Flying School, Royal Air Force Flying Training Command, lined up for display at Hullavington, Wiltshire. In the front row, right to left: De Havilland Mosquito, Hawker Typhoon, Supermarine Spitfire, Percival Proctor, Grumman Avenger, Hawker Hurricane and three Miles Masters. In the back row, right to left: Avro Anson, Airspeed Oxford, De Havilland Tiger Moth, Avro Lancaster, Miles Magister, Vickers Wellington, Douglas Boston, North American Mitchell, Miles Master and Short Stirling. In the foreground is a GAL Hotspur glider. (Imperial War Museum CH11722)

Douglas Boston Mark IIIs of No. 326 Wing RAF based at Souk el Khemis ('Kings Cross') Tunisia, flying in formation to bomb enemy positions during the final Allied offensives on Tunis and Bizerta. (Imperial War Museum CNA4728-1)

Two Douglas Boston Mark IIIs, Z2303 and Z2284, of No. 114 Squadron RAF based at Souk el Khemis (‘Kings Cross’) Tunisia, flying over the Aurés mountains to attack enemy airfields. (Imperial War Museum CNA475)

HRH The Duke of Kent being shown a Douglas Boston Mark I at Boscombe Down, Aeroplane and Armament Experimental Establishment, Wiltshire, during an inspection of new American aircraft for the Royal Air Force. (Imperial War Museum CH1111)

The last crew to return from the last operational mission undertaken by No. 88 Squadron RAF prior to its disbandment, walk away from their Douglas Boston Mark IV, BZ405 'RH-E', at B50/Vitry-en-Artois, France. The crew are, (left to right): Flying Officer J L Weston from Buenos Aires; Flying Officer H Poole from Ilford, Essex; Flying Officer B W Lawrence from Enfield, Middlesex; Flight-Sergeant D Hack from Clevedon, Somerset. Eleven Bostons of the Squadron bombed enemy gun positions in the Emmerich area of Germany for this final mission. (Imperial War Museum CL3182)

Low-level oblique aerial photograph taken during the course of a daylight attack on the Matford automotive works at Poissy, France, by Douglas Bostons of Nos. 88 and 226 Squadrons RAF.  This special raid, led by the Commanding Officer of 226 Squadron, Wing Commander V S Butler, opened the 1942 day bombing offensive.  Twelve aircraft were dispatched, of which eight successfully bombed the target.  Here, two Bostons can be seen running in towards the target as bombs fall on lines of finished lorries, and smoke from exploding bombs pours from the factory roof (lower left). (Imperial War Museum C2284)

Boston Mark III, AL775 ‘RH-D’, of No. 88 Squadron RAF based at Attlebridge, Norfolk, in flight. (Imperial War Museum CH5618)

Douglas Boston Mark III, (Intruder) W8358 'TH-R', of No. 418 Squadron RCAF flying off the French coast while heading back to its base at Bradwell Bay, Essex, after a night sortie over Europe.  W8358 was eventually lost while on another night intruder sortie to Creil, France, on 8 November 1942. (Imperial War Museum CH7215)

Douglas Boston Mk. III (Intruder), No. 418 (Intruder) Squadron, RCAF, illuminated by a Chance Light by the runway at Bradwell Bay, Essex, prepares to take off on a night intruder mission over North-west Europe, circa 1942. No. 418 (Intruder) Squadron, led by Russ Bannock and Johny Caine (Edmonton), achieved more RCAF air to ground and air to air kills, than all other Canadian squadrons. The squadron was later equipped with Mosquitoes. The squadrons score included 173 aircraft destroyed of which 73 were on the ground, 9 probables, 103 damaged, 76 V-1's destroyed over water, and 7 V-1's destroyed over England. No. 418 (Intruder) Squadron dropped 56 tons of bombs, destroyed 17 locomotives and damaged 59 locomotives, with 52 freight and passenger cars destroyed or derailed and 300 motor vehicles destroyed. (Imperial War Museum CH7211)

Douglas Boston Mk. III (Intruder), No. 418 (Intruder) Squadron, RCAF, coded TH-C, taxiing at Bradwell Bay, Essex, prior to a night intruder raid over France, September 1942. No. 418 (Intruder) Squadron, operated Douglas Boston Mk. IIIs on night intruder sorties from Bradwell Bay. Its usual targets were Luftwaffe airfields, the French railway system and occasionally factory buildings. The aircraft in the photograph carry ventral fuselage gun packs housing four 20-mm cannon. (Imperial War Museum CH7210)

Boston Mark III (Intruder), W8317 ‘TH-S’, of No. 418 Squadron RCAF, parked at Ford, Sussex at nightfall.  Canvas covers are protecting the glazed nose and the front of the engine cowlings. (Imperial War Museum CH9502)

Havoc Mark I of No. 23 Squadron RAF based at Ford airfield in Sussex. The aircraft had been converted from a Boston for 'Intruder' duties, flying over European airfields at night to interrupt the activities of German night fighters. The aircraft has been painted black, and the armament changed. (Imperial War Museum)

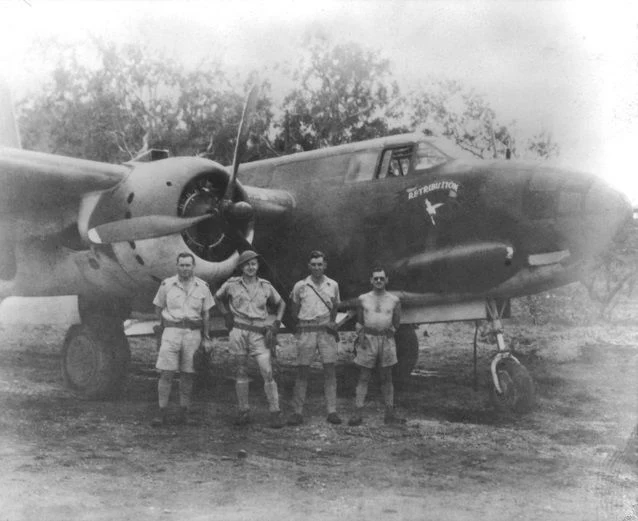
Squadron Leader K R McDonald (second from left) and his crew in front of their Boston bomber aircraft "Retribution" of No. 22 Squadron RAAF. Second from the right is 420247 Sergeant Charles Roland 'Chick' Napier who was killed during operations over Buna on 26 November 1942. (Australian War Memorial OG0078)

Noemfoor Island, Dutch New Guinea, c. August 1944. Pilots standing beside a Boston, DU-U, of No. 22 Squadron RAAF checking over the course on the maps before setting out on a strike over enemy territory. Left to right: Flight Lieutenant (Flt Lt) J. T. Robert; Flt Lt G. I. Murrie (lost on operations over Netherlands East Indies on 23 September 1944); Flying Officer (FO) F. Ford; Flt Lt L. Williamson; Flt Lt D. H. Daly; FO J. E. Warren (lost on operations over the Arde Islands on 25 September 1944). (Australian War Memorial OG1529)

Douglas Boston Mark IIIs of No 88 Squadron RAF, lined up at Attlebridge, Norfolk. (Imperial War Museum CH5601)

Ground crew testing the engines of a Douglas Boston Mark III  of No. 88 Squadron RAF Attlebridge, Norfolk. (Imperial War Museum CH5599)

Five Douglas Boston Mark IIIs of No. 12 Squadron SAAF, lined up ready for take off at Gzina/Sidi Azzab, Libya. (Imperial War Museum CM4677)

A Douglas Boston Mark III of No. 12 Squadron SAAF raises the dust while opening up its engines for take off at Bir el Beheira, Libya. (Imperial War Museum CM2903)

Douglas Boston Mark IIIs of No. 12 Squadron SAAF set off in loose formation on a bombing raid from their base at Bir el Beheira, Libya. (Imperial War Museum CM2912)

The crew of Douglas Boston Mark III, W8376 'C', of No 24 Squadron, South African Air Force, walking away from their aircraft on an airfield in Libya after a sortie. (Imperial War Museum CM2079)

Douglas Boston Mark III, BZ208 'OA-G', of No. 342 (Free French) Squadron RAF undergoes a serviceability check by ground crew at  B50/Vitry-en-Artois, on the first day of the unit's return to France. (Imperial War Museum CL1457)

Douglas Boston Mark IIIs of No. 24 Squadron SAAF prepare to take off from Bir el Beheira, Libya, to bomb enemy positions in the 'Knightsbridge' area during the first Battle of Alamein. (Imperial War Museum CM3099)

Three Douglas Boston Mark IIIs, Z2218, Z2225 and Z2237, flying in formation on an air test or delivery flight from Kasfareet, Egypt.  These aircraft served with No. 24 Squadron SAAF, so may be flying to join the unit in the Western Desert. (Imperial War Museum  CM3042)

Ground crew prepare Douglas Boston Mark III, Z2162 'G', of No. 24 Squadron SAAF, for action at a landing ground in the Western Desert.  The fairing covering the forward-firing .303 machine guns has been removed so that the guns may be armed. (Imperial War Museum CM2081)

Douglas Boston Mark III, AL691 'VL-W', of No. 12 Squadron SAAF being refueled and readied at Bir el Beheira, Libya, for a bombing raid on enemy transport.  In the foreground, armorers prepare 500-lb GP Bombs for loading into the aircraft.  AL691 was lost on 25 June 1942 when it was hit by anti-aircraft fire and spun into the ground near Sidi Baarrani. (Imperial War Museum CM2907)

The "Boston Shuttle" (1): a squadron of Douglas Boston Mark IIIs of No. 3 Wing SAAF positioned for their famous simultaneous take-off maneuver on a landing ground in the Western Desert.  This commenced with all aircraft turning into wind in line abreast.  The leading aircraft, on the right-hand side, then commenced its take-off run with the remainder following in echelon port so that each aircraft avoided the dust of the one ahead. (Imperial War Museum CM3539)