Viewing Photographs

Many of the images used in this blog are larger than they are reproduced in the article posts. Click on any image and a list of thumbnails will be displayed and clicking on a thumbnail will display that image in its original size.

The Attack on Pearl Harbor

It was early morning, 7 December 1941. As the sun was just beginning to rise in Oahu, Hawaii, a fleet of Japanese naval air forces were taking off from their respective aircraft carriers in various locations in the Pacific Ocean. Just as many of the islanders were waking up for breakfast, it happened. The Japanese air fleet had arrived with a vengeance. No one was prepared for what was occurring. Pearl Harbor, the United States’ center for military action in the Pacific Ocean, was almost completely destroyed. Anger toward the Japanese spread quickly throughout the entire country, and this anger led to the United States’ entry into World War II.

Events Leading Up to the Attack

Before entering World War II, Japan had many other problems to deal with. It had begun to rely more and more for raw materials (especially oil) from outside sources because their land was so lacking in these. Despite these difficulties, Japan began to build a successful empire with a solid industrial foundation and a good army and navy. The military became highly involved in the government, and this began to get them into trouble. In the early 1930’s, the Japanese Army had many small, isolated battles with the Chinese in Manchuria. The Japanese Army prevailed in the series of battles, and Manchuria became a part of the Japanese political system. In 1937, the conflicts began again with the Chinese in the area near Beijing’s Marco Polo Bridge. Whether or not these conflicts began inadvertently or whether they were planned is unknown. These led to a full-scale war known as the second Sino-Japanese War. This was one of the bloodiest wars in world history and continued until the final defeat of Japan in 1945.

In 1939, World War II was beginning with a string of victories by German forces. Germany’s success included defeats of Poland and France along with a seizure of England. Many of the European nations that Germany now controlled had control over important colonial empires such as the East Indies and Singapore in Southeast Asia. These Southeast Asian countries contained many of the natural resources that Japan so desperately needed. Now that these countries were worried about matters over in Europe, Japan felt that it should seize the opportunity to take over some of them.

At the same time in the United States, President Franklin D. Roosevelt wanted to halt the expansion of Germany and Japan, but many others in the government wanted to leave the situation alone. The United States began to supply materials to the countries at war with Germany and Japan, but it wanted to remain neutral to prevent an overseas war. Meanwhile, Germany, Italy, and Japan formed the Axis Alliance in September of 1940. Japan was becoming desperate for more natural resources. In July of 1941, Japan made the decision to secure access to the abundance of the much needed resources in Southeast Asia. It was afraid that it could not defeat the larger and stronger Western powers. It needed to build up its armies in order to stay in the war. It also had to worry, though, about the United States’ reaction to their plans to seize Southeast Asia.

Japan began their seizure with southern Indochina. (They already controlled northern Indochina.) The United States was in strict opposition to Japan’s plans, and began their reaction with an embargo on the shipment of oil to Japan. Oil was necessary to keep Japan’s technology and military progressing. Without it, Japan’s industrial and military forces would come to a stop in only a short time. Japan’s government viewed the oil embargo as an act of war.

Throughout the next few months of 1941, the United States tried to come to some kind of resolve with Japan to settle their differences. Japan wanted the United States to lift the oil embargo and allow them to attempt a of China. The United States refused to lift the embargo until takeover Japan would back off of their aggression with China. Neither country would budge on their demands, and war seemed to be inescapable.

The United States regarded Japan’s adamant refusal to budge on their stance as a sign of hostility. They too realized that war was inevitable. They responded to this potential war with Japan by adding to the military forces stationed in the Pacific. General Douglas MacArthur and his ground forces in the Philippines began to organize into a formidable army. The B-17 was just arriving at many air force bases throughout the country, and was a great confidence to MacArthur upon its arrival. MacArthur became so confident in his forces stationed in the Philippines that on 5 December 1941 he said, “Nothing would please me better than if they would give me three months and then attack here.”

The most powerful and most crucial part of American defense in the Pacific Ocean was that of the U.S. Pacific Fleet. Usually, this fleet was stationed somewhere along the west coast of the United States, and made a training cruise to Hawaii each year. With war looming, the U.S. Pacific Fleet was moved to the Pearl Harbor naval base in Hawaii. This was the perfect location for the American forces in the Pacific because of its location, halfway between the United States west coast and the Japanese military bases in the Marshall Islands. The Pacific Fleet first arrived at Pearl Harbor naval base on 2 April 1940, and were scheduled to return to the United States mainland around 9 May 1940. This plan was drastically changed because of the increasing activity of Italy in Europe and Japan’s attempt at expansion in Southeast Asia. President Roosevelt felt that the presence of the Pacific Fleet in Hawaii would retard any Japanese attempt at a strike on the United States. Admiral James O. Richardson of the Pacific Fleet was in full opposition to the long stay at Pearl Harbor. He felt that the facilities were inadequate to maintain the ships or crews. Admiral Harold R. Stark, Chief of Naval Operations, was the one who originally made the decision to extend the crew’s stay in Hawaii; and, in spite of Admiral Richardson’s complaints, he maintained that the Pacific Fleet must stay there to keep the Japanese from entering the East Indies. Richardson felt that the Japanese would realize the military disadvantages of being stationed at Pearl Harbor, and would be quick to act on the situation. All of Richardson’s objections, in meetings with both the Secretary of the Navy Frank Knox and the President, got him nothing but a dismissal shortly thereafter.

On 12 November 1940, British torpedo bombers launched an attack on the Taranto harbor in Italy. This sent worry into United States government officials who were afraid that the same thing could happen to Pearl Harbor. On 22 November, Admiral Stark suggested to Richardson the idea of placing anti-torpedo nets in Pearl Harbor. Richardson replied that they were neither necessary nor practical. On 1 February 1941, Richardson was officially replaced by Admiral Husband E. Kimmel. Kimmel also did not like the idea of his fleet at Pearl Harbor; but, after seeing what had happened to Richardson, he was very quiet about his objections. The Pacific Fleet was to be used as a defensive measure to direct Japan’s attention away from Southeast Asia by:

Capturing the Caroline and Marshall Islands

Disrupting Japanese trade routes, and

Defending Guam, Hawaii, and the United States mainland. Kimmel was supposed to prepare his fleet for war with Japan.

Admiral Isoroku Yamamoto, commander-in-chief of Japan’s Combined Fleet, had to be careful of his country’s position in the Pacific. If he concentrated his forces too much in the Pacific islands, then the mainland would be more susceptible to attack from Europe and even the United States. Yamamoto devised a plan that involved an opening blow to the United States Pacific Fleet at the same time as their offensive against British, American, and Dutch forces in Southeast Asia. He planned to cripple the United States while he quickly conquered much of Southeast Asia and gathered their natural resources. He hoped that his attack against the Pacific Fleet would demoralize the American forces and get them to sign a peace settlement allowing Japan to remain as the power in the Pacific. A month after the British attack on Taranto harbor, Yamamoto decided that if war with the United States was unavoidable he would launch a carrier attack on Pearl Harbor. In January of 1941, Yamamoto first began to commit to this strategy by planning out his attack and showing it to other Japanese officials. Yamamoto developed the following eight guidelines for the attack:

Surprise was crucial

American aircraft carriers there should be the primary targets

U.S. aircraft there must be destroyed to prevent aerial opposition

All Japanese aircraft carriers available should be used

All types of bombing should be used in the attack

A strong fighter element should be included in the attack for air cover for the fleet

Refueling at sea would be necessary, and

A daylight attack promised best results, especially in the sunrise hours.

Many of Japan’s Navy General Staff were in opposition to Yamamoto’s plan, but they continued to prepare for the attack. All of the necessary training was given to troops, and all of the fighters and submarines were prepared.

The Bombing Begins

There were peace talks occurring up until about 27 November 1941. At that time, negotiations had come to a halt. The United States put its troops on alert. On 6 December 1941, President Roosevelt made an appeal for peace to the Emperor of Japan. Not until late that day did the U.S. decode thirteen parts of a fourteen part message that presented the possibility of a Japanese attack. Approximately 9 a.m. (Washington time) on 7 December 1941, the last part of the fourteen part message was decoded stating a severance of ties with the United States. An hour later, a message from Japan was decoded as instructing the Japanese embassy to deliver the fourteen part message at 1 p.m. (Washington time). The U.S., upon receiving this message sent a commercial telegraph to Pearl Harbor because radio communication had been down.

At 6 a.m. (Hawaiian time) on 7 December 1941, the first Japanese attack fleet of 183 planes took off from aircraft carriers 230 miles north of Oahu. At 7:02 a.m., two Army operators at a radar station on Oahu’s north shore picked up Japanese fighters approaching on radar. They contacted a junior officer who disregarded their sighting, thinking that it was B-17 bombers from the United States west coast. The first Japanese bomb was dropped at 7:55 a.m. on Wheeler Field, eight miles from Pearl Harbor. The crews at Pearl Harbor were on the decks of their ships for morning colors and the singing of The Star Spangled Banner. Even though the band was interrupted in their song by Japanese planes gunfire, the crews did not move until the last note was sung. The telegraph from Washington had been too late. It arrived at headquarters in Oahu around noon (Hawaiian time), four long hours after the first bombs were dropped.

Aftermath of the Bombing

Of the approximately one hundred U.S. Navy ships present in the harbor that day, eight battleships were damaged with five sunk. Eleven smaller ships including cruisers and destroyers were also badly damaged. Among those killed were 2,335 servicemen and 68 civilians. The wounded included 1,178 people. The U.S.S. Arizona was dealt the worst blow of the attack. A 1,760 pound bomb struck it, and the ammunition on board exploded killing 1,177 servicemen. Today, there is a memorial spanning the sunken remains of the Arizona dedicated to the memory of all those lost in the bombing.

News of the attack was a shock to the entire nation. The bombing rallied the United States behind the President in declaring war on Japan. On 11 December, Germany and Italy declared war on the U.S., bringing about a global conflict. The United States would later drop two atomic bombs on the Japanese cities of Hiroshima and Nagasaki, bringing Japan to complete surrender on 14 August 1945.

Map showing the disposition of the fleet at Pearl Harbor on 7 December 1941.

Cartoon found in a crashed Japanese Navy aircraft following the attack on Pearl Harbor. The Japanese inscription at left reads: Hear! The voice of the moment of death. Wake up, you fools.

Recovered from a Japanese Navy aircraft downed during the attack on Pearl Harbor, 7 December 1941. The chart identifies ship mooring locations and is entitled (at upper left): Report on positions of enemy fleet at anchorage B. The chart identifies mooring locations with a radial grid. Sectors and distances are coded by single katakana figures.

Found among Hirano’s effects was this map marked with an “X” for the rendezvous point. 

Japanese model of Pearl Harbor, showing ships located as they were during the 7 December 1941 attack. This model was constructed after the attack for use in making a motion picture. The original photograph was brought back to the U.S. from Japan at the end of World War II by Rear Admiral John Shafroth, USN.

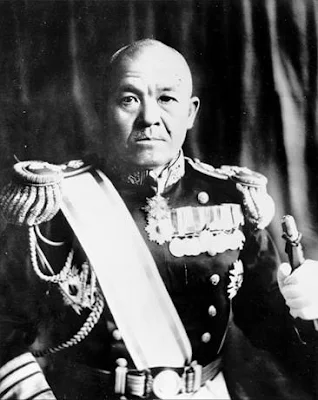
Adm. Isoroku Yamamoto, architect of the Pearl Harbor attack. Educated in the United States and an inveterate gambler, Yamamoto’s nickname “80 Sen” derived from the two missing fingers on his left hand, evident in this photo, lost at the Battle of Tsushima. A Geisha manicure of the time cost 100 yen.

Fleet Admiral Isoroku Yamamoto, Imperial Japanese Navy, Commander in Chief of the Japanese Combined Fleet, initiated plans for the attack.

Vice Admiral Chuichi Nagumo, Imperial Japanese Navy, First Fleet Air Commander, led the Japanese Striking Force which launched the air attacks on Hawaii.

Tatsuta Maru, flagship of the NYK [Nippon Yusen Kaisha] Line, view taken circa 1940, with neutrality markings prominently displayed on the sides of her hull, forward. The Tatsuta Maru (16,975 grt, 584 ft. long) commenced her maiden voyage between Yokohama and San Francisco in April 1930. The transliteration of her name was changed to Tatuta Maru in 1938. In December 1941 Tatsuta Maru was part of an elaborate Japanese deception plan to mask the unannounced attack on the U.S. Pacific Fleet in Pearl Harbor.

Tatsuta Maru, marked with symbols of safe passage while working as a repatriation ship as seen through the periscope of the U.S. Navy submarine USS Kingfish (SS-234) in October 1942. Subsequently, with the start of the Pacific War, the Tatsuta Maru was requisitioned for use as a troopship for the Imperial Japanese Navy. She ended her days in 1943 when sunk by a U.S. submarine off Mikurajima, 120 miles south of Tokyo Bay. Her sistership the Asama Maru was near-identical, whereas a half-sister, the Chichibu Maru, was slightly larger with only one funnel. In 1942, the Tatsuta Maru and two other NYK vessels - Asama Maru and Kamakura Maru - provided transport for exchange of U.S., British, and Japanese diplomats.

Tatsuta Maru marked with symbols of safe passage while working as a repatriation ship. She sailed from Yokohama on 2 December bound for San Francisco with the task of exchanging American evacuees from East Asia for Japanese nationals in the United States. She was scheduled to reach the U.S. on 14 December and despite rumors of war the American press wrongly concluded that meant nothing was likely to happen for some time. The master of the ship had sealed orders to turn around at midnight on 7 December and return to Japan while maintaining radio silence.

Minoru Genda (16 August 1904 – 15 August 1989) was a well-known Japanese military aviator and politician. He is best known for helping to plan the attack on Pearl Harbor. He was also the third Chief of Staff of the Japan Air Self-Defense Force.

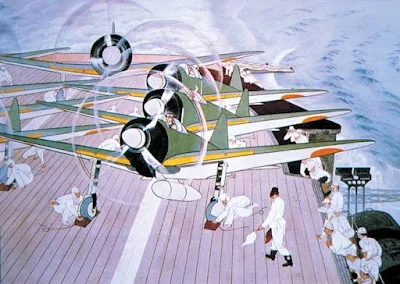
On the eve of the Pacific war, while American and British aircraft carriers operated singly, Japan's carrier force, Kido Butai, had evolved into one of naval history's most awesome weapons. John Hamilton's painting depicts first attack-wave aircraft assembling above Kido Butai's six carriers early on 7 December 1941.

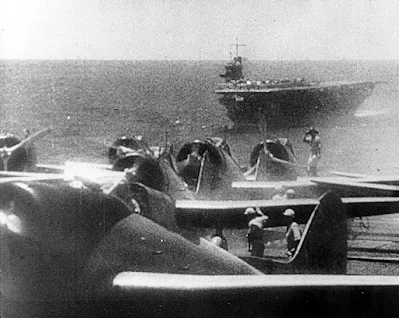
Japanese aircraft carrier steams through heavy north Pacific seas, en route to attack Pearl Harbor, Hawaii, circa early December 1941. Carrier Zuikaku is at right. Frame from a motion picture film taken from the carrier Akagi. The original film was found on Kiska in 1943.

Japanese pilots on one of the carriers headed for Oahu listen to the radio.

Briefing of Japanese air crews on Kaga.

Japanese war art depicting the launching Mitsubishi Zero fighters from the deck of one of the carriers on December 7, 1941.

A6M2 Zero fighter aboard carrier Akagi prior or during the attack on Pearl Harbor, December 1941.

Japanese Navy Type 97 Carrier Attack Plane (B5N1 Kate) Takes off from the carrier Akagi during the filming of the motion picture From Pearl Harbor to Malaya, circa March-April 1942. This scene is frequently used to represent the launch of torpedo planes to attack Pearl Harbor on 7 December 1941. However the plane is the older B5N1 model, not the B5N2 used for the Hawaii Operation. Its torpedo is an exercise unit (note its dented nose and lack of air box aerodynamic fins at the tail).

Aircraft prepare to depart the Imperial Japanese Navy aircraft carrier Shokaku for the first wave of strikes on the US naval base at Pearl Harbor, Hawaii on December 7, 1941.

Japanese naval aircraft prepare to take off from an aircraft carrier (reportedly Shokaku) to attack Pearl Harbor during the morning of 7 December 1941. Plane in the foreground is a Zero Fighter. This is probably the launch of the second attack wave. The original photograph was captured on Attu in 1943.

Japanese Navy Type 99 Carrier Bombers (Val) prepare to take off from an aircraft carrier during the morning of 7 December 1941. Ship in the background is the carrier Soryu.

A Japanese Navy Type 97 Carrier Attack Plane (Kate) takes off from a carrier as the second wave attack is launched. Ship's crewmen are cheering Banzai This ship is either Zuikaku or Shokaku. Note light tripod mast at the rear of the carrier's island, with Japanese naval ensign.

The Commanding Officer of the Japanese aircraft carrier Shokaku watches as planes take off to attack Pearl Harbor, during the morning of 7 December 1941. The Kanji inscription at left is an exhortation to pilots to do their duty.

A Japanese Navy Type 97 Carrier Attack Plane (Kate) takes off from the aircraft carrier Shokaku, en route to attack Pearl Harbor, during the morning of 7 December 1941.

A Japanese Navy Zero fighter (tail code A1-108) takes off from the aircraft carrier Akagi, on its way to attack Pearl Harbor during the morning of 7 December 1941.

This photo purports to be the second wave leaving Akagi.

Another view of Akagi launching Zero fighters.

Flight Officer 1st Class Shinpei Sano launches from the flight deck of the Akagi in an A6M2 model 21 Zero after sunrise in the second attack wave on Pearl Harbor. Sano died in the Battle of Midway in June 1942.

Japanese Navy Type 99 Carrier Bomber (Val) in action during the attack.

Japanese Type 00 Carrier Fighter (Zero) trailing smoke after it was hit by anti-aircraft fire during the attack. The masthead machine gun platform of a battleship is visible in the lower right. [US Navy/National Archives]

Japanese Navy Type 99 Carrier Bomber (Val) drops a 250 kilogram bomb during the attack.

Japanese Navy Type 99 Carrier Bomber, an Aichi D3A “VAL”, in action at Pearl Harbor during the Japanese Attack. Plane was from the Japanese carrier Akagi. [U.S. Navy photograph 80-33013 now in the collections of the National Archives]

A Japanese Type 99 Val bomber in the skies over Pearl Harbor. [US Navy/National Archives]

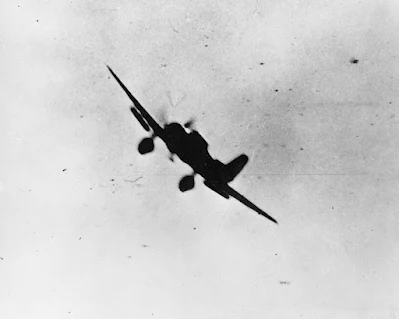
Aichi D3A being shot down over Pearl Harbor.

Commander Logan C. Ramsey, the officer who broadcast the dramatic signal "Air Raid Pearl Harbor. This is no drill."

B-17s flying into Hawaii were caught in the middle of the attack. Two Vals are shown here off the left wing of a B-17E after attacking it.

A USAAF B-17E Flying Fortress with landing gear lowered tries to find a safe place to land during the attack. In the foreground is the seaplane tender USS Avocet (AVP-4).

Boeing B-17C Flying Fortress heavy bombers burning at Hickam Field, Oahu, on 7 December.

One of the 38th Reconnaissance Squadron’s B-17Es at Hickam Field. In the background is a B-17C and a column of smoke from the burning Arizona.

A burned U.S. Army Air Forces Boeing B-17C Flying Fortress (s/n 40-2074) rests near Hangar 5, Hickam Field, Oahu, Hawaii, on 7 December 1941. It was flown to Hickam by Captain Raymond T. Swenson from California and arrived during the attack. On its final approach, the aircraft’s magnesium flare box was hit by Japanese strafing and ignited. The burning plane separated upon landing. The crew survived the crash, but a flight surgeon was killed by strafing as he ran from the burning wreck.

Nakajima B5N2 over Hickam.

AII-352 and AII-318 are high level bombers from the Kaga high level first wave unit on 7 December 1941. The crew identity is unknown. The date attack, for the Japanese is 16th year, 12th month, 8th day. The year is given as the year of an Emperor's reign, in Hirohito's case this was known as 'Showa', so the this can be literally read as 16 Showa or the 16th year of Hirohito which equated to 1941. The day is Tokyo time, i.e, when it was the 7th here (or in Hawaii) it was the 8th in Japan. Note the demarcation between the fuselage green and the brown tail of "352" [with AII-318 in the background.] Note the absence of portside "AII-" on Kaga KATE "352" over Oahu. This means where the deck crew had not completed the painting yet it was in operation.

Japanese Nakajima B5N2 Type 97 “Kate” bomber from the carrier Zuikaku, flying over Pearl Harbor with Battleship Row in flames. This “Kate”, tail code EII-307, was flown by F1c Masato Hatakenaka, accompanying him were PO2c Shuichi Ueno and F1c Kingoro Oizumi; December 7, 1941.

Nakajima B5N from Kaga departing Pearl Harbor after attack. (US National Archives]

The first Japanese plane shot down during the attack on Pearl Harbor on December 7, 1941.

Hirano crashed into Fort Kamehameha’s ordnance machine shop.

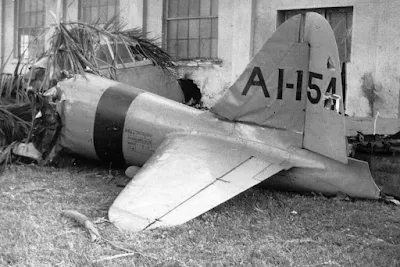
Japanese Type 00 Carrier Fighter (Zero) that crashed at Fort Kamehameha, near Pearl Harbor, during the attack. This plane, which had tail code A1-154 and a red band around its rear fuselage, came from the aircraft carrier Akagi.

The pilot brought his damaged plane down on a street in Fort Kamehameha. The airplane broke up but was largely intact. The pilot, Petty Officers 1st Class Takeshi Hirano was killed.

Workers at the Hawaiian Air Depot hanger begin to assemble parts of the wrecked fighter prior to their examination and evaluation.


Examiners made many incorrect assumptions about AI-154, most based on the belief that it reflected American technology.

Interior of the cockpit of a Zero which crashed into Building 52 at Fort Kamehameha, Oahu, during the 7 December 1941 raid on Pearl Harbor. The pilot, who was killed, was NAP1/c Takeshi Hirano. Plane's tail code was AI-154. Note the U.S. manufactured Fairchild Radio Compass in the upper center (Compass Model RC-4, Serial # 484). It was tuned in on 760 KC.

Tail of a Zero which crash landed on Niihau Island, Territory of Hawaii, on 7 December 1941, following the raid on Pearl Harbor. The plane's tail code was BII-120. It came from the carrier Hiryu and landed on Niihau after running low on fuel. Some of the rudder's fabric covering has been cut off by souvenir hunters.

The wreckage of a Japanese Nakajima B5N2 "Kate" torpedo bomber from the Kaga hauled from the bottom of the harbor still clearly showed the red "meatball" and indications that it had probably burned before crashing.

Wing of a Japanese Navy Type 97 Carrier Attack Plane (Kate) that crashed at the Naval Hospital, Pearl Harbor, during the attack. This plane came from the aircraft carrier Kaga. Its Rising Sun insignia has been largely cut away by souvenir hunters.

Japanese Navy Type 99 Carrier Bomber (Val).

Japanese Navy Type 99 Carrier Bomber (Val) is examined by U.S. Navy personnel following its recovery from Pearl Harbor shortly after the attack. This plane was relatively intact, except that its tail section was broken away. It came from the aircraft carrier Kaga.

Japanese Navy Type 99 Carrier Bomber, an Aichi D3A “Val".

Japanese Navy Type 99 Carrier Bomber, an Aichi D3A “Val".

Wreckage of a Japanese plane shot down in raid on Pearl Harbor.

Still from a Japanese propaganda movie about the attack on Pearl Harbor.

West Virginia (foreground) and Tennessee (background). 

Hawaii Undersea Research Lab Report on Condition of Three-Piece Japanese Midget Submarine

by Terry Kerby, Ops Director HURL

On March 22 and 23, 2009, the Hawaii Undersea Research Lab conducted dives to the 3 piece Japanese Midget Submarine as part of a Lone Wolf and NHK expedition. This project enabled HURL to conduct a detailed survey of all three sections of the submarine.

The historical significance of these submarine sections is that this is most likely the 5th and final Japanese Midget Submarine from the Dec 7th attack.

HURL discovered the stern section in 1992, the mid-section in 2000, and the bow section in 2001.

The last survey of all 3 pieces of the submarine sections was in 2001. The condition of the submarine has degraded significantly since then. Most notable was the condition of the mid-section. The mid-section is laying on the bottom with a 45° list to port.

The first thing I noticed on our return survey was that most of the periscope has broken off and is laying on the bottom and that the aft part of the conning tower has broken away.

The jagged edges of the after section aft of the conning tower that appeared to have been caused by an external explosion have broken away at the frames. This gives the appearance of a cleaner break now.

There is a hole in the forward starboard side of the hull about 1ft long and 9" wide that was not an open hole when the sub was surveyed in 2001. The hole now affords a clean view into upper area of the forward end of the mid-section.

There is still a major section of this submarine that is missing. The after part of the mid-section from the jagged end where it is presumed the scuttling charge blew the stern off to where this section bolted onto the stern section is about 15ft.

The three pieces of the midget sub are oriented in a Northeast-Southwest direction about 60 to 70 meters apart. Further surveys to the Northeast or Southwest may produce the resting place of the 4th piece if it was dumped with the rest of the sub.

Survey conditions: As with the surveys done on the USS Ward's midget sub, current conditions dictate where the Pisces subs could safely survey the wreckage without causing damage to the wreck site. During the filming and survey of the 3 piece midget submarine changing current conditions allowed us to survey both ends of all pieces. The pieces are close enough together that if the current changed allowing us to get access to a section we could not survey before it was not difficult to move the subs back to another section to conduct a closer survey.

Since the discovery of 3 pieces followed by the discovery of the midget submarine sunk by the USS Ward, HURL has formed a general theory as to how what may be the 5th Pearl Harbor midget submarine may have come to be jettisoned in the Defensive sea area.

The following is a brief review of HURL's history with the 3 piece midget submarine and an overview of how we think it may have come to a final resting place in the Defensive Sea area surrounded by wrecked landing craft.

The Origin of the 3-piece Midget Submarine: The HURL Operations Theory

In 1991 the HURL team did not know anything about the midget submarines involved in the predawn attack on Pearl Harbor on Dec 7th 1941, except that one was sunk by the USS Ward before the air attack started. That same year HURL was invited by the US National Park Service and National Geographic Society to participate in the 50th anniversary of the attack on Pearl Harbor by providing the Pisces V to try to find the resting place of the midget submarine sunk by the USS Ward. We were not able to participate but as a result developed a relationship with Dan Lenihan of the National Park Services Submerged Cultural Resources Unit. It was then we learned the Wards Midget had not been discovered and that 5 midget submarines participated in the attack. We decided then to conduct our pre-dive season test dives in and around the Defensive Sea Area to try to find the Wards midget submarine. 1992 was our first effort and during our first test dive I discovered the stern section of a Japanese midget submarine. It was only because we had become familiar with how they were constructed that I knew what we had discovered. My 2 passengers were convinced we had discovered the Wards midget but it was obvious to me at the time that this section appeared to have been disassembled at the flange joint and rigged with cables and dumped.

We continued to dive in and around the Defensive Sea Area finding many World War II artifacts until 2000 when National Geographic and Bob Ballard were launching an expedition to locate the Wards Midget. On our first test dive of 2000, about a month before the Nat Geo/Ballard project was to start, we came across the mid-section of a Japanese midget submarine. When I saw the conning tower I thought we had actually discovered the resting place of the Ward's midget. The first thing that seemed obvious to me was that the stern section had blown off. I surmised that this might have been where the USS Ward's shell detonated, though I did not see a hole in the starboard side of the conning tower where veterans from the Ward reported seeing the shell hit. When our silt cloud cleared away I moved forward to inspect the bow and was surprised to find it was missing. When I saw the clean disconnection at the flange joint and the cable rigged through a hole in the forward upper deck I realized this was not the Wards midget sub. I realized this mid-section probably went with the stern section we had discovered in 1992 surmised that this midget submarine was probably a prize of war brought back to Hawaii from the Pacific campaign and inspected, disassembled and dumped.

The next year we went back to the same area to conduct our test dives and further survey the mid-section. We located the mid-section and then located the bow section and finally relocated the stern section, all in close proximity to each other. Except for about 15 feet missing from where the after part of the mid-section bolted to the stern section we had now discovered all three pieces of a midget sub that had been disassembled, rigged, and dumped in an area with numerous landing craft.

On August 28 2002, during our 3rd and final test dive before our science dive season commenced, we discovered the final resting place of the midget submarine sunk by the USS Ward on Dec 7th 1941. We had been searching for 10 years.

After finding the Ward's midget we recognized the identical construction characteristics between the Ward's midget and the 3 piece midget and asked ourselves "could this possibly be the missing 5th and final midget submarine?"

In December of 2006 we collectively made a decision to present HURL's theory to the historians. Dr Chris Kelley, HURL's chief biologist gave a presentation as part of "A Nation Remembers" symposium on the Pearl Harbor attacks. At the end of his talk entitled "Hidden History, the Discovery of the Wards Midget sub" Chris presented our theory that we might have found the 5th midget to the room full of historians. Chris was the one who located 39 possible midget sub targets during testing of a side scan system that helped lead to the discovery of the Wards midget in 2002.

In March 2009 we returned to the location of the 3 piece midget to do a project with Lone Wolf Productions and NHK. The project was to explore the possibility that these 3 sections comprise the missing Japanese midget submarine from the Dec 7th attack. A team of midget sub experts joined us and made dives to the sites. The most valued member of this team was retired Admiral Kazuo Ueda, a midget submarine veteran. Admiral Ueda confirmed the figure-eight torpedo guard configuration was only used on the 5 Pearl Harbor midget submarines, thus confirming our theory. All 5 hulls with the figure-8 torpedo guard were now accounted for. HURL had discovered the 5th and final midget submarine.

The big question now was how did it get disassembled and dumped at sea?

This is the theory we feel makes the most sense with the available information at hand. We believe this submarine was salvaged from protected waters. If it had been lost at sea in deeper water it might not have been discovered. Like the Keehi Lagoon midget it would have probably eluded detection for years. If it was visible on the reef there would have been surge damage to the hull. The hull is clean without signs of depth charge wash boarding or impact damage that would have been sustained from wave action and the reef. It is also doubtful the Navy or a private contractor would risk a crane barge to recover the submarine in an area subject to the effects of onshore swells. Such an operation would have been very visible as well and there is no record so far of the salvage of this submarine. The closest protected waters would be Pearl Harbor.

We believe this submarine fired its torpedoes at the heavy cruiser USS St Louis as the ship was trying to make its way out to sea from Pearl Harbor. There are multiple sources verifying the fact that 2 torpedoes were seen coming towards the St Louis and detonated on the reef. We do not think these torpedoes could have come from one of the fleet submarines. The St Louis was still in the channel surrounded by reef and could not maneuver to avoid the torpedoes without going aground. The fleet subs were 343ft long and would have been nearly on the reef to have made that shot. Admiral Ueda confirmed that the fleet subs ran away and were nowhere near where the St Louis was when 2 torpedoes exploded close off her starboard side. If it was a fleet submarine, why would it just fire 2 torpedoes when they could fire 4?

We feel it is unlikely that any midget sub made it all the way to battleship row. First of all they were difficult to control at periscope depth. They did not have bow planes and the stern planes were very small and not very effective. Both the Ward's midget and the midget submarine rammed by the USS Monaghan were running with the conning tower exposed. The submarine sunk by the Monaghan barely made it into the harbor before it was detected and fired on by several batteries.

Some sources believe the 5th midget made it undetected all the way to battleship row and sat on the bottom and waited for the attack to begin, then surfaced amongst falling bombs and passing torpedoes, and fired two torpedoes into battleship row. We believe this theory is not only unlikely, but preposterous. First of all, for the reasons already mentioned, but also from first-hand experience conducting a dive in the submersible Star II in the 1970's off of Taiwan. A tremendous explosion occurred during one dive that rocked the Star II and felt like the aft end of the sub had blown off. We found out later that the Chinese Army had detonated an underwater demolition charge off an island that was 5 miles away. It is hard to imagine what it would have been like sitting in 30ft of water with bombs and torpedoes exploding 100yards away or less.

After firing both torpedoes at the St Louis we believe the midget sub sat on the bottom and waited. Admiral Ueda said it would have been unlikely the crews could have still been alive after being submerged all day, but we know Sakamaki and Inagaki were still alive that night and made it all the way around to Bellows Beach on the East side of Oahu.

By nightfall surviving crews would have been in the subs for about 17 hours. The crew of the 5th midget were probably exhausted, confused, and near death from asphyxiation. After attacking the St Louis and sitting on the bottom all day listening to explosions and ships overheard, they may have decided to try to surface, risking detection, but death was a certainty anyway if he did not surface and get air. The sub may have been sitting close to the entrance to the harbor. Even if the entrance nets were closed, all he would have needed to get over them was about 6ft of clearance.

The Admiral does not think these crews were trained enough to have the strategic forethought to plan to move up the West Loch, but what if the midget sub commander had no idea where he was going but chose the route where there was the least amount of activity. He would have had a good diversion if he entered when ship and shore batteries were shooting at SDB Dauntless Dive Bombers arriving from the USS Enterprise. He may have ended up in West Loch out of battery power, and having no other options, but to submerge and detonate the scuttling charge.

The submarine could have lain in the silt on the bottom of the West Loch basin undetected until May 21, 1944 when the West Loch disaster occurred. We believe the submarine was discovered by accident during the clean up after the West Loch explosion. It's our belief that a civilian salvage crew tasked with salvaging the damaged and sunken craft discovered the 80ft sub on the bottom. It had been soaking in the stagnant waters for 2.5 years and likely had no intelligence value at that point in the war. The salvors probably lifted it onto a crane barge and disassembled it at the flange joints to make the sections more manageable for disposal. We verified that the sections had been disassembled from the outside when we cleaned away the corrosion from the flange joint on the forward end of the mid-section. This revealed sheared off bolts in the flange holes.

The bow and mid sections were rigged in the same manner with a hole punched through the forward end near the flange joint and a cable rigged through the hole.

The stern section had a cable choked around the tail. The West Loch Disaster and the subsequent cleanup had been placed under a tight veil of secrecy. This would explain why there was no record of this salvage and disposal.

The mystery of the 5th midget submarine may become closer to being solved with the research and joint efforts of all involved in the NOVA/NHK documentary now being produced. From the evidence so far it is safe to assume that this is the 5th midget submarine from the Pearl Harbor attack and should be considered to be included in the protective management plan with the Ward's midget.