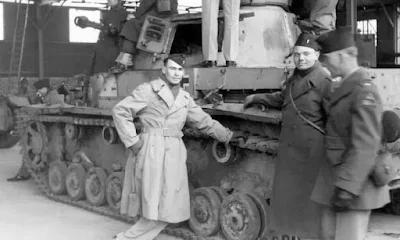
If the M4 Sherman and the PzKpfw. IV Ausf. H are compared point by point, there can be little doubt that the German tank was the better of the two in a meeting engagement.
The gun of the PzKpfw. IV Ausf. H was the 7.5-cm KwK 40 L/48, with a penetration roughly one and a half times that of the M4's M3 gun. The actual figures are about 96-mm and 66-mm respectively for an APCBC projectile at 500-m and an armor slope of 30 degrees from the vertical. Extrapolating these figures by adding twenty-five per cent to each gives a zero slope penetration of approximately 120-mm and 83-mm respectively. The decisive superiority of the KwK 40 is obvious.
The PzKpfw. IV Ausf. H also had better gun optics than the Sherman. Another important factor to consider is that every German medium and heavy tank (as well as many of the light) had an all-round vision cupola for the commander, which greatly improved the vehicle's fighting efficiency. In contrast to this practice, Shermans with vision cupolas didn't see action until mid-1944, and even then only the 76-mm versions had them as standard equipment until cupola production became sufficient. As a result, many Shermans finished the war without one.
In relation to both main armament and optics, mention must be made of the U.S. gyrostabilizer. Strictly speaking, the gyro was used much less in reality. Many sources state this lack of use, but perhaps one quote can sum it up: "Later, in France, 1944, another officer reported that 'experience has proven that tank crews have no faith in gyrostabilizers and will not use them. No amount of training seems to convince the tank's crews of the value of firing while moving … it could be left out of tanks scheduled for theaters of operations.'" Fortunately they weren't omitted, and with constant emphasis in training their use slowly but steadily increased in 1945. The Sherman was designed and used as a weapon of maneuver and exploitation, not for armored slugfests or for trading frontal blows with a more powerful enemy.
The hull front of the PzKpfw. IV Ausf. H consisted of two basically vertical 80‑mm plates and a 25-mm plate (containing three countersunk hatches) sloped at 73 degrees from the vertical; the turret front was 50-mm, again almost vertical, with a small curved 50-mm gun mantlet. The M4's front hull armor included a one-piece lower hull front of 51-mm sloped at 0-56 degrees and a five-piece upper hull front of 51-mm sloped at 56 degrees; the turret front was 76-mm, sloped at 30 degrees and somewhat curved horizontally, with a two-piece rotor/gun shield of 51-mm and 89-mm respectively. (On models built prior to 1943, the lower hull front was three pieces bolted together, the gun shield was 76-mm, and the rotor shield was 51-mm but too small to make much difference.) Using calculations based on penetration tables and slope evaluation formulas, the effective armor thicknesses (i.e., the ballistic resistance based on the combined characteristics of the actual thickness plus the amount of slope) of the PzKpfw. IV Ausf. H is only a few mm more than those figures given above, but the M4 hull front becomes about 114-mm thick and the turret front almost 100-mm. This effective thickness is illusory, however, and the clue to why is the fact that whereas the front of the PzKpfw. IV Ausf. H essentially consisted of four sections, that of the M4 was made up of no less than nine (and as many as thirteen in the early M4A2), and these separate sections—no matter how well attached to each other—were still inherently weaker than if they had been fewer in number.
The M4's gun could only penetrate about 87-mm at 250 yd. and zero slope, leaving an unpenetrated 13-mm–23-mm on a somewhat annoyed Tiger I.
Size is perhaps the biggest liability to the M4's survival. It's usually easier to hit than its opponent. When compared to other workhorses of the war, the PzKpfw. IV and the T-34/76, the M4 was a much bulkier target. Both were at least a foot lower in height (exclusive of any vision cupola), which is an important factor since an AFV's height determines its vulnerability to a much greater extent than does its width or length. Moreover, both had their guns mounted almost a foot lower, enabling them to assume an effective hull-down position behind a lower obstacle; if the M4 were to be behind this same obstacle, it would be more exposed both above and below its gun and thus be easier to hit.
To summarize the PzKpfw. IV Ausf. H/Sherman M4 comparison, the former had a more powerful gun, better optics, a vision cupola, and a lower height.
 |
| M4A1 75 supporting the 30th Infantry Division near St. Lo, July 1944, during Operation Cobra. The knocked out tanks are German Panzerkampfwagen IV tanks. |
 |
| American Medium Tank M4 Sherman passing destroyed German Panzer-kampfwagen IV tank alongside roadway into the city of Salerno. |
 |
| Canadian M4A4 "Sherman" of the South Alberta Regiment and destroyed PzKpfw IV. |
 |
| M4 medium tank passes a knocked out Panzerkampfwagen IV. Note the flat steel plate welded to the upper glacis plate. |
 |
| A Sherman tank passes a wrecked German Mk IV near Cagny during Operation 'Goodwood', 18 July 1944. Imperial War Museum B 7760. |
 |
| The same tanks as in the above photo, with troops from the 415th Regiment of the 104th Infantry Division. |
 |
| Captured Pz.Kpfw. IV being examined by Allied personnel. |
 |
| Pz.Kpfw. IV Ausf. H and M4A3E2 "Jumbo" medium tank on display at the Royal Museum of the Army and Military History in Brussels. |


No comments:
Post a Comment