|
| HMS Jervis Bay at Dakar, Senegal, which has to have been taken in either January or April 1940. You can clearly see that the ship was not painted battleship grey, as all of the painted pictures of the battle incorrectly indicate. You can also clearly see the starboard guns. S2 (on the well deck) was blown off the ship during the battle (complete with gun crew, who all perished - apart from Fred Billinge, who was on deck elsewhere at the moment the salvo hit.) (J.F. Aylard, survivor) |
HMS Jervis Bay was a British liner later converted into an
armed merchant cruiser, pennant F40. She was launched in 1922, and sunk on 5
November 1940 by the German pocket battleship Admiral Scheer.
The ship was launched as the Commonwealth Line steamer Jervis
Bay, named after the Australian bay of that name (the line named all its
passenger liners after bays). She was requisitioned by the Royal Navy in August
1939 at the outbreak of the Second World War, and armed with seven 1898-vintage
6 in (150 mm) guns and two 3 in (76 mm) guns of 1894 design.
After her acquisition and commissioning, Jervis Bay was
initially assigned to the South Atlantic station before becoming a convoy
escort in May 1940. Given brief repairs at Halifax, Nova Scotia, she became the
sole escort for the 37 merchant ships of Convoy HX-84 from Halifax, Nova Scotia
to Britain.
When the convoy encountered the German warship Admiral Scheer
about 755 nautical miles (1,398 km) south-southwest of Reykjavík, the Captain
of Jervis Bay, Edward Fegen, ordered the convoy to scatter, and set his own
ship on a course towards the German warship to draw its fire. Jervis Bay was
hopelessly outgunned and outranged by the 28 cm (11 inch) guns of the German
ship, but it attacked the larger ship with its guns, firing more to distract
the German ship from the merchantmen than with hopes of doing any damage.
Although the German's shells ravaged the Jervis Bay, and Fegen was wounded and
many crew killed, Fegen and the surviving crew fought on until their ship was
sunk. Captain Fegen, and many of the crew, went down with the ship.
Jervis Bay's sacrifice bought enough time for the convoy to
begin to scatter. Further time was bought by the freighter SS Beaverford which
engaged Admiral Scheer for over four hours. In the end the German cruiser was
only able to sink five merchant ships and the remainder of the convoy escaped.
Sixty-eight survivors of Jervis Bay's crew of 254 were picked
up by the neutral Swedish ship Stureholm (three later died of their injuries).
Guy Byam was one of the survivors of the sinking, he was later killed while
covering an air raid over Germany for the BBC.
Captain Fegen was awarded a posthumous Victoria Cross as a
result of this action. The citation for his award reads:
… for valour in
challenging hopeless odds and giving his life to save the many ships it was his
duty to protect. On the 5th of November, 1940, in heavy seas, Captain Fegen, in
His Majesty's Armed Merchant Cruiser Jervis Bay, was escorting thirty-eight
Merchantmen. Sighting a powerful German warship he at once drew clear of the
Convoy, made straight for the Enemy, and brought his ship between the Raider
and her prey, so that they might scatter and escape. Crippled, in flames,
unable to reply, for nearly an hour the Jervis Bay held the German's fire. So
she went down: but of the Merchantmen all but four or five were saved.
Memorials
Bermuda
There is a monument to Jervis Bay at Albouy's Point, in
Hamilton, Bermuda, from where Jervis Bay had departed on her final mission.
Bermuda was a formation point for trans-Atlantic convoys in both World Wars.
During the Second World War, convoys formed at Bermuda and coded BHX merged at
sea with those formed at Halifax, which were coded HX, before crossing the
Atlantic as it was easier to protect one large convoy than two smaller.
The monument was unveiled on 5 November 1941, in front of a
Guard of Honour provided by the Royal Marines detachment of Despatch, by Vice
Admiral Sir Charles Kennedy-Purvis, Commander-in-Chief of the America and West
Indies Station, who said:
To-day is the
anniversary of a very gallant naval deed, that of the action of H.M.S. Jervis
Bay, in which the ship was lost with most hands, carrying out her duty on
November 5th, 1940.... The Jervis Bay was serving at the time under my command
on this station and she was well-known in this City, where her officers and
ship's company had many friends....The Jervis Bay was a medium-sized liner of
16 knots, used on the Australian trade. She was taken up at the beginning of
the war and armed with eight 6-inch guns, of which four could be fired on one
broadside. She was manned by a crew mostly Royal Naval Reserve and Mercantile
Marine. The only Royal Naval Officer was Captain Fegen, her Commander - that
was all. On November 5th towards evening she was steaming in the centre of the
front line of a big convoy of nearly forty ships. These ships were disposed in
columns of four with the columns abeam of each other. Suddenly, the port wing
ship sighted smoke on the port bow, and very soon afterwards the foretop of a
man-of-war.... Captain Fegen instructed the Commandant of the convoy, if this
proved to be an enemy ship, to turn his convoy to starboard and to scatter,
while he went out to port to engage the enemy. It soon became plain that the
ship was German - one of the pocket battleships. The Jervis Bay steamed out
ahead and turned to port. The convoy turned to starboard, dropping smoke floats
and soon after scattered. The Jervis Bay proceeded on her course and was soon
enveloped in the fire of six 11-inch guns. She was heavily straddled and hit
and took fire. As soon as he was within range with his own guns, Captain Fegen
opened fire and kept his 6-inch guns firing until the last. The ship became a
blazing wreck and after an hour's action went to the bottom. A few survivors
were picked up that night. The Jervis Bay delayed an attack on the convoy for a
while and in that time the convoy was all over the ocean, with the result that
only some 20% of the ships were lost and 80% of the convoy reached home. Now,
that is a tremendous decision to take when you are faced with overwhelming
odds, but I know that in Captain Fegen's case there were no second thoughts. He
had been brought up by his training of nearly forty years in His Majesty's Navy
and by tradition to believe that the duty of an escort of a convoy is to
protect that convoy at all costs. This he did. He was posthumously awarded the
Victoria Cross, the highest award for bravery which His Majesty the King can
award.
A small ceremony is held before the monument every Remembrance
Day (following the larger parade in front of the Cenotaph commemorating all of
the territory's dead of the two world wars) in which personnel from the Royal
Navy, the Royal Naval Association, and the Sea Cadet Corps take part.
Canada
There is a monument to Captain Fegen and the crew of Jervis
Bay at Ross Memorial Park in Saint John, New Brunswick, Canada. This is the
port where she was refitted for war service in the summer of 1940.
Britain
In 2006 the Scottish town of Wick erected a plaque to the
Caithness members who died in the sinking of the ship. The ship was crewed
extensively from Caithness, and Wick in particular.
There was also a monument in London. The main room of the
Merchant Navy Hotel (closed, 2002) was known as the "Jervis Bay
Room", and included a display detailing the action. It was the custom for
everyone entering the room to salute the display.
Depictions
The Australian poet Michael Thwaites wrote a ballad about
Jervis Bay in 1941, while he was serving as a naval officer in the Atlantic. It
can be read in The Faber Book of War Poetry or online at the Thwaites family
website.
The final action of Jervis Bay was portrayed in the movie San
Demetrio London, released in 1943, regarding the tale of heavy damage and
subsequent survival of MV San Demetrio, one of the vessels of Convoy HX 84. The
encounter between Jervis Bay and Admiral Scheer is also narrated in a short
story in Alistair MacLean's book "The Lonely Sea". Jervis Bay is also
commemorated by the Jervis Bay Memorial Pipe Band, located in Saint John, New
Brunswick, Canada.
The ship is featured as a model in Scarborough's "Naval
Warfare" holiday show, which takes place in the summer at Peasholm Park;
in the show the ship fights off an enemy battleship and submarine.
In the Ant and Cleo novels by Dominic Green, a British space
fleet names one of its cruisers in the Jervis Bay's honor.
It is also the subject of issue 47 of Hitman and in Volume 6
of the collection, which the protagonists take as an example of how to live.
The ship was later honored by the Sea Cadets and Marine Cadets
Detachment in Brock Barracks in Reading, who adopted TS Jervis Bay (Training
Ship) as the name of the unit.
Two ships of the Royal Australian Navy have been named HMAS
Jervis Bay, however, for Jervis Bay, on the south coast of New South Wales.
In Popular Culture
The ship and its sinking is depicted in an early part of the
1943 film "San Demetrio London".
A merchant ship, Jervis Bay, is in the Tony Palmer 1969
documentary on Jack Bruce: "Rope Ladder To The Moon" at 11m 23s; the
ship Jervis Bay figures prominently as the camera pans right.
Name: HMS Jervis Bay
Builder: Vickers Limited, Barrow-in-Furness
Launched: 1922, as SS Jervis Bay
Acquired: August 1939
Commissioned: October 1940
Fate: Sunk, 5 November 1940
Type: Armed Merchant Cruiser
Displacement: 14,164 long tons (14,391 t)
Length: 549 ft (167 m)
Beam: 68 ft (21 m)
Draught: 33 ft (10 m)
Speed: 15 knots (28 km/h; 17 mph)
Complement: 254
Armament:
7 × 6 in (152 mm) Mk. VII guns
2 × 3 in (76 mm) anti-aircraft guns
Sources
Osborne, Richard; Spong, Harry & Grover, Tom (2007). Armed
Merchant Cruisers 1878–1945. Windsor, UK: World Warship Society.
Ralph
Segman and Gerald Duskin, If the Gods are Good: The Epic Sacrifice of HMS
Jervis Bay (Naval Institute Press, 2004)
 |
| HMS Jervis Bay. |
 |
| S.S. Jervis Bay pre-war. |
 |
| Jervis Bay in King George V Dock, London, 13 May 1934. |
 |
| Jervis Bay passing under Harbour Bridge, Sydney, NSW, Australia. |
 |
| Jervis Bay as seen from Harbour Bridge, Sydney, NSW, Australia, 1936. |
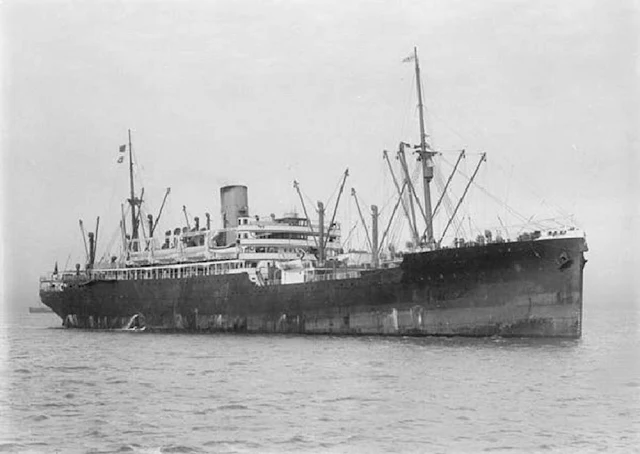 |
| Jervis Bay. |
 |
| HMS Jervis Bay. |
 |
| HMS Jervis Bay. |
 |
| Captain Fegen and his officers at sea in June 1940. |
 |
| HMS Jervis Bay in the dry dock at Saint John, New Brunswick, Canada. This is a unique photograph, taken in either July or August 1940. (J.F. Aylard, survivor) |
 |
| HMS Jervis Bay. Date and location unknown. (A.W. Desborough) |
 |
| Captain Fegen meeting the Earl Of Athlone during a visit to the Jervis Bay in June 1940. (J.F. Aylard, survivor) |
 |
| Captain Fegen meeting Princess Alice, Countess of Athlone during a visit to the Jervis Bay in June 1940. (J.F. Aylard, survivor) |
 |
| Gunnery Practice, possibly 1940. Date and location unknown. (A.W. Desborough, casualty) |
 |
| Gunnery Practice, possibly 1940. Date and location unknown. (A.W. Desborough, casualty) |
 |
| Gunnery Practice, possibly 1940. Date and location unknown. (A.W. Desborough, casualty) |
 |
| Jervis Bay somewhere in the North Atlantic during escort duty with Convoy HX72. |
 |
| Admiral Scheer. |
 |
| Admiral Scheer. |
 |
| Captain Theodor Krancke, commanding the German pocket battleship Admiral Scheer. |
 |
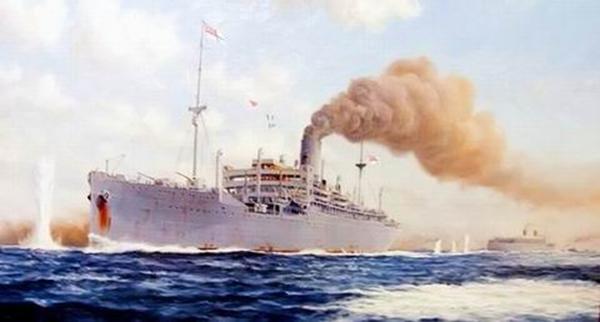
| HMS Jervis Bay in action with Admiral Scheer. |
 |
| HMS Jervis Bay. |
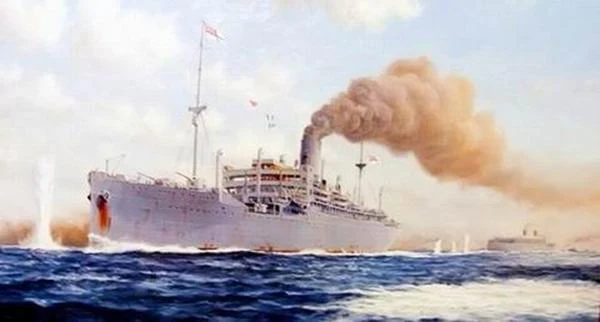 |
| HMS Jervis Bay steams towards Admiral Scheer. |
 |
| HMS Jervis Bay's guns firing as she steams towards Admiral Scheer. |
 |
| Painting of HMS Jervis Bay (right) fighting with Admiral Scheer as another ship in the convoy sinks. |
 |
| The bridge was hit, and with it the Jervis Bay's gunnery control center. Captain Fegen lost an arm and soon afterwards was killed by another shell. Most of the officers were killed. Nevertheless, this one-sided battle lasted for twenty-four minutes. At the end of that period the Jervis Bay was ablaze and her guns out of action, and the order was given to abandon ship. |
 |
| A crewman aboard the Admiral Scheer was filming the action as it took place, using 16mm with telephoto lens. These are three stills taken from that footage. Jervis Bay being bracketed by salvos. |
 |
| Jervis Bay is hit. |
 |
| Jervis Bay continues to receive more punishment. |
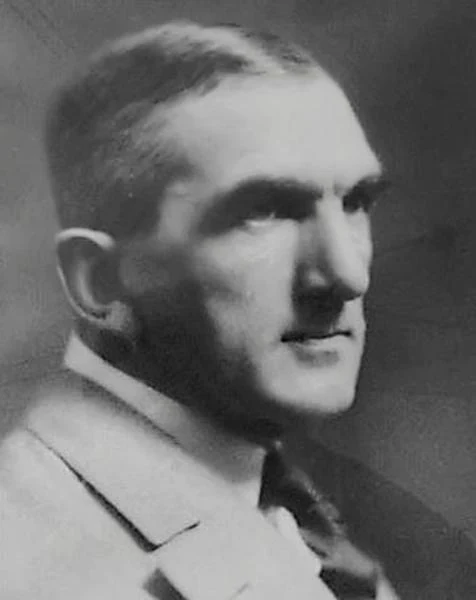 |
| Captain Edward Stephen Fogarty Fegen, VC. |
 |
| Captain Edward Stephen Fogarty Fegen, VC. |
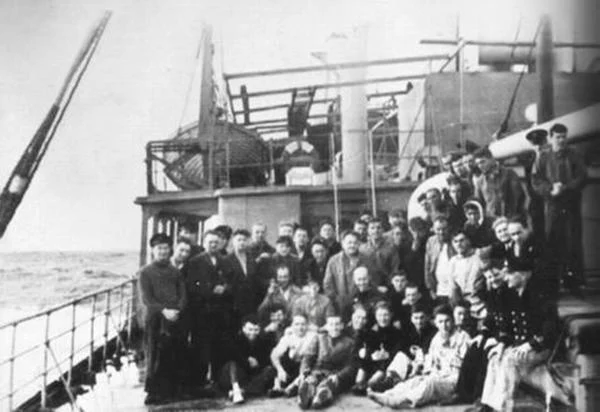 |
| Jervis Bay survivors aboard the Stureholm. |
 |
| Jervis Bay survivors aboard the Stureholm. |
 |
| Only 65 men were picked up by the Swedish freighter Stureholm under the command of Capt. Sven Olander. But the sacrifice had not been in vain, for the Admiral Scheer only succeeded in destroying five of the freighters in the short time before nightfall. |
 |
| When the Jervis Bay was sunk the Beaverford took over, although she had only two small anti-submarine guns. This action also contributed to the delaying action, some sources suggest for a great deal longer than the Jervis Bay, enabling the other merchantmen to escape. Captain Pettigrew and the other 76 crew members of the SS Beaverford all perished. They were not recognized for their part in the delaying action. |