Showing posts with label Imperial Japanese Navy. Show all posts

Battle of Tassafaronga

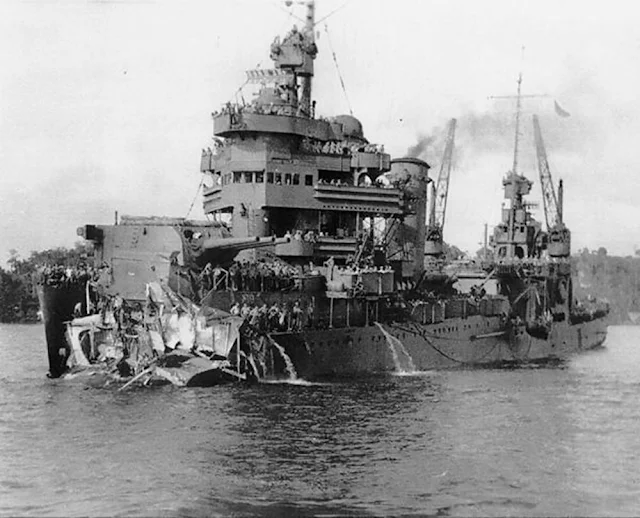
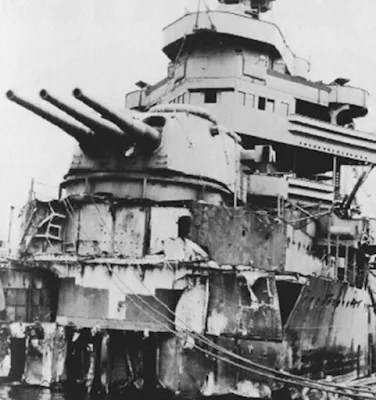
The U.S. Navy heavy cruiser USS Minneapolis (CA-36) at Tulagi with torpedo damage received in the Battle of Tassafaronga, the night before. The photograph was taken on 1 December 1942, as work began to cut away the wreckage of her bow.

The Battle of Tassafaronga, sometimes referred to as the Fourth Battle of Savo Island or, in Japanese sources, as the Battle of Lunga Point, was a nighttime naval battle that took place on November 30, 1942, between United States (US) Navy and Imperial Japanese Navy warships during the Guadalcanal campaign. The battle took place in Ironbottom Sound near the Tassafaronga area on Guadalcanal.

In the battle, a US warship force of five cruisers and four destroyers under the command of Rear Admiral Carleton H. Wright attempted to surprise and destroy a Japanese warship force of eight destroyers under the command of Rear Admiral Raizō Tanaka. Tanaka’s warships were attempting to deliver food to Japanese forces on Guadalcanal.

Using radar, the US warships gained surprise, opened fire, and sank one of the Japanese destroyers. Tanaka and the rest of his ships reacted quickly and launched numerous Type 93 “Long Lance” torpedoes at the US warships. The Japanese torpedoes hit and sank one US cruiser and heavily damaged three others, enabling the rest of Tanaka’s force to escape with no significant additional damage but also without completing the intended supply mission. Although a severe tactical defeat for the US, the battle had little strategic impact; the Japanese were unable to take advantage of the victory to further resupply or otherwise assist in their ultimately unsuccessful efforts to recapture Guadalcanal from Allied forces.

Background

On August 7, 1942, U.S. and some Allied forces landed on Guadalcanal, Tulagi, and the Florida Islands in the Solomon Islands. The landings were meant to deny the Japanese access to bases that they could use to threaten supply routes between the U.S. and Australia, and to secure the islands as starting points for a campaign with the eventual goal of neutralizing the major Japanese base at Rabaul while also supporting the Allied New Guinea campaign. The landings began the six-month Guadalcanal campaign.

The 2,000 to 3,000 Japanese personnel on the islands were taken by surprise, and by nightfall on August 8 the 11,000 Allied troops, under the command of Lieutenant General Alexander Vandegrift, secured Tulagi and nearby small islands as well as the Japanese airfield under construction at Lunga Point on Guadalcanal. The Allies later renamed the airfield Henderson Field. Allied aircraft operating out of Henderson were called the “Cactus Air Force” (CAF) after the Allied code name for Guadalcanal. To protect the airfield, the U.S. Marines established a perimeter defense around Lunga Point. Reinforcements over the next two months increased the number of U.S. troops at Lunga Point on Guadalcanal to more than 20,000.

In response to the Allied landings on Guadalcanal, the Japanese Imperial General Headquarters assigned the Imperial Japanese Army’s 17th Army, a corps-sized command based at Rabaul and under the command of Lieutenant General Harukichi Hyakutake, the task of retaking the island. Units of the 17th Army began to arrive on Guadalcanal on August 19 to drive Allied forces from the island.

Because of the threat by CAF aircraft based at Henderson Field, the Japanese were rarely able to use large, slow transport ships to deliver troops and supplies to the island. Instead, the Japanese used warships based at Rabaul and the Shortland Islands to carry their forces to Guadalcanal. The Japanese warships, mainly light cruisers and destroyers from the Eighth Fleet under the command of Vice Admiral Gunichi Mikawa, were usually able to make the round trip down “The Slot” to Guadalcanal and back in a single night, thereby minimizing their exposure to CAF air attack. Delivering the troops in this manner, however, prevented most of the soldiers’ heavy equipment and supplies, such as heavy artillery, vehicles, and much food and ammunition, from being carried to Guadalcanal with them. These high-speed warship runs to Guadalcanal occurred throughout the campaign and were later called the “Tokyo Express” by Allied forces and “Rat Transportation” by the Japanese.

The Japanese attempted several times between August and November 1942 to recapture Henderson Field and drive Allied forces from Guadalcanal, to no avail. The last attempt by the Japanese to deliver significant additional forces to the island failed during the Naval Battle of Guadalcanal of November 12–15.

On November 26, Japanese Lieutenant General Hitoshi Imamura took command of the new Eighth Area Army at Rabaul. The new command encompassed both Hyakutake’s 17th Army in the Solomons and the 18th Army in New Guinea. One of Imamura’s first priorities upon assuming command was the continuation of the attempts to retake Henderson Field and Guadalcanal. The Allied offensive at Buna in New Guinea, however, changed Imamura’s priorities. Because the Allied attempt to take Buna was considered a more severe threat to Rabaul, Imamura postponed further major reinforcement efforts to Guadalcanal to concentrate on the situation in New Guinea.

Supply Crisis

Due to a combination of the threat from CAF aircraft, US Navy PT boats stationed at Tulagi, and a cycle of bright moonlight, the Japanese had switched to using submarines to deliver provisions to their forces on Guadalcanal. Beginning on November 16, 1942, and continuing for the next three weeks, 16 submarines made nocturnal deliveries of foodstuffs to the island, with one submarine making the trip each night. Each submarine could deliver 20 to 30 tons of supplies, about one day’s worth of food, for the 17th Army, but the difficult task of transporting the supplies by hand through the jungle to the frontline units limited their value to sustain the Japanese troops on Guadalcanal. At the same time, the Japanese tried to establish a chain of three bases in the central Solomons to allow small boats to use them as staging sites for making supply deliveries to Guadalcanal, but damaging Allied airstrikes on the bases forced the abandonment of this plan.

On November 26, the 17th Army notified Imamura that it faced a critical food crisis. Some front-line units had not been resupplied for six days and even the rear-area troops were on one-third rations. The situation forced the Japanese to return to using destroyers to deliver the necessary supplies.

Eighth Fleet personnel devised a plan to help reduce the exposure of destroyers delivering supplies to Guadalcanal. Large oil or gas drums were cleaned and filled with medical supplies and food, with enough air space to provide buoyancy, and strung together with rope. When the destroyers arrived at Guadalcanal they would make a sharp turn, the drums would be cut loose, and a swimmer or boat from the shore could pick up the buoyed end of the rope and return it to the beach, where the soldiers could haul in the supplies.

The Eighth Fleet’s Guadalcanal Reinforcement Unit, based in the Shortland Islands and under the command of Rear Admiral Raizō Tanaka, was tasked by Mikawa with making the first of five scheduled runs using the drum method on the night of November 30. Tanaka’s unit was centered on the eight ships of Destroyer Squadron (DesRon) 2, with six destroyers assigned to carry from 200 to 240 drums of supplies apiece, to Tassafaronga at Guadalcanal. Tanaka’s flagship Naganami along with Takanami acted as escorts. The six drum-carrying destroyers were Kuroshio, Oyashio, Kagerō, Suzukaze, Kawakaze, and Makinami. To save weight, the drum-carrying destroyers left their reloads of Type 93 torpedoes (Long Lances) at the Shortlands, leaving each ship with eight torpedoes, one for each tube.

After the Naval Battle of Guadalcanal, US Vice Admiral William Halsey, commander of Allied forces in the South Pacific, had reorganized US naval forces under his command, including, on November 24, the formation of Task Force 67 (TF67) at Espiritu Santo, comprising the heavy cruisers USS Minneapolis, New Orleans, Pensacola, and Northampton, the light cruiser Honolulu, and four destroyers (Fletcher, Drayton, Maury, and Perkins). US Rear Admiral Carleton H. Wright replaced Thomas Kinkaid as commander of TF67 on November 28.

Upon taking command, Wright briefed his ship commanders on his plan for engaging the Japanese in future, expected night battles around Guadalcanal. The plan, which he had drafted with Kinkaid, stated that radar-equipped destroyers were to scout in front of the cruisers and deliver a surprise torpedo attack upon sighting Japanese warships, then vacate the area to give the cruisers a clear field of fire. The cruisers were then to engage with gunfire from 10,000 yards (9,100 m) to 12,000 yards (11,000 m). The cruisers’ floatplanes would scout and drop flares during the battle.

On November 29, Allied intelligence personnel intercepted and decoded a Japanese message transmitted to the 17th Army on Guadalcanal alerting them to Tanaka’s supply run. Informed of the message, Halsey ordered Wright to take TF67 to intercept Tanaka off Guadalcanal. TF67, with Wright flying his flag on Minneapolis, departed Espiritu Santo at 27 knots (31 mph; 50 km/h) just before midnight on November 29 for the 580 miles (930 km) run to Guadalcanal. En route, destroyers Lamson and Lardner, returning from a convoy escort assignment to Guadalcanal, were ordered to join up with TF67. Lacking the time to brief the commanding officers of the joining destroyers of his battle plan, Wright assigned them a position behind the cruisers. At 17:00 on November 30, Wright’s cruisers launched one floatplane each for Tulagi to drop flares during the expected battle that night. At 20:00, Wright sent his crews to battle stations.

Tanaka’s force departed the Shortlands just after midnight on November 30 for the run to Guadalcanal. Tanaka attempted to evade Allied aerial reconnaissance aircraft by first heading northeast through Bougainville Strait before turning southeast and then south to pass through Indispensable Strait. Paul Mason, an Australian coastwatcher stationed in southern Bougainville, reported by radio the departure of Tanaka’s ships from Shortland and this message was passed to Wright. At the same time, a Japanese search aircraft spotted an Allied convoy near Guadalcanal and communicated the sighting to Tanaka who told his destroyer commanders to expect action that night and that, “In such an event, utmost efforts will be made to destroy the enemy without regard for the unloading of supplies.”

Battle

Prelude

At 21:40 on November 30, Tanaka’s ships sighted Savo Island from Indispensable Strait. The Japanese ships were in line ahead formation, interval 600 meters (660 yd), in the order of Takanami, Oyashio, Kuroshio, Kagerō, Makinami, Naganami, Kawakaze, and Suzukaze. At this same time, TF67 entered Lengo Channel en route to Ironbottom Sound. Wright’s ships were in column in the order Fletcher, Perkins, Maury, Drayton, Minneapolis, New Orleans, Pensacola, Honolulu, Northampton, Lamson, and Lardner. The four van destroyers led the cruisers by 4,000 yards (3,700 m) and the cruisers steamed 1,000 yards (910 m) apart.

At 22:40, Tanaka’s ships passed south of Savo about 3 miles (5 km) offshore from Guadalcanal and slowed to 12 knots (14 mph; 22 km/h) as they approached the unloading area. Takanami took station about 1 mile (2 km) seaward to screen the column. At the same time, TF67 exited Lengo Channel into the sound and headed at 20 knots (23 mph; 37 km/h) towards Savo Island. Wright’s van destroyers moved to a position slightly inshore of the cruisers. The night sky was moonless with between 2 miles (3 km) and 7 miles (11 km) of visibility. Because of extremely calm seas which created a suction effect on their pontoons, Wright’s cruiser floatplanes were delayed in lifting off from Tulagi harbor, and would not be a factor in the battle.

At 23:06, Wright’s force began to detect Tanaka’s ships on radar near Cape Esperance on Guadalcanal about 23,000 yards (21,000 m) away. Wright’s destroyers rejoined the column as it continued to head towards Savo. At the same time, Tanaka’s ships, which were not equipped with radar, split into two groups and prepared to shove the drums overboard. Naganami, Kawakaze, and Suzukaze headed for their drop-off point near Doma Reef while Makinami, Kagerō, Oyashio, and Kurashio aimed for nearby Tassafaronga. At 23:12, Takanami’s crew visually sighted Wright’s column, quickly confirmed by lookouts on Tanaka’s other ships. At 23:16, Tanaka ordered unloading preparations halted and “All ships attack.”

Action

At 23:14, operators on Fletcher established firm radar contact with Takanami and the lead group of four drum-carrying destroyers. At 23:15, with the range 7,000 yards (6,400 m), Commander William M. Cole, commander of Wright’s destroyer group and captain of Fletcher, radioed Wright for permission to fire torpedoes. Wright waited two minutes and then responded with, “Range on bogies [Tanaka’s ships on radar] excessive at present.” Cole responded that the range was fine. Another two minutes passed before Wright responded with permission to fire. In the meantime, the US destroyers’ targets escaped from an optimum firing setup ahead to a marginal position passing abeam, giving the American torpedoes a long overtaking run near the limit of their range. At 23:20, Fletcher, Perkins, and Drayton fired a total of 20 Mark 15 torpedoes towards Tanaka’s ships. Maury, lacking SG radar and thus having no contacts, withheld fire.

At the same time, Wright ordered his force to open fire. At 23:21, Minneapolis complied with her first salvo, quickly followed by the other American cruisers. Cole’s four destroyers fired star shells to illuminate the targets as previously directed then increased speed to clear the area for the cruisers to operate.

Because of her closer proximity to Wright’s column, Takanami was the target of most of the Americans’ initial gunfire. Takanami returned fire and launched her full load of eight torpedoes, but was quickly hit by American gunfire and, within four minutes, was set afire and incapacitated. As Takanami was destroyed, the rest of Tanaka’s ships, almost unnoticed by the Americans, were increasing speed, maneuvering, and preparing to respond to the American attack. All of the American torpedoes missed. Historian Russell S. Crenshaw, Jr. postulates that had the twenty-four Mark 15 torpedoes fired by U.S. Navy destroyers during the battle not been fatally flawed, the outcome of the battle might have been different.

Tanaka’s flagship, Naganami, reversed course to starboard, opened fire and began laying a smoke screen. The next two ships astern, Kawakaze and Suzukaze, reversed course to port. At 23:23, Suzukaze fired eight torpedoes in the direction of the gun flashes from Wright’s cruisers, followed by Naganami and Kawakaze which fired their full loads of eight torpedoes at 23:32 and 23:33 respectively.

Meanwhile, the four destroyers at the head of the Japanese column maintained their heading down the Guadalcanal coast, allowing Wright’s cruisers to pass on the opposite course. Once clear of Takanami at 23:28, Kuroshio fired four and Oyashio fired eight torpedoes in the direction of Wright’s column and then reversed course and increased speed. Wright’s cruisers maintained the same course and speed as the 44 Japanese torpedoes headed in their direction.

At 23:27, as Minneapolis fired her ninth salvo and Wright prepared to order a course change for his column, two torpedoes, from either Suzukaze or Takanami, slammed into her forward half. One warhead exploded the aviation fuel storage tanks forward of turret one and the other knocked out three of the ship’s four firerooms. The bow forward of turret one folded down at a 70-degree angle and the ship lost power and steering control. Thirty-seven men were killed.

Less than a minute later a torpedo hit New Orleans abreast of turret one and exploded the ship’s forward ammunition magazines and aviation gasoline storage. The blast severed the ship’s entire bow forward of turret two. The bow twisted to port, damaging the ship’s hull as it was wrenched free by the ship’s momentum, and sank immediately off the aft port quarter. Everyone in turrets one and two perished. New Orleans was forced into a reverse course to starboard and lost steering and communications. A total of 183 men were killed. Herbert Brown, a seaman in the ship’s plotting room, described the scene after the torpedo hit,

I had to see. I walked alongside the silent turret two and was stopped by a lifeline stretched from the outboard port lifeline to the side of the turret. Thank God it was there, for one more step and I would have pitched head first into the dark water thirty feet below. The bow was gone. One hundred and twenty five feet of ship and number one main battery turret with three 8 inch guns were gone. Eighteen hundred tons of ship were gone. Oh my God, all those guys I went through boot camp with - all gone.

Pensacola followed next astern in the cruiser column. Observing Minneapolis and New Orleans taking hits and slowing, Pensacola steered to pass them on the port side and then, once past, returned to the same base course. At 23:39, Pensacola took a torpedo abreast the mainmast. The explosion spread flaming oil throughout the interior and across the main deck of the ship, killing 125 of the ship’s crew. The hit ripped away the port outer driveshaft and the ship took a 13-degree list and lost power, communications, and steering.

Astern of Pensacola, Honolulu’s captain chose to pass Minneapolis and New Orleans on the starboard side. At the same time, the ship increased speed to 30 knots (35 mph; 56 km/h), maneuvered radically, and successfully transited the battle area without taking any damage while maintaining main battery fire at the rapidly disappearing Japanese destroyers.

The last cruiser in the American column, Northampton, followed Honolulu to pass the damaged cruisers ahead to starboard. Unlike Honolulu, Northampton did not increase speed or attempt any radical maneuvers. At 23:48, after returning to the base course, Northampton was hit by two of Kawakaze’s torpedoes. One hit 10 feet (3 m) below the waterline abreast the after engine room, and four seconds later, the second hit 40 feet (12 m) further aft. The after engine room flooded, three of four shafts ceased turning, and the ship listed 10 degrees to port and caught fire. Fifty men were killed.

The last ships in Wright’s column, Lamson and Lardner, failed to locate any targets and exited the battle area to the east after being mistakenly fired on by machine guns from New Orleans. Cole’s four destroyers circled completely around Savo Island at maximum speed and reentered the battle area, but the engagement had already ended.

Meanwhile, at 23:44 Tanaka ordered his ships to break contact and retire from the battle area. As they proceeded up Guadalcanal’s coast, Kuroshio and Kagerō fired eight more torpedoes towards the American ships, which all missed. When Takanami failed to respond to radio calls, Tanaka directed Oyashio and Kuroshio to go to her assistance. The two destroyers located the burning ship at 01:00 on December 1 but abandoned rescue efforts after detecting American warships in the area. Oyashio and Kuroshio quickly departed the sound to rejoin the rest of Tanaka’s ships for the return journey to the Shortlands, which they reached 10 hours later. Takanami was the only Japanese warship hit by American gunfire and seriously damaged during the battle.

Aftermath

Takanami’s surviving crew abandoned ship at 01:30, but a large explosion killed many more of them in the water, including the destroyer division commander, Toshio Shimizu, and the ship’s captain, Masami Ogura. Of her crew of 244, 48 survived to reach shore on Guadalcanal and 19 of them were captured by the Americans.

Northampton’s crew was unable to contain the ship’s fires and list and began to abandon ship at 01:30. The ship sank at 03:04 about 4 miles (6 km) from Doma Cove on Guadalcanal. Fletcher and Drayton rescued the ship’s 773 survivors.

Minneapolis, New Orleans, and Pensacola were able to make it the 19 miles (31 km) to Tulagi on the morning of December 1 where they were berthed for emergency repairs. The fires on Pensacola burned for 12 hours before being extinguished. Pensacola departed Tulagi for rear area ports and further repair on December 6. After construction of temporary bows from coconut logs, Minneapolis and New Orleans departed Tulagi for Espiritu Santo or Sydney, Australia on December 12. All three cruisers required lengthy and extensive repairs. New Orleans returned to action in August, Minneapolis in September, and Pensacola in October 1943.

The battle was one of the worst defeats suffered by the US Navy in World War II, third only to the Attack on Pearl Harbor and the Battle of Savo Island. The battle, along with the losses suffered during the Battle of Savo Island, Cape Esperance and the Naval Battles of Guadalcanal temporarily left the US Navy with only 4 operational heavy cruisers and 9 light cruisers in the entire Pacific Ocean. In spite of his defeat in the battle, Wright was awarded the Navy Cross, one of the highest American military decorations for bravery, for his actions during the engagement. Mitigating to some degree the destruction of his task force, Wright, in his after-action report, claimed that his force sank four Japanese destroyers and damaged two others. Halsey, in his comments on Wright’s report, placed much of the blame for the defeat on Cole, saying that the destroyer squadron commander fired his torpedoes from too great a distance to be effective and should have “helped” the cruisers instead of circling around Savo Island. The recriminations did not affect Coles’s career, who had won a Navy Cross of his own for actions during the Naval battles of Guadalcanal; he continued to lead destroyer squadrons in the Pacific and was later promoted to Rear Admiral.

Tanaka claimed to have sunk a battleship and two cruisers in the battle.

The results of the battle led to further discussion in the US Pacific Fleet about changes in tactical doctrine and the need for technical improvements, such as flashless powder. It was not until eight months later that the naval high command recognized there were serious problems with the functioning of the torpedoes. The Americans were still unaware of the range and power of Japanese torpedoes and the effectiveness of Japanese night battle tactics. In fact, Wright claimed that his ships must have been fired on by submarines since the observed position of Tanaka’s ships “make it improbable that torpedoes with speed-distance characteristics similar to our own” could have caused such damage, though Tanaka states that his torpedoes were fired at a range as short as three miles. The Americans would not recognize the true capabilities of their Pacific adversary’s torpedoes (particularly the surface-ship-fired Type 93 “Long Lance”) and night tactics until well into 1943. After the war, Tanaka said of his victory at Tassafaronga, “I have heard that US naval experts praised my command in that action. I am not deserving of such honors. It was the superb proficiency and devotion of the men who served me that produced the tactical victory for us.”

In spite of their defeat in the battle, the Americans had prevented Tanaka from landing the desperately needed food supplies on Guadalcanal, albeit at high cost. A second Japanese supply delivery attempt by 10 destroyers led by Tanaka on December 3 successfully dumped 1,500 drums of provisions off Tassafaronga, but strafing American aircraft sank all but 310 of them the next day before they could be pulled ashore. On December 7, a third attempt by 12 destroyers was turned back by US PT boats off Cape Esperance. The next night, two US PT boats torpedoed and sank the Japanese submarine I-3 as it attempted to deliver supplies to Guadalcanal. Based on the difficulties experienced trying to deliver food to the island, the Japanese Navy informed Imamura on December 8 that they intended to stop all destroyer transportation runs to Guadalcanal immediately. After Imamura protested, the navy agreed to one more run to the island.

The last attempt to deliver food to Guadalcanal by destroyers in 1942 was led by Tanaka on the night of December 11 and consisted of 11 destroyers. Five US PT boats met Tanaka off Guadalcanal and torpedoed his flagship Teruzuki, severely damaging the destroyer and injuring Tanaka. After Tanaka transferred to Naganami, Teruzuki was scuttled. Only 220 of the 1,200 drums released that night were recovered by Japanese army personnel on shore. Tanaka was subsequently relieved of command and transferred to Japan on December 29, 1942.

On December 12, the Japanese Navy proposed that Guadalcanal be abandoned. Despite opposition from Japanese Army leaders, who still hoped that Guadalcanal could eventually be retaken from the Allies, on December 31, 1942 Japan’s Imperial General Headquarters, with approval from the Emperor, agreed to the evacuation of all Japanese forces from the island and the establishment of a new line of defense for the Solomons on New Georgia. The Japanese evacuated their remaining forces from Guadalcanal over three nights between February 2 and February 7, 1943, conceding the hard fought campaign to the Allies. Building on their success at Guadalcanal and elsewhere, the Allies continued their campaign against Japan, ultimately culminating in Japan’s defeat and the end of World War II.

U.S. Rear Admiral Carleton H. Wright.

United States Navy Task Force 67 just before the Battle of Tassafaronga on November 30, 1942. USS Fletcher is in the foreground, followed by other destroyers and, in the distance, cruisers.

The U.S. Navy heavy cruiser USS Minneapolis (CA-36) underway at sea on 25 June 1938. She is wearing an “E” award, for engineering excellence, on her after smokestack.

USS New Orleans near Tulagi on 1 December 1942. The bow was blown off forward of turret two during the Battle of Tassafaronga the night before, killing 180+ of the ship’s crew.

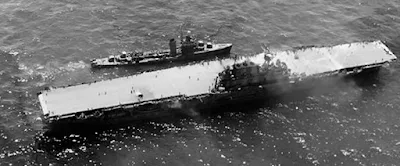
The U.S. Navy heavy cruiser USS New Orleans (CA-32) seen after the Battle of Tassafaronga near Tulagi on 1 December 1942. The PT boat in the foreground is carrying survivors from the USS Northampton (CA-26).

Damage to the U.S. Navy heavy cruiser USS New Orleans (CA-32) with everything ahead of turret No. 2 missing after being hit by a single torpedo which exploded her forward magazines. Photographed after the Battle of Tassafaronga which occurred on 30 November 1942.

The U.S. Navy heavy cruisers USS Salt Lake City (CA-25), USS Pensacola (CA-24) and USS New Orleans (CA-32) (listed from left to right) nested together at Pearl Harbor, 31 October 1943. Ford Island is at the left, with the battleship USS Oklahoma (BB-37) under salvage at the extreme left, just beyond Salt Lake City’s forward superstructure. Note the radar antennas, gun directors and 203 mm guns on these three heavy cruisers. Two New Mexico-class battleships are visible in the background between Pensacola and New Orleans.

US Navy chart of the Battle of Tassafaronga based on accounts by both Japanese and US participants.


Battle of the Santa Cruz Islands

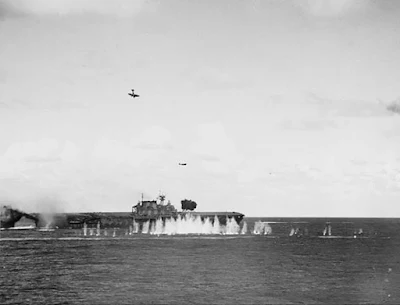
The U.S. Navy aircraft carrier USS Enterprise (CV-6) and other ships of her screen in action during the Battle of Santa Cruz, 26 October 1942. One bomb is exploding off her stern, while two Japanese dive bombers are visible directly above the carrier and towards the center of the image. A flash from anti-aircraft guns of the battleship USS South Dakota (BB-57) can be seen in the distance.

The Battle of the Santa Cruz Islands, fought during 25–27 October 1942, sometimes referred to as the Battle of Santa Cruz or in Japan as the Battle of the South Pacific, was the fourth carrier battle of the Pacific campaign of World War II. It was also the fourth major naval engagement fought between the United States Navy and the Imperial Japanese Navy during the lengthy and strategically important Guadalcanal campaign. As in the battles of Coral Sea, Midway, and the Eastern Solomons, the ships of the two adversaries were rarely in sight or gun range of each other. Instead, almost all attacks by both sides were mounted by carrier- or land-based aircraft.

In an attempt to drive Allied forces from Guadalcanal and nearby islands and end the stalemate that had existed since September 1942, the Imperial Japanese Army planned a major ground offensive on Guadalcanal for 20–25 October 1942. In support of this offensive, and with the hope of engaging Allied naval forces, Japanese carriers and other large warships moved into a position near the southern Solomon Islands. From this location, the Japanese naval forces hoped to engage and decisively defeat any Allied (primarily U.S.) naval forces, especially carrier forces, that responded to the ground offensive. Allied naval forces also hoped to meet the Japanese naval forces in battle, with the same objectives of breaking the stalemate and decisively defeating their adversary.

The Japanese ground offensive on Guadalcanal was under way in the Battle for Henderson Field while the naval warships and aircraft from the two adversaries confronted each other on the morning of 26 October 1942, just north of the Santa Cruz Islands. After an exchange of carrier air attacks, Allied surface ships retreated from the battle area with one carrier sunk (Hornet) and another heavily damaged (Enterprise). The participating Japanese carrier forces also retired because of high aircraft and aircrew losses, plus significant damage to two carriers.

Although Santa Cruz was a tactical victory and a short-term strategic victory for the Japanese in terms of ships sunk and damaged, and control of the seas around Guadalcanal, Japan’s loss of many irreplaceable veteran aircrews proved to be a long-term strategic advantage for the Allies, whose aircrew losses in the battle were relatively low and quickly replaced.

Background

On 7 August 1942, Allied forces (primarily U.S.) landed on Japanese-occupied Guadalcanal, Tulagi, and Florida Islands in the Solomon Islands. The landings on the islands were meant to deny their use by the Japanese as bases for threatening the supply routes between the U.S. and Australia, and to secure the islands as starting points for a campaign with the eventual goal of neutralizing the major Japanese base at Rabaul while also supporting the Allied New Guinea campaign. The landings initiated the six-month-long Guadalcanal campaign.

After the Battle of the Eastern Solomons on 24–25 August, in which the aircraft carrier USS Enterprise was heavily damaged and forced to travel to Pearl Harbor, Hawaii, for a month of major repairs, three U.S. carrier task forces remained in the South Pacific area. The task forces included the carriers USS Wasp, Saratoga, and Hornet plus their respective air groups and supporting surface warships, including battleships, cruisers, and destroyers, and were primarily stationed between the Solomons and New Hebrides (Vanuatu) islands. At this location, the carriers were charged with guarding the line of communication between the major Allied bases at New Caledonia and Espiritu Santo, supporting the Allied ground forces at Guadalcanal and Tulagi against any Japanese counteroffensives, covering the movement of supply ships to Guadalcanal, and engaging and destroying any Japanese warships, especially carriers, that came within range.

The area of ocean in which the U.S. carrier task forces operated was known as “Torpedo Junction” by U.S. forces because of the high concentration of Japanese submarines in the area.

On 31 August, USS Saratoga was torpedoed by Japanese submarine I-26 and was out of action for three months for repairs. On 14 September, USS Wasp was hit by three torpedoes fired by Japanese submarine I-19 while supporting a major reinforcement and resupply convoy to Guadalcanal and almost engaging two Japanese carriers Shōkaku and Zuikaku (which withdrew just before the two adversaries came into range of each other’s aircraft). With power knocked out from torpedo damage, Wasp’s damage-control teams were unable to contain the ensuing large fires, and she was abandoned and scuttled.

Although the U.S. now had only one operational carrier (Hornet) in the South Pacific, the Allies still maintained air superiority over the southern Solomon Islands because of their aircraft based at Henderson Field on Guadalcanal. However, at night, when aircraft were not able to operate effectively, the Japanese were able to operate their ships around Guadalcanal almost at will. Thus, a stalemate in the battle for Guadalcanal developed, with the Allies delivering supplies and reinforcements to Guadalcanal during the day, and the Japanese doing the same by warship (called the “Tokyo Express” by the Allies) at night, with neither side able to deliver enough troops to the island to secure a decisive advantage. By mid-October, both sides had roughly an equal number of troops on the island. The stalemate was briefly interrupted by two large-ship naval actions. On the night of 11–12 October, a U.S. naval force intercepted and defeated a Japanese naval force en route to bombard Henderson Field in the Battle of Cape Esperance. But just two nights later, a Japanese force that included the battleships Haruna and Kongō successfully bombarded Henderson Field, destroying most of the U.S. aircraft and inflicting severe damage on the field’s facilities. Although still marginally operational, it took several weeks for the airfield to recover from the damage and replace the destroyed aircraft.

The U.S. made two moves to try to break the stalemate in the battle for Guadalcanal. First, repairs to Enterprise were expedited so that she could return to the South Pacific as soon as possible. On 10 October, Enterprise received her new air group (Air Group 10) and on 16 October, she left Pearl Harbor; and on 23 October, she arrived back in the South Pacific and rendezvoused with Hornet and the rest of the Allied South Pacific naval forces on 24 October, 273 nmi (506 km; 314 mi) northeast of Espiritu Santo.

Second, on 18 October, Admiral Chester Nimitz, Allied Commander-in-Chief of Pacific Forces, replaced Vice Admiral Robert L. Ghormley with Vice Admiral William Halsey, Jr. as Commander, South Pacific Area: this position commanded Allied forces involved in the Solomon Islands campaign. Nimitz felt that Ghormley had become too myopic and pessimistic to lead Allied forces effectively in the struggle for Guadalcanal. Halsey was reportedly respected throughout the U.S. naval fleet as a “fighter.” Upon assuming command, Halsey immediately began making plans to draw the Japanese naval forces into a battle, writing to Nimitz, “I had to begin throwing punches almost immediately.”

The Japanese Combined Fleet was also seeking to draw Allied naval forces into what was hoped to be a decisive battle. Two fleet carriers—Hiyō and Jun’yō—and one light carrier—Zuihō—arrived at the main Japanese naval base at Truk Atoll from Japan in early October and joined Shōkaku and Zuikaku. With five carriers fully equipped with air groups, plus their numerous battleships, cruisers, and destroyers, the Japanese Combined Fleet, directed by Admiral Isoroku Yamamoto, was confident that it could make up for the defeat at the Battle of Midway. Apart from a couple of air raids on Henderson Field in October, the Japanese carriers and their supporting warships stayed in the northwestern area of the Solomon Islands, out of the battle for Guadalcanal and waiting for a chance to approach and engage the U.S. carriers. With the Japanese Army’s next planned major ground attack on Allied forces on Guadalcanal set for 20 October, Yamamoto’s warships began to move towards the southern Solomons to support the offensive and to be ready to engage any Allied (primarily U.S.) ships, especially carriers, that approached to support the Allied defenses on Guadalcanal.

Prelude

From 20–25 October, Japanese land forces on Guadalcanal attempted to capture Henderson Field with a large-scale attack against U.S. troops defending the airfield. The attack was decisively defeated with heavy casualties for the Japanese during the Battle for Henderson Field.

Incorrectly believing that the Japanese army troops had succeeded in capturing Henderson Field, the Japanese sent warships toward Guadalcanal on the morning of 25 October to support their ground forces on the island. Aircraft from Henderson Field attacked the convoy throughout the day, sinking the light cruiser Yura and damaging the destroyer Akizuki.

Despite the failure of the Japanese ground offensive and the loss of Yura, the rest of the Combined Fleet continued to maneuver near the southern Solomon Islands on 25 October with the hope of encountering Allied naval forces in battle. The Japanese naval forces now comprised four carriers, because Hiyō had suffered an accidental, damaging fire in her engine room on 22 October that forced her to return to Truk for repairs.

The Japanese naval forces were divided into three groups: The “Advanced” force consisted of the carrier Jun’yō, plus two battleships, four heavy cruisers, one light cruiser, and 10 destroyers, and was commanded by Vice Admiral Nobutake Kondō in heavy cruiser Atago; the “Main Body” consisted of Shōkaku, Zuikaku, and Zuihō plus one heavy cruiser and eight destroyers, and was commanded by Vice Admiral Chūichi Nagumo aboard Shōkaku; and the “Vanguard” force contained two battleships, three heavy cruisers, one light cruiser, and seven destroyers, and was commanded by Rear Admiral Hiroaki Abe in battleship Hiei. In addition to commanding the Advanced force, Kondo acted as the overall commander of the three forces.

On the U.S. side, the Hornet and Enterprise task groups, under the overall command of Rear Admiral Thomas Kinkaid swept around to the north of the Santa Cruz Islands on 25 October searching for the Japanese naval forces. The U.S. warships were deployed as two separate carrier groups, each centered on either Hornet or Enterprise, and separated from each other by about 10 nmi (19 km; 12 mi). A U.S. PBY Catalina based in the Santa Cruz Islands located the Japanese Main body carriers at 11:03. However, the Japanese carriers were about 355 nmi (657 km; 409 mi) from the U.S. force, just beyond carrier aircraft range. Kinkaid, hoping to close the range to be able to execute an attack that day, steamed towards the Japanese carriers at top speed and, at 14:25, launched a strike force of 23 aircraft. But the Japanese, knowing that they had been spotted by U.S. aircraft and not knowing where the U.S. carriers were, turned to the north to stay out of range of the U.S. carriers’ aircraft. Thus, the U.S. strike force returned to their carriers without finding or attacking the Japanese warships.

Battle

Carrier Action on 26 October: First Strikes

At 02:50 on 26 October, the Japanese naval forces reversed direction and the naval forces of the two adversaries closed the distance until they were only 200 nmi (370 km; 230 mi) away from each other by 05:00. Both sides launched search aircraft and prepared their remaining aircraft to attack as soon as the other side’s ships were located. Although a radar-equipped PBY Catalina sighted the Japanese carriers at 03:10, the report did not reach Kinkaid until 05:12. Therefore, believing that the Japanese ships had probably changed position during the intervening two hours, he decided to withhold launching a strike force until he received more current information on the location of the Japanese ships.

At 06:45, a U.S. scout aircraft sighted the carriers of Nagumo’s main body. At 06:58, a Japanese scout aircraft reported the location of Hornet’s task force. Both sides raced to be the first to attack the other. The Japanese were first to get their strike force launched, with 64 aircraft, including 21 Aichi D3A2 dive bombers, 20 Nakajima B5N2 torpedo bombers, 21 A6M3 Zero fighters, and two Nakajima B5N2 command and control aircraft on the way towards Hornet by 07:40. Also at 07:40, two U.S. SBD-3 Dauntless scout aircraft, responding to the earlier sighting of the Japanese carriers, arrived and dove on Zuihō. With the Japanese combat air patrol (CAP) busy chasing other U.S. scout aircraft away, the two U.S. aircraft were able to hit Zuihō with both their 500-pound bombs, causing heavy damage and preventing the carrier’s flight deck from being able to land aircraft.

Meanwhile, Kondo ordered Abe’s Vanguard force to race ahead to try to intercept and engage the U.S. warships. Kondo also brought his own Advanced force forward at maximum speed so that Junyō’s aircraft could join in the attacks on the U.S. ships. At 08:10, Shōkaku launched a second wave of strike aircraft, consisting of 19 dive bombers and eight Zeros, and Zuikaku launched 16 torpedo bombers at 08:40. Thus, by 09:10 the Japanese had 110 aircraft on the way to attack the U.S. carriers.

The U.S. strike aircraft were running about 20 minutes behind the Japanese. Believing that a speedy attack was more important than a massed attack, and because they lacked fuel to spend time assembling prior to the strike, the U.S. aircraft proceeded in small groups towards the Japanese ships, rather than forming into a single large strike force. The first group—consisting of 15 Douglas SBD Dauntless dive bombers, six Grumman TBF-1 Avenger torpedo bombers, and eight Grumman F4F Wildcat fighters, led by Lieutenant Commander William J. “Gus” Widhelm from Hornet—was on its way by about 08:00. A second group—consisting of three SBDs, nine TBFs (including the Air Group Commander’s), and eight Wildcats from Enterprise—was off by 08:10. A third group—which included nine SBDs, ten TBFs (including the Air Group Commander’s), and seven F4Fs from Hornet—was on its way by 08:20.

At 08:40, the opposing aircraft strike formations passed within sight of each other. Nine Zeros from Zuihō surprised and attacked the Enterprise group, attacking the climbing aircraft from out of the sun. In the resulting engagement, four Zeros, three Wildcats, and two TBFs were shot down, with another two TBFs and a Wildcat forced by heavy damage to return to Enterprise.

At 08:50, the lead U.S. attack formation from Hornet spotted four ships from Abe’s Vanguard force. Pressing on, the U.S. aircraft sighted the Japanese carriers and prepared to attack. Three Zeros from Zuihō attacked the formation’s Wildcats, drawing them away from the bombers they were assigned to protect. Thus, the dive bombers in the first group initiated their attacks without fighter escort. Twelve Zeros from the Japanese carrier CAP attacked the SBD formation, shot down two (including Widhelm’s, although he survived), and forced two more to abort. The remaining 11 SBDs commenced their attack dives on Shōkaku at 09:27, hitting her with three to six bombs, wrecking her flight deck and causing serious damage to the interior of the ship. The final SBD of the 11 lost track of Shōkaku and instead dropped its bomb near the Japanese destroyer Teruzuki, causing minor damage. The six TBFs in the first strike force, having become separated from their strike group, did not find the Japanese carriers and eventually turned back towards Hornet. On the way back, they attacked the Japanese heavy cruiser Tone, missing with all their torpedoes.

The TBFs of the second U.S. attack formation from Enterprise were unable to locate the Japanese carriers and instead attacked the Japanese heavy cruiser Suzuya from Abe’s Vanguard force but caused no damage. At about the same time, nine SBDs from the third U.S. attack formation — from Hornet — found Abe’s ships and attacked the Japanese heavy cruiser Chikuma, hitting her with two 1,000 lb (450 kg) bombs and causing heavy damage. The three Enterprise SBDs then arrived and also attacked Chikuma, causing more damage with one bomb hit and two near-misses. Finally, the nine TBFs from the third strike group arrived and attacked the smoking Chikuma, scoring one more hit. Chikuma, escorted by two destroyers, withdrew from the battle and headed towards Truk for repairs.

The U.S. carrier forces received word from their outbound strike aircraft at 08:30 that Japanese attack aircraft were headed their way. At 08:52, the Japanese strike force commander sighted the Hornet task force (the Enterprise task force was hidden by a rain squall) and deployed his aircraft for attack. At 08:55, the U.S. carriers detected the approaching Japanese aircraft on radar—about 35 nmi (65 km; 40 mi) away—and began to vector the 37 Wildcats of their CAP to engage the incoming Japanese aircraft. However, communication problems, mistakes by the U.S. fighter control directors, and primitive control procedures prevented all but a few of the U.S. fighters from engaging the Japanese aircraft before they began their attacks on Hornet. Although the U.S. CAP was able to shoot down several dive bombers, most of the Japanese aircraft commenced their attacks relatively unmolested by U.S. fighters.

At 09:09, the anti-aircraft guns of Hornet and her escorting warships opened fire as the 20 untouched Japanese torpedo planes and remaining 16 dive bombers commenced their attacks on the carrier. At 09:12, a dive bomber placed its 551 lb (250 kg), semi-armor-piercing bomb dead center on Hornet’s flight deck, across from the island, which penetrated three decks before exploding, killing 60 men. Moments later, a 534 lb (242 kg) “land” bomb struck the flight deck, detonating on impact to create an 11 ft (3.4 m) hole and kill 30 men. A minute or so later, a third bomb hit Hornet near where the first bomb hit, penetrating three decks before exploding, causing severe damage but no loss of life. At 09:14, a dive bomber was set on fire by Hornet’s anti-aircraft guns; the pilot deliberately crashed into Hornet’s stack, killing seven men and spreading burning aviation fuel over the signal deck.

At the same time as the dive bombers were attacking, the 20 torpedo bombers were also approaching Hornet from two different directions. Despite suffering heavy losses from anti-aircraft fire, the torpedo planes planted two torpedoes into Hornet’s side between 09:13 and 09:17, knocking out her engines. As Hornet came to a stop, a damaged Japanese dive bomber approached and purposely crashed into the carrier’s side, starting a fire near the ship’s main supply of aviation fuel. At 09:20, the surviving Japanese aircraft departed, leaving Hornet dead in the water and burning. Twenty-five Japanese and six American aircraft were destroyed in this attack.

With the assistance of fire hoses from three escorting destroyers, the fires on Hornet were under control by 10:00. Wounded personnel were evacuated from the carrier, and an attempt was made by the heavy cruiser USS Northampton to tow Hornet away from the battle area. However, the effort to rig the towline took some time, and more attack waves of Japanese aircraft were inbound.

Carrier Action on 26 October: Post-First Strike Actions

Starting at 09:30, Enterprise landed many of the damaged and fuel-depleted CAP fighters and returning scout aircraft from both carriers. However, with her flight deck full, and the second wave of incoming Japanese aircraft detected on radar at 09:30, Enterprise ceased landing operations at 10:00. Fuel-depleted aircraft then began ditching in the ocean, and the carrier’s escorting destroyers rescued the aircrews. One of the ditching aircraft, a damaged TBF from Enterprise’s strike force that had been attacked earlier by Zuihō Zeros, crashed into the water near the destroyer USS Porter. As Porter rescued the TBF’s aircrew, she was struck by a torpedo, perhaps from the ditched aircraft, causing heavy damage and killing 15 crewmen. After the task force commander ordered the destroyer scuttled, the crew was rescued by the destroyer USS Shaw which then sank Porter with gunfire.

As the first wave of Japanese strike aircraft began returning to their carriers from their attack on Hornet, one of them spotted the Enterprise task force (which had just emerged from a rain squall) and reported the carrier’s position. The second Japanese aircraft strike wave, believing Hornet to be sinking, directed their attacks on the Enterprise task force, beginning at 10:08. Again, the U.S. CAP had trouble intercepting the Japanese aircraft before they attacked Enterprise, shooting down only two of the 19 dive bombers as they began their dives on the carrier. Attacking through the intense anti-aircraft fire put up by Enterprise and her escorting warships, the bombers hit the carrier with two 551 lb (250 kg) bombs and near-missed with another. The bombs killed 44 men and wounded 75, and caused heavy damage to the carrier, including jamming her forward elevator in the “up” position. Twelve of the nineteen Japanese bombers were lost in this attack.

Twenty minutes later, the 16 Zuikaku torpedo planes arrived and split up to attack Enterprise. One group of torpedo bombers was attacked by two CAP Wildcats which shot down three of them and damaged a fourth. On fire, the fourth damaged aircraft purposely crashed into the destroyer Smith, setting the ship on fire and killing 57 of her crew. The torpedo carried by this aircraft detonated shortly after impact, causing more damage. The fires initially seemed out of control until Smith’s commanding officer ordered the destroyer to steer into the large spraying wake of the battleship USS South Dakota, which helped put out the fires. Smith then resumed her station, firing her remaining anti-aircraft guns at the torpedo planes.

The remaining torpedo planes attacked Enterprise, South Dakota, and cruiser Portland, but all of their torpedoes missed or failed, causing no damage. The engagement was over at 10:53; nine of the 16 torpedo aircraft were lost in this attack. After suppressing most of the onboard fires, at 11:15 Enterprise reopened her flight deck to begin landing returning aircraft from the morning U.S. strikes on the Japanese warship forces. However, only a few aircraft landed before the next wave of Japanese strike aircraft arrived and began their attacks on Enterprise, forcing a suspension of landing operations.

Between 09:05 and 09:14, Jun’yō had arrived within 280 nmi (320 mi; 520 km) of the U.S. carriers and launched a strike of 17 dive bombers and 12 Zeros. As the Japanese main body and advanced force maneuvered to try to join formations, Jun’yō readied follow-up strikes. At 11:21, the Jun’yō aircraft arrived and dove on the Enterprise task force. The dive bombers scored one near miss on Enterprise, causing more damage, and one hit each on South Dakota and light cruiser San Juan, causing moderate damage to both ships. Eleven of the 17 Japanese dive bombers were destroyed in this attack.

At 11:35, Kinkaid decided to withdraw Enterprise and her screening ships from battle, since Hornet was out of action, Enterprise was heavily damaged, and surmising, correctly, that the Japanese had one or two undamaged carriers in the area. Leaving Hornet behind, Kinkaid directed the carrier and her task force to retreat as soon as they were able. Between 11:39 and 13:22, Enterprise recovered 57 of the 73 airborne U.S. aircraft as she retreated. The remaining U.S. aircraft ditched in the ocean, and their aircrews were rescued by escorting warships.

Between 11:40 and 14:00, the two undamaged Japanese carriers, Zuikaku and Jun’yō, recovered the few aircraft that returned from the morning strikes on Hornet and Enterprise and prepared follow-up strikes. It was now that the devastating losses sustained during these attacks became apparent. Lt. Cmdr. Okumiya Masatake, Jun’yō’s air staff officer, described the return of the carrier’s first strike groups:

We searched the sky with apprehension. There were only a few planes in the air in comparison with the numbers launched several hours before... The planes lurched and staggered onto the deck, every single fighter and bomber bullet holed ... As the pilots climbed wearily from their cramped cockpits, they told of unbelievable opposition, of skies choked with antiaircraft shell bursts and tracers.

Only one of Jun’yō’s bomber leaders returned from the first strike, and upon landing he appeared “so shaken that at times he could not speak coherently.”

At 13:00, Kondo’s Advanced force and Abe’s Vanguard force warships together headed directly towards the last reported position of the U.S. carrier task forces and increased speed to try to intercept them for a warship gunfire battle. The damaged carriers Zuihō and Shōkaku, with Nagumo still on board, retreated from the battle area, leaving Rear Admiral Kakuji Kakuta in charge of the Zuikaku and Jun’yō aircraft forces. At 13:06, Junyō launched her second strike of seven torpedo planes and eight Zeros, and Zuikaku launched her third strike of seven torpedo planes, two dive bombers, and five Zeros. At 15:35, Junyō launched the last Japanese strike force of the day, consisting of four bombers and six Zeros.

After several technical problems, Northampton finally began slowly towing Hornet out of the battle area at 14:45, at a speed of only five knots. Hornet’s crew was on the verge of restoring partial power but at 15:20, Jun’yō’s second strike arrived, and the seven torpedo planes attacked the almost stationary carrier. Although six of the torpedo planes missed, at 15:23, one torpedo struck Hornet mid-ship, which proved to be the fatal blow. The torpedo hit destroyed the repairs to the power system and caused heavy flooding and a 14° list. With no power to pump out the water, Hornet was given up for lost, and the crew abandoned ship. The third strike from Zuikaku attacked Hornet during this time, hitting the sinking ship with one more bomb. All of Hornet’s crewmen were off by 16:27. The last Japanese strike of the day dropped one more bomb on the sinking carrier at 17:20.

After being informed that Japanese forces were approaching and that further towing efforts were infeasible, Admiral Halsey ordered the Hornet sunk. While the rest of the U.S. warships retired towards the southeast to get out of range of Kondō’s and Abe’s oncoming fleet, destroyers USS Mustin and Anderson attempted to scuttle Hornet with multiple torpedoes and over 400 shells, but she still remained afloat. With advancing Japanese naval forces only 20 minutes away, the two U.S. destroyers abandoned Hornet’s burning hulk at 20:40. By 22:20, the rest of Kondō’s and Abe’s warships had arrived at Hornet’s location. The destroyers Makigumo and Akigumo then finished Hornet with four 24 in (610 mm) torpedoes. At 01:35 on 27 October 1942, she finally sank. Several night attacks by radar-equipped Catalinas on Jun’yō and Teruzuki, knowledge of the head start the U.S. warships had in their retreat from the area, plus a critical fuel situation apparently caused the Japanese to reconsider further pursuit of the U.S. warships. After refueling near the northern Solomon Islands, the ships returned to their main base at Truk on 30 October. During the U.S. withdrawal from the battle area towards Espiritu Santo and New Caledonia, while taking evasive action from a Japanese submarine, South Dakota collided with destroyer Mahan, heavily damaging the destroyer.

Aftermath

Both sides claimed victory. The Americans stated that two Shōkaku-class fleet carriers had been hit with bombs and eliminated. Kinkaid’s summary of damage to the Japanese included hits to a battleship, three heavy cruisers, a light cruiser, and possible hits on another heavy cruiser. For their part, the Japanese asserted that they sank three American carriers, one battleship, one cruiser, one destroyer, and one “unidentified large warship.” Actual American losses comprised the carrier Hornet and the destroyer Porter, and damage to Enterprise, the light cruiser San Juan, the destroyer Smith and the battleship South Dakota.

The loss of Hornet was a severe blow for Allied forces in the South Pacific, leaving Enterprise as the one operational, but damaged, Allied carrier in the entire Pacific theater. As she retreated from the battle, the crew posted a sign on the flight deck: “Enterprise vs Japan.” Enterprise received temporary repairs at New Caledonia and, although not fully restored, returned to the southern Solomons area just two weeks later to support Allied forces during the Naval Battle of Guadalcanal. There she played an important role in what turned out to be the decisive naval engagement in the overall campaign for Guadalcanal, when her aircraft sank several Japanese warships and troop transports during the naval skirmishes around Henderson Field. The lack of carriers pressed the Americans and Japanese to deploy battleships in night operations around Guadalcanal, one of only two actions in the entire Pacific War in which battleships fought each other, with South Dakota again being damaged while two Japanese battleships were lost.

Although the Battle of Santa Cruz was a tactical victory for the Japanese in terms of ships sunk, it came at a high cost for their naval forces, as Jun’yō was the only active aircraft carrier left to challenge Enterprise or Henderson Field for the remainder of the Guadalcanal campaign. Zuikaku, despite being undamaged and having recovered the aircraft from the two damaged carriers, returned to home islands via Truk for training and aircraft ferrying duties, only returning to the South Pacific in February 1943 to cover the evacuation of Japanese ground forces from Guadalcanal. Both damaged carriers were forced to return to Japan for extensive repairs and refitting. After repair, Zuihō returned to Truk in late January 1943. Shōkaku was under repair until March 1943 and did not return to the front until July 1943, when she was reunited with Zuikaku at Truk.

The most significant losses for the Japanese Navy were in aircrew. The U.S. lost 81 aircraft of the 175 U.S. aircraft at the start of the battle, of which 33 were fighters, 28 were dive-bombers, and 20 were torpedo bombers. Only 26 pilots and aircrew members were lost. The Japanese fared much worse, especially in airmen; in addition to losing 99 aircraft of the 203 involved in the battle, they lost 148 pilots and aircrew members including two dive bomber group leaders, three torpedo squadron leaders, and eighteen other section or flight leaders. Forty-nine percent of the Japanese torpedo bomber aircrews involved in the battle were killed along with 39% of the dive bomber crews and 20% of the fighter pilots. The Japanese lost more aircrew at Santa Cruz than they had lost in each of the three previous carrier battles at Coral Sea (90), Midway (110), and Eastern Solomons (61). By the end of the Santa Cruz battle, at least 409 of the 765 elite Japanese carrier aviators who had participated in the attack on Pearl Harbor were dead. Having lost so many of its veteran carrier aircrew, and with no quick way to replace them – because of an institutionalized limited capacity in its naval aircrew training programs and an absence of trained reserves – the undamaged Zuikaku and Hiyō were also forced to return to Japan because of the scarcity of trained aircrew to man their air groups. Although the Japanese carriers returned to Truk by the summer of 1943, they played no further offensive role in the Solomon Islands campaign.

Admiral Nagumo was relieved of command shortly after the battle and reassigned to shore duty in Japan. He acknowledged that the victory was incomplete:

[T]his battle was a tactical win, but a shattering strategic loss for Japan ... Considering the great superiority of our enemy’s industrial capacity, we must win every battle overwhelmingly in order to win this war. This last one, although a victory, unfortunately, was not an overwhelming victory.

In retrospect, despite being a tactical victory, the battle effectively ended any hope the Japanese navy might have had of scoring a decisive victory before the industrial might of the United States placed that goal out of reach. Historian Eric Hammel summed up the significance of the Battle of the Santa Cruz Islands as, “Santa Cruz was a Japanese victory. That victory cost Japan her last best hope to win the war.”

Military historian Dr. John Prados offers a dissenting view, asserting that this was not a Pyrrhic victory for Japan, but a strategic victory:

By any reasonable measure the Battle of Santa Cruz marked a Japanese victory – and a strategic one. At its end the Imperial Navy possessed the only operational carrier force in the Pacific. The Japanese had sunk more ships and more combat tonnage, had more aircraft remaining, and were in physical possession of the battle zone... Arguments based on aircrew losses or who owned Guadalcanal are about something else – the campaign, not the battle.

In Prados’ view, the real story of the aftermath is that the Imperial Navy failed to exploit their hard-won victory although it is unclear how Japanese forces could have done so with such crippling losses of trained air crews.

U.S. Navy aircraft carrier USS Wasp (CV-7) burning and listing after she was torpedoed by the Japanese submarine I-19, on 15 September 1942, while operating in the Southwestern Pacific in support of forces on Guadalcanal. Note that the wartime censor has removed the CXAM-1 radar antenna, only its lower frame is still visible.

The U.S. Navy Sims-class destroyer USS O’Brien (DD-415) is torpedoed by the Japanese submarine I-19 during the Guadalcanal Campaign, on 15 September 1942. The aircraft carrier USS Wasp (CV-7), torpedoed a few minutes earlier, is burning in the left distance. The last of I-19’s torpedoes hit the battleship USS North Carolina (BB-55). O’Brien was hit in the extreme bow, but “whipping” from the torpedo explosion caused serious damage to her hull amidships, leading to her loss on 19 October 1942, while she was en route back to the United States for repairs.

The U.S. Navy destroyer USS Laffey (DD-459) in harbor, probably at Espiritu Santo, New Hebrides, with survivors of USS Wasp (CV-7) on board. Wasp had been sunk by a Japanese submarine on 15 September 1942. Note Laffey’s 127 mm/38 guns, depth charges, and life rafts. The light cruiser in the center background is USS Juneau (CL-52).

A U.S. Navy Grumman F4F-4 Wildcat fighter piloted by Ens. Lyman Fulton of Fighting Squadron 10 (VF-10) “Grim Reapers” prepares for launch from the aircraft carrier USS Enterprise (CV-6) before the Battle of the Santa Cruz Islands, on 24 October 1942. Note the small bright number “17” on the engine cowling (17th plane of VF-10).

A group of Imperial Japanese Naval pilots lined up on the deck of an aircraft carrier during the Battle of Santa Cruz, probably being briefed before taking to their aircraft.

Mitsubishi Type 00 Shipboard Fighters (A6M2 Model 21. Allied codename: “Zeke”) ready for takeoff from a Japanese aircraft carrier, 1942. This view was probably taken on board Shōkaku as she prepared to launch aircraft in the morning of 26 October 1942, during the Battle of the Santa Cruz Islands.

A Japanese Mitsubishi A6M2 Model 21 (“Zero”) launches from the carrier Shōkaku during the Battle of the Santa Cruz Islands on 26 October 1942, while deck crewmen cheer on the pilot, Lieutenant Hideki Shingo, the Fighter Group leader.

A U.S. Navy Grumman TBF-1 Avenger from Torpedo Squadron 10 (VT-10) prepares for launch from the aircraft carrier USS Enterprise (CV-6) during the Battle of the Santa Cruz Islands, 26 October 1942. The sign visible beyond the plane’s landing gear reads “PROCEED WITHOUT HORNET,” indicating Enterprise´s strike is not to wait to join up with a strike being launched by the USS Hornet (CV-8). The sign to the left reads “JAP ‘CV’ SPEED 25 AT 0830” (Japanese aircraft carrier, speed 25 knots, at 0830°).

Battle of the Santa Cruz Islands, October 1942: Plane handling crews at work aboard the U.S. Navy aircraft carrier USS Enterprise (CV-6) during the action, 26 October 1942. The plane at center is Grumman F4F-4 Wildcat fighter. To the right is a Douglas SBD-3 Dauntless. Other planes are overhead. Note that the ship is heeling over to port.

The crew of Imperial Japanese Navy aircraft carrier Shokaku fight fires after the ship was hit by American carrier aircraft bombs during the Battle of the Santa Cruz Islands.

The Japanese heavy cruiser Chikuma under air attack during the Battle of the Santa Cruz Islands, 26 October 1942. Note the smoke coming from her bridge area, which had been hit by a bomb, and what appears to be a recognition marking painted atop her number two eight-inch gun turret. The ship’s catapults and aircraft crane appear to be swung out over her sides, aft of amidships.

A Japanese Type 99 Aichi D3A1 dive bomber (Allied codename “Val”) trails smoke as it dives toward the U.S. Navy aircraft carrier USS Hornet (CV-8), during the morning of 26 October 1942. This plane struck the ship’s stack and then her flight deck. A Type 97 Nakajima B5N2 torpedo plane (“Kate”) is flying over Hornet after dropping its torpedo, and another “Val” is off her bow. Note anti-aircraft shell burst between Hornet and the camera, with its fragments striking the water nearby.

A Japanese Aichi D3A “Val” dive-bomber crashes into the U.S. Navy aircraft carrier USS Hornet (CV-8) during the Battle of the Santa Cruz Islands on 26 October 1942 at 09:14 hrs. Note the two Nakajima B5N2 “Kate” torpedo bombers on the right.

A Japanese Aichi D3A “Val” dive-bomber is shot down over the U.S. Navy aircraft carrier USS Enterprise (CV-6) during the Battle of the Santa Cruz Islands on 26 October 1942. Note the battleship USS South Dakota (BB-57) heading in the opposite direction.

The U.S. Navy aircraft carrier USS Hornet (CV-8) on fire after a Japanese D3A1 “Val” dive-bomber crashed into her island during the Battle of Santa Cruz on 26 October 1942.

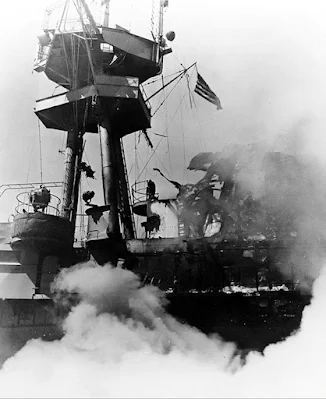
Damage to the smokestack and signal bridge of the U.S. Navy aircraft carrier USS Hornet (CV-8) after it was struck by a crashing Japanese Aichi D3A1 dive bomber, during the morning of 26 October 1942. The smoke at bottom is from fires started when the plane subsequently hit the flight deck. Note ship’s tripod mast, with CXAM radar antenna in top left and the flag still flying above the damaged structure.

Battle of the Santa Cruz Islands, October 1942: Crew members of the U.S. Navy aircraft carrier USS Hornet (CV-8) prepare to abandon ship on 26 October 1942, after she was disabled by Japanese air attacks. Photographed from the destroyer USS Russell (DD-414). Note radar antennas on the carrier’s masts and gun directors, and other details of the ship’s island and port side. Radar antennas include FD mounted atop the two Mark 37 gun directors at the island ends, a CXAM atop the foremast and a SC radar partially visible atop the after mast.

The U.S. Navy aircraft carrier USS Hornet (CV-8) under attack and burning during the Battle of the Santa Cruz Islands on 26 October 1942. Anti-aircraft shell bursts are visible above the carrier.

The U.S. heavy cruiser USS Northampton (CA-26) maneuvers to try to take the crippled aircraft carrier USS Hornet (CV-8) under tow during the Battle of the Santa Cruz Islands on 26 October 1942. A destroyer is standing by.

A Japanese Nakajima B5N2 (“Kate”) torpedo bomber from the aircraft carrier Junyo’s 2nd attack wave, with torpedo visible underneath the aircraft, heads for the U.S. carrier USS Hornet (CV-8) on 26 October 1942 during the Battle of the Santa Cruz Islands. The U.S. Navy heavy cruiser USS Northampton (CA-26) is visible in the background.

A Japanese Nakajima B5N2 “Kate” torpedo aircraft (visible just above and to the right of carrier’s island) drops a torpedo (splash at lower right) that will hit the U.S. Navy aircraft carrier USS Hornet (CV-8) and cause fatal damage on 26 October 1942.

The damaged U.S. Navy aircraft carrier USS Hornet (CV-8) during the Battle of Santa Cruz Islands with the destroyer USS Russell (DD-414) alongside ready to take off her crew.

The U.S. Navy aircraft carrier USS Hornet (CV-8), severely listing, is abandoned by her crew at about 17:00 hrs during the Battle of the Santa Cruz Islands on 26 October 1942.

U.S. Navy aircraft of Carrier Air Group 10 (CVG-10), many critically low on fuel, circle to land on the aircraft carrier USS Enterprise (CV-6) during a lull in the Battle of the Santa Cruz Islands on 26 October 1942.

The U.S. Navy aircraft carrier USS Enterprise (CV-6) maneuvers to avoid Japanese bombs during the Battle of the Santa Cruz Islands on 26 October 1942.

A Japanese bomb explodes off the port side of the U.S. Navy aircraft carrier USS Enterprise (CV-6) during the Battle of the Santa Cruz Islands, 26 October 1942.

Three near-misses from Japanese dive-bombers straddle the U.S. Navy aircraft carrier USS Enterprise (CV-6) as she maneuvers violently with her screening ships during the Battle of the Santa Cruz Islands on 26 October 1942.

A bomb from a Japanese Aichi D3A2 dive-bomber from the carrier Junyo barely misses the U.S. Navy aircraft carrier USS Enterprise (CV-6) during the Battle of the Santa Cruz Islands on 26 October 1942. The dive-bomber was shot down and crashed on the other side of the Big E.

The U.S. Navy aircraft carrier USS Enterprise (CV-6), burning from two bomb hits, continues evasive maneuvers during Japanese air attack during the Battle of the Santa Cruz Islands on 26 October 1942.

A Japanese Aichi D3A "Val" dive-bomber is shot down over the U.S. Navy aircraft carrier USS Enterprise (CV-6) during the Battle of the Santa Cruz Islands on 26 October 1942. Note the battleship USS South Dakota (BB-57) heading in the opposite direction.

Two Japanese Nakajima B5N2 Kate torpedo bombers fly near the U.S. battleship USS South Dakota (BB-57) during the Battle of Santa Cruz Islands on 26 October 1942 in the Southwest Pacific.

A parked Douglas SBD-3 Dauntless topples off of the flight deck of the U.S. Navy aircraft carrier USS Enterprise (CV-6) as she heels sharply over after being hit by a bomb during the Battle of the Santa Cruz Islands on 26 October 1942.

A Grumman F4F-4 Wildcat of Fighting Squadron 72 (VF-72) from the aircraft carrier USS Hornet (CV-8) slides across the flight deck after landing aboard USS Enterprise (CV-6) as the carrier maneuvers violently under aerial attack during the Battle of the Santa Cruz Islands, 26 October 1942. Two crewmen are in defensive posture on the deck and the ship appears to be burning.

The U.S. Navy battleship USS South Dakota (BB-57), foreground, and a destroyer maneuvering at high speed during the Battle of the Santa Cruz Islands on 26 October 1942.

The U.S. Navy battleship USS South Dakota (BB-57) underway at high speed while firing her anti-aircraft guns during the Battle of the Santa Cruz Islands on 26 October 1942.

The U.S. Navy battleship USS South Dakota (BB-57) firing her anti-aircraft guns at attacking Japanese planes during the Battle of Santa Cruz, 26 October 1942. A Japanese Type 97 Nakajima B5N2 torpedo plane ("Kate") is visible at right, apparently leaving the area after having dropped its torpedo.

The U.S. Navy light cruiser USS Juneau (CL-52) firing at attacking Japanese Aichi D3A dive bombers during the Battle of the Santa Cruz Islands on 26 October 1942.

The U.S. Navy destroyer USS Smith (DD-378) is hit by a crashing Japanese torpedo plane, during an attack on USS Enterprise (CV-6), Battle of the Santa Cruz Islands, 26 October 1942.

The U.S. Navy destroyer USS Smith (DD-378) burning after she was hit by a crashing Japanese Nakajima B5N2 torpedo plane during an attack on the aircraft carrier USS Enterprise (CV-6) during the Battle of the Santa Cruz Islands, 26 October 1942.

The crew of the U.S. Navy aircraft carrier USS Enterprise (CV-6) conducts burial-at-sea on 27 October 1942, for 44 crewmen killed during the Battle of the Santa Cruz Islands the day before.

The U.S. Navy destroyer USS Smith (DD-378) refueling from the battleship USS South Dakota (BB-57) on 28 October 1942. Her two forward 5"/38 guns and much of her forward superstructure are burned out and otherwise damaged, the result of a Japanese Nakajima B5N torpedo plane that crashed into her two days earlier, during the Battle of the Santa Cruz Islands.

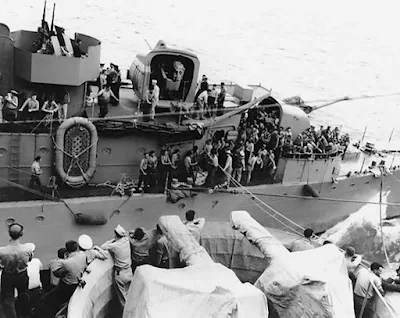
The U.S. Navy destroyer USS Shaw (DD-373) transferring survivors of USS Porter (DD-356) between Shaw and the battleship USS South Dakota (BB-57) on 28 October 1942. Porter had been torpedoed and sunk two days earlier, during the Battle of the Santa Cruz Islands. Photographed from on board the South Dakota, one of whose 40 mm quad gun mounts, covered with canvas, is in the foreground.

Damage to the Imperial Japanese Navy aircraft carrier Shokaku after the ship was hit by American carrier aircraft bombs during the Battle of the Santa Cruz Islands. View of damage to flight deck and upper part of hangar.

Damage to the Imperial Japanese Navy aircraft carrier Shokaku after the ship was hit by American carrier aircraft bombs during the Battle of the Santa Cruz Islands. View of damage to flight-deck on starboard side underneath, the hangar side wall.