 |
| Men of the 5th South African Reconnaissance Regiment in a Marmon-Herrington armored car firing their captured Italian 37mm Breda gun at enemy vehicles which are throwing a mirage reflection. (Imperial War Museum Art.IWM ART LD 4596) |
The Marmon-Herrington Armoured Car was a
series of armored vehicles that were produced in South Africa and adopted by
the British Army during the Second World War. RAF Armoured Car companies
possessed them, but seem never to have used them in action, making greater use
of Rolls Royce Armoured Cars and other types.
In 1938 the South African authorities began
funding development of a new armored car for the Union Defence Force. The
outbreak of the Second World War led to a vehicle based on a Ford 3-ton truck
chassis. As South Africa then lacked a developed automotive industry, many
components of the vehicle had to be imported. Chassis components were purchased
from Ford Canada and fitted with a four-wheel drive train produced by the
American company Marmon-Herrington (hence the designation), UK-made armament
(with the exception of the U.S.-made Browning machine gun) and armor plates
produced by the South African Iron & Steel Industrial Corporation, ISCOR.
Final assembly was done by the local branch of the Dorman Long company among
others.
The first version, the “South African
Reconnaissance Vehicle” Mk I, entered service in 1940. It was a long wheelbase
four wheeled chassis with drive to only one axle. It was armed with two Vickers
machine guns: one in a cylindrical turret and the other in the left hand side
of the hull. There were two large access doors in the rear. It saw a brief
action against the Italian forces in the Western Desert and thereafter relegated
to training use.
The Mk II had a shorter wheelbase than the
Mark I and four wheel drive by using a kit from Marmon-Herrington that offered
a front-driven axle. It was known in British service as Armoured Car,
Marmon-Herrington Mk II. The Mark I continued in production (until the end of
1940) while supply of parts from the United States was resolved. Mark II,
“Middle East Model” denoted the vehicles serving with British forces in the
North African campaign. This variant was fitted with a Boys anti-tank rifle and
a single coaxial Bren light machine gun. A second model intended for
sub-Saharan deployments was armed with twin Vickers machine guns.
Marmon-Herringtons saw extensive combat in
North Africa, being the only armored car available to Commonwealth divisions in
sufficient numbers, and had a reputation as a dependable, if somewhat light and
undergunned, vehicle. As an unusual quantity of German, Vichy French, or
Italian weaponry was captured during desert engagements, Allied troops began
modifying their Mk IIs with Breda Model 35, Breda Meccanica Bresciana, 3.7 cm
Pak 36 and the 2.8 cm sPzB 41 anti-tank guns. As the turret made no provision
for larger armament, it was simply removed and crew members dependent on gun
shields for protection. Besides those cars utilized for reconnaissance, others
were adopted for use as mobile command posts, military ambulances, recovery
vehicles, and Royal Air Force liaison.
The Mark III was created with thicker armor
plate on a compact body, which included a shorter wheelbase. More than 2,000
Mark IIIs were exported before production ceased in mid-1942. Some were
dispatched to the Royal Netherlands East Indies Army and arrived during the
East Indies Campaign. Local crews adopted the earlier South African
configuration of twin Vickers machine guns; in Dutch service these were
designated Zuid-Afrikaanse pantserautos and continued to serve as late as the
Indonesian National Revolution. A number were captured by invading Japanese
forces in March 1942.
In March 1943 a completely redesigned Mk
IV/Mk IVF entered production. It was a monocoque with rear-mounted engine and a
turret-mounted 2 pounder with a coaxial 0.3 in Browning machine gun as the
standard armament. Due to the inability of Marmon-Herrington to supply
sufficient drive trains, the F used a Canadian Ford drive train. Further
versions were designed but never got beyond the prototype stage. By that time,
the North African Campaign had ended and the mountainous geography of the
Italian campaign did not suit armored cars and in late 1943 the British and
Commonwealth armies were receiving enough armored cars from other sources.
In total, 5,746 Marmon-Herrington Armoured
Cars were built. About 4,500 were used by South African units, while others
were employed by British, Indian, New Zealand, Greek, Free French, Polish,
Dutch East Indies and Belgian forces. After the Second World War, a few were
given to the Transjordan and saw combat with the Arab Legion in the 1948
Arab-Israeli War. The Mk IVF saw combat as late as July–August 1974, during the
Turkish invasion of Cyprus, when it was used by the Cypriot National Guard. The
Greek army used Marmon-Herringtons in the islands of the Aegean well into the
1990s, in mechanized infantry battalions of special composition, alongside
Jeeps, M113s and Leonidas AFVs. They were finally phased out of service with
the introduction of VBL AFV, six decades after their introduction.
Variants
Mk I
(1940): Two wheel drive only, armed with two .303 Vickers machine guns, one in
a cylindrical turret, other in the left rear of the hull. 113 units built.
Mk
II (1941): Lengthened chassis, all-wheel drive. Early vehicles carried the same
armament as Mk I. Late production vehicles received an octagonal turret with
Boys anti-tank rifle and Bren MG. There were pintle mountings for Vickers MG
and Bren MG (the latter was rarely carried). Hull was riveted in early vehicles
and welded in late production ones. 887 units built.
Mk
III (1941): Similar to late production Mk II, with a slightly shorter wheelbase.
Late production vehicles had single rear door, no radiator grille and no
headlight covers. 2,630 units built.
Mk
IIIA: Turret replaced by a ring mount for two .303 Vickers K machine guns protected
by a steel skirt. The A denoted a modification of the armament.
Mk
IV (1943): The Mark IV was a completely redesigned vehicle, though still based on
the same engine and Marmon-Herrington components. The rear-mounted engine and
the transmission were bolted directly to the welded hull. Armor protection was
still thin at only 12 mm to the front and 6 mm thick elsewhere. A QF 2 pounder
anti-tank gun was mounted in a two-man turret. The gun used an artillery
mounting as the turret was not up to the stress of a tank mantlet mounting.
Late production vehicles had a coaxial Browning MG. An anti-aircraft Vickers or
Browning MG was mounted on the turret roof. Over 2,000 units built. After the
war many Jordanian examples had the turret lengthened at the front and fitted
with a 6 pounder (57mm) gun, while others had the turret removed and a Vickers
2.95” mountain howitzer fitted in its place.
Mk
IVF (1943): Due to a difficulty in obtaining the Marmon-Herrington kit, a version
very similar to the Mk IV but based on the Canadian Ford F60L four wheel drive
3 ton truck chassis was built to fulfill a British order of 1,200 vehicles.
South
African Heavy Armoured Car Mark V (1942): The Mark V was of four 8-wheeled designs
(the others were in the US and Canada) built as a response to reports of the
German 8-wheeled armored cars (Schwerer Panzerspähwagen). . Power was from two
Albion 6-cylinder engines driving only the two middle axles. The prototype had
poor performance in desert conditions and was rebuilt with both engines at the
rear. Although well-armored it was heavy at 16 tons and performance still
lacked so the project was stopped. A very large vehicle armed with the QF 6
pounder gun and armored side skirts; only the one prototype was built.
Mk
VI (1943): The Mark VI was a return to the 8-wheeled design. Powered by two
Mercury V8 engines with an eight-wheel drive steered on the front and rear
wheels. Two prototypes were built, one with a 2 pounder and other with a 6
pounder gun in an open-topped three-man turret with electric powered traverse
and protected by 10 to 30 mm of sloped armor. Additional armament consisted of
2 or 3 machine guns. The two-pounder equipped version was sent to the UK for
assessment, the transmission proved unreliable suffering several axle failures.
The 2-pdr is now in the Bovington Tank Museum, the other in South Africa.
Mk
VII: An improved version of the Mk IIIA, the project was stopped after prototypes
as it was only armed with a Vickers machine gun.
Mk
VIII: Similar to the Mk III but with a 2 pounder gun in a bigger turret. The
project was stopped in 1943 as requirements had already moved on to larger
weapons such as the 6 pounder gun.
Operators
Cyprus: Cypriot National
Guard: Deployed against invading Turkish troops in 1974.
Greece: Hellenic Army
British
India: British Indian Army: Mark III.
Kingdom
of Italy: Royal Italian Army operated captured vehicles during the North African
Campaign.
Japan: Imperial Japanese
Army operated vehicles captured during the Malayan and East Indies campaigns.
Kenya
Colony: Kenyan Armoured Car Regiment
Netherlands
Dutch East Indies: Royal Netherlands East Indies Army operated Mark III vehicles.
Poland: 2nd Armoured
Brigade: Mark II.
Rhodesia: British South
Africa Police. Retired vehicles in 1972.
South
Africa: South African Armoured Corps
Transjordan: Arab Legion
operated Mark IV vehicles.
United
Kingdom: 1st King’s Dragoon Guards operated 80 during the Siege of Tobruk.
Further Reading
Forty, George. World War Two Armoured
Fighting Vehicles and Self-Propelled Artillery, Osprey Publishing 1996.
Fletcher, David (1989). The Great Tank
Scandal: British Armour in the Second World War - Part 1. HMSO.
Armored Car: The Wheeled Fighting Vehicle
Journal No. 8
Spoelstra, Hanno. “Armoured Cars with
Marmon-Herrington All-Wheel Drive Conversion Kits”. Marmon-Herrington Military
Vehicles.
 |
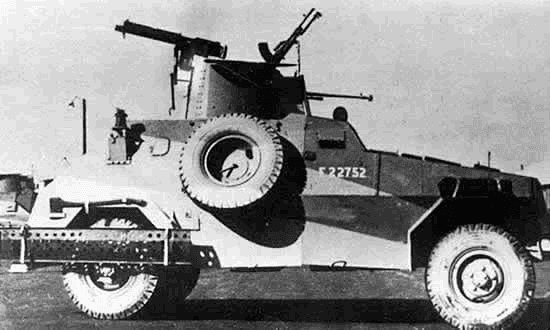
| A Marmon-Herrington Mk II armored car armed with an Italian Breda 20mm gun, near Tobruk, 8 May 1941. (Imperial War Museum E 2872) |
 |
| Marmon-Herrington armored cars on patrol in the Western Desert, 28 November 1941. (Imperial War Museum E 6820) |
 |
| A South African Marmon-Herrington Mk.II armored car (captured 47mm Breda gun) crew stops to take a compass bearing during a patrol. The South African armored car units were successfully used in North Africa for reconnaissance duties and as part of mobile columns dispatched to harass the enemy. 13 April 1942. (Imperial War Museum E 10601) |
 |
| Italian POWs, captured by the Polish troops in the Axis Highway area, being escorted by one of the Brigade's soldiers behind Allied lines. Note a Marmon-Herrington armored car in ‘Caunter’ camouflage which they are passing by, 15 December 1941. (Imperial War Museum E 7069) |
 |
| Marmon-Herrington armored cars await issue to units at Singapore, December 1941. (Imperial War Museum FE 481) |
 |
| Marmon-Herrington armored cars in the streets of Aleppo, 22 July 1941. (Imperial War Museum E 4409) |
 |
| A crewman mans a Vickers machine gun on the turret of his Marmon-Herrington armored car, Western Desert, May 1941. Note 'Caunter' camouflage scheme. (Imperial War Museum E 3085) |
 |
| The crew of a Marmon-Herrington armored car investigate the burning wreckage of a German fighter, Libya, 8 June 1942. (Imperial War Museum E 13026) |
 |
| A Marmon-Herrington Mark II armored car, used as a mobile wireless telegraphy post by the RAF Wireless Observer Units in the Western Desert.. (Imperial War Museum CM 2442) |
 |
| Turkish troops are inspecting a Marmon-Herrington Mark II armored car on the Syrian-Turkish border, 1941. |
 |
| A Japanese tank burning after being hit by gunfire from 13th Battery, 4th Australian Anti-tank Regiment. A second tank hidden by the first was also destroyed. A capsized Marmon-Herrington armored car and two destroyed vehicles of the 45th Indian Brigade lie beside the road. Bakri, Malaya, January 18, 1942. (Australian War Memorial 011300) |
 |
| German forces entering Bajina Basta, Serbia in 1941. A German Sd.Kfz. 232 (6 rad) armored car followed by a captured Marmon-Herrington armored car. |
 |
| Marmon-Herrington Mk II armored cars from the 11th (Prince Albert's Own) Hussars of the 7th Armoured Division, of the British Army Western Desert Force on patrol in the Egyptian desert near the Libyan border during the Western Desert campaign in North Africa circa August 1940. |
 |
| A Marmon-Herrington Mk. II armored car of the Divisional Cavalry at Maadi Camp during preparations for its dispatch to Greece. At this stage it is in the standard desert scheme of sand, dark earth and dull blue. The divisional insignia is carried on the hull side behind the radiator doors and the B Squadron insignia and troop number are found on both the turret and hull. |
 |
| Australian crew of a Marmon-Herrington Mk. II armored car read German and Italian signs during operation Crusader in Derna, Libya, December 1941. |
 |
| Marmon-Herrington Mk. II armored car, Mobile Field Force. |
 |
| Marmon-Herrington Mk. II armored car, Mobile Field Force. |
 |
| Marmon-Herrington Mk. II armored car. |
 |
| Marmon-Herrington Mk. II armored car. |
 |
| Marmon-Herrington Mk. I armored car. |
 |
| Marmon-Herrington Mk. II armored car. |
 |
| A Marmon-Herrington Mk. II armored car pulling another armored car that has gotten stuck in the river. |
 |
| German soldiers inspect a captured Marmon-Herrington Mk. II of the Divisional Cavalry in Greece. |
 |
| Another view of German soldiers inspect a captured Marmon-Herrington Mk. II of the Divisional Cavalry in Greece. |
 |
| Captured Marmon-Herrington armored car in German service in North Africa. |
 |
| Marmon-Herrington armored car used as a railway protection vehicle. |
 |
| Marmon-Herrington Mk. II armored car. |
 |
| Marmon-Herrington Mk. II armored cars in North Africa. |
 |
| Marmon-Herrington Mk. II armored car in Greece in 1941. |
 |
| Marmon-Herrington Mk. III armored car. |
 |
| Marmon-Herrington Mk. III armored car. |
 |
| British POWs watch as German troops inspect two Marmon-Herrington armored cars. |
 |
| Another view of the same British POWs and one of the Marmon-Herrington armored cars. |
 |
| Greek Soldiers train in a Marmon-Herrington Mk. III armored car. |
 |
| Destroyed Marmon-Herrington Mk. II armored car. |
 |
| Captured Marmon-Herrington in Italian service in 1942. |
 |
| British Marmon-Herrington Mk. II armored car near Tobruk. |
 |
| Captured Marmon-Herrington Mk. III being inspected by German troops. |
 |
| Damaged Marmon-Herrington Mk. II armored car. |
 |
| Captured Marmon-Herrington armored car in German service. Note the application of local vegetation for camouflage, rocks piled alongside the tires for protection from small arms fire or shrapnel, and a German ID flag hanging on the front of the vehicle. |
 |
| Convoy with a variety of vehicles and tanks including a Marmon-Herrington armored car. |
 |
| British POWs alongside a captured Marmon-Herrington Mk. III armored car. |
 |
| Captured Marmon-Herrington in German service and a Kettenkrad half-track motorcycle. |
 |
| Captured Marmon-Herrington being retrieved by a German Sd.Kfz. 253. |
 |
| Captured Marmon-Herrington being retrieved by a German Sd.Kfz. 253. |
 |
| Captured Marmon-Herrington Mk. III in German service in North Africa. |
 |
| Captured Marmon-Herrington armored car in German service. |
 |
| Captured Marmon-Herrington Mk. III armored car in German service. |
 |
| Captured Marmon-Herrington armored car in German service alongside an 8.8cm Flak gun, left, and a Kubelwagen, right. |
 |
| Captured Marmon-Herrington armored car set up with rocks piled alongside tires for their protection from small arms fire and shrapnel. |
 |
| Captured Marmon-Herrington Mk. III armored car. |
 |
| German officers alongside a captured Marmon-Herrington armored car. |
 |
| British POWs alongside a captured Marmon-Herrington armored car. |
 |
| Captured Marmon-Herrington armored car in a column of German vehicles. |
 |
| Captured Marmon-Herrington armored car in German service. Note the German ID flag on the hood. |
 |
| Captured Marmon-Herrington Mk. II armored car in German service. |
 |
| Marmon-Herrington Armored Car Mk.VI. |
 |
| Marmon-Herrington Armored Car Mk.V. |
 |
| Marmon-Herrington Armored Car Mk.V. |
 |
| Two German Afrika Corps soldiers, now POWs, hitch a ride into captivity on the front of a 2nd South African Division Marmon-Herrington armored car. Fort Capuzzo, Libya, December 1941. |
 |
| Australian Marmon-Herrington armored car mounting a German 3.7cm anti-tank gun in place of the vehicle’s usual turret. Western Desert, Egypt, August 8, 1942. |
 |
| South African Marmon-Herrington armored cars, North Africa. |
 |
| South African Marmon-Herrington armored car. |
 |
| South African Marmon-Herrington armored car crossing the Union Bridge at Ionte, Abyssinia. |
 |
| South African Marmon-Herrington armored car crew with a captured Banda soldier. |
 |
| Marmon-Herrington Mk. I. |
 |
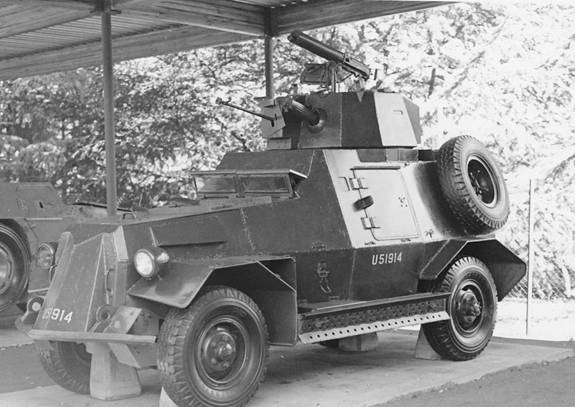
| South African Marmon-Herrington Reconnaissance Car MK.III. |
 |
| Marmon-Herrington Mk. II ME (Middle East). |
 |
| Marmon-Herrington Mk. II headlights, radiator and cover. |
 |
| Marmon-Herrington Mk. II armored car. |
 |
| Marmon-Herrington Mk. I armored car. |
 |
| Marmon-Herrington Mk. II armored car. |
 |
| Marmon-Herrington Mk. II armored car. |
 |
| Marmon-Herrington Mk. 2 armored car, North Africa. |
 |
| Marmon-Herrington Mk. II armored car, North Africa. |
 |
| Marmon-Herrington Mk. II armored car. |
 |
| Original wartime caption: The long line of armored cars off towards the South, to begin their penetration into the enemy's lines, 3 November 1942. (Marmon-Herrington). (Imperial War Museum E 18891) |
 |
| Original wartime caption: Italians surrender to an armored car (Marmon-Herrington III). Men of the famous Bersaglieri Regiment gave themselves up to one armored car of the Household Cavalry. So certain were the Italians of the good treatment they would receive, that they did not even raise their hands when they surrendered, 11 November 1942. (Imperial War Museum E 19374) |
 |
| Original wartime caption: The Occupation of Syria: Marmon-Herrington armored cars coming through a picturesque archway on one of the road along the Turkish frontier, 22 July 1941. (Imperial War Museum E 4414) |
 |
| Original wartime caption: The Occupation of Syria: Marmon-Herrington armored cars coming through a picturesque archway on one of the road along the Turkish frontier, 22 July 1941. (Imperial War Museum E 4415) |
 |
| Interior view of a Marmon-Herrington Mk. III armored car. |
 |
| Marmon-Herrington Mk. VI armored car. |
 |
| Marmon-Herrington Mk. VI armored car. |
 |
| A dug-in Marmon-Herrington armored car. Note the added Vickers machine gun. |
 |
| The Marmon-Herrington Mk. II had welded instead of riveted armor. This vehicle also has an added Vickers machine gun. |
 |
| Marmon-Herrington Mk. III armored car with Indian troops in 1942. The censor has obliterated the markings. |
 |
| Marmon-Herrington Mk. III Armored car. |
 |
| Marmon-Herrington Mk. III armored car. |
 |
| Captured Marmon-Herrington armored car with radio aerial. |


No comments:
Post a Comment